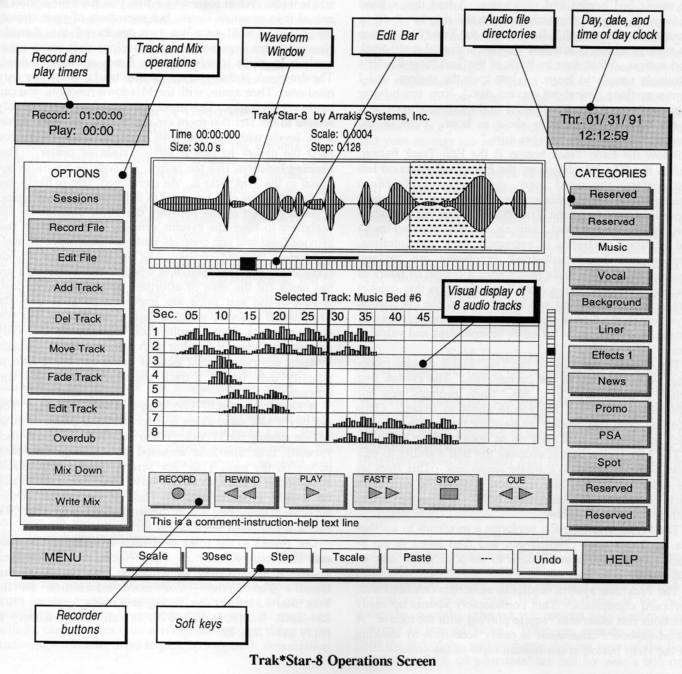
It's time now to decide in what category to store this file you are about to record. You can record the file into any category. After selecting a category, you are prompted to enter four items of information -- a Cart Number, a Title, whether or not the file will be Temporary, and finally, the Run Time of the recording. At this point, the software acts more like that for an on-air digital studio rather than a production room, but this is obviously a necessary step for interfacing the program with other Arrakis software. You have to assign a "cart" number to continue. If you assign a number already assigned, you will be asked if you wish to record over that file or not. When you finally enter a number that is available, the cursor moves on to the title field where you enter a name for the sound file -- Music Bed 1, Voice Track 2, Thunder SFX, etc.. When done, move the cursor to the next field where you decide whether the file will be a Temporary file that is deleted after you leave the "session," or a permanent file that will remain in the file library until you delete it. Finally, you are asked for a Run Time. Here, enter the maximum amount of time you think you'll need for the recording. When the Run Time is entered, two level meters appear at the top of the screen, the mouse arrow moves to the Record button, and the system is ready to record with one click of the mouse. When the Run Time is elapsed, the recording ends. Clicking the Stop button also ends the recording.
Now you can place the file into the 8-track mix. One way this is done is with the Edit File function. Clicking this button prompts you to select a file from a category for editing, such as the file you've just recorded. Once selected, a waveform of the file appears on the screen. This entire file can be placed into the 8-track mix, or the edit functions can be used to "block" only a segment of the file to be placed in the 8-track mix. The Trak*Star's scrub function is used to help mark start and end points of the block. Scrubbing is activated by pressing the Caps Lock key on the keyboard and using the left and right mouse buttons to play the audio backwards or forwards. Moving the mouse forward increases playback speed; moving it backwards decreases playback speed. Scrubbing with the mouse in this manner takes a little getting used to, but after some practice, accurate edit points are easily marked. All other functions of the Trak*Star-8 are suspended while the scrub function is enabled.

If you intend to use the entire file in the 8-track mix, the Add Track button will do the job. Click the Add Track button, select the category that has the file from the categories to the right, then select the file. The center of the screen then switches to the 8-track screen where all eight tracks are represented. Two red bars are attached to the mouse arrow and indicate the two channels of the audio file just selected. The mouse is used to move the red bars from track to track. When the bars are on the tracks you want, at the point in time desired, pressing the left mouse button places the audio at that point, and the red bars become actual waveforms of the left and right channels of audio. This process is exceptionally simple to perform as are most all functions of the Trak*Star-8.
The Delete Track button is obviously used to delete tracks from the 8-track mix. Again, it doesn't get any simpler. Click on Delete Track, then click on the track you want deleted -- it's gone. Of course, no digital workstation would be complete without an "undo" function, and the Trak*Star-8 has one. Clicking on this button restores the deleted tracks (or restores the session to whatever state it was in prior to the last task performed). As with most DAWs, all editing is non-destructive because the original files remain intact on the hard disk, in their original form, regardless of how much you chop them up on an edit screen.
