
by Steve Cunningham
It’s been almost two years since we looked at Nuendo 2 (see the January 2004 issue of RAP), Steinberg’s last major version of what they call their Media Production System (or Pro Tools killer, depending on whom you’re speaking to). Since version 2 the company has been acquired by Yamaha, but Nuendo’s development has continued apace. It’s a slick and satisfying product whose only downside is it’s price — now a breathtaking $2499 list. This month we’ll take a look at what’s new and improved in what is arguably the most powerful and most expensive of all the native (or non-DSP) DAWs on the market.
BIG FELLA
Nuendo is a full-featured multitrack audio workstation that will handle an unlimited number of tracks at up to 24-bit resolution and 192 kHz sampling rate. It runs nicely on either Macs or PCs, but it requirements are somewhat steeper than version 2 — at minimum you’ll need a 1.6GHz Athalon with WinXP and 512 MB of RAM, but the manual suggests twice those specs for good performance. On the Mac side you’ll need at least a 1GHz dual-processor and 512 MB of RAM, but you’ll really want a G5 with a gig of RAM. Big computers for a very big program.
Nuendo is copy-protected with a USB dongle, which must be programmed and authorized via the internet during the installation process. This is true even if you’re upgrading from an earlier version as I did.
And Nuendo still prefers ASIO-compliant hardware, but will work on DirectX or Windows Multimedia hardware. But the very best performance, including low-latency operation, requires ASIO hardware and drivers.
WHAT’S THE SAME
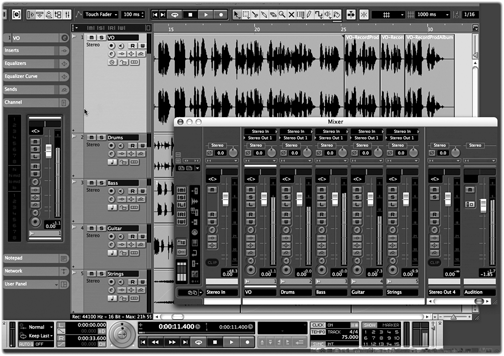
The Project Window hasn’t changed much, and still gets the job done well. Being able to view the volume automation on a separate track below the audio track itself is handy, and stands in contrast to being forced to choose whether to view audio or volume automation in a Pro Tools track. Tracks can still be organized in folders, keeping complex projects manageable. And all the real time fade and cross fade handles are still there on regions, as are the trim handles for top and tailing. Double-clicking a region brings up the Sample editor, where you’ll find all the non-destructive editing operations you expect to see.
The mixer is also much the same, save the addition of the Audition bus. This bus creates a special audio path for monitoring your mix, previewing audio while importing, editing in the Sample editor, and for the special Listen Mode in the mixer which provides AFL/PFL solo (that’s After Fader Listen and Pre Fader Listen). More about that below, but the rest of the mixer is still highly flexible and easy to use. And the sound of Nuendo’s mix bus is among the best in the business — mixing down while working totally inside the computer is no cause for pause with Nuendo. The same cannot be said for other editors out there, but that’s a discussion for a future article.
WHAT’S DIFFERENT
One of the main new features is Audio Warping, which enables you to time-stretch and pitch-shift Audio Events in real time so that they follow the tempo of the Project or can be quantised. Nuendo 2.1 introduced the Time Warp tool, which allows you to drag an Audio Event to a timecode position, while Nuendo 3 brings you the Warp Samples tool, which enables you to pick a point in time in an Audio Event, drag that point elsewhere in the time line and have Nuendo automatically (non-destructively in real time) time-stretch the audio so that the point in the Audio Event now plays correctly to its new position.
Another nice bit is Event Envelopes and the “Automation Follows Events” switch in the preferences. When set, you can create volume automation for an audio event, and that automation is tied to that specific audio event, so it will move on the track with the event.
Then there’s Play Order Tracks, which allows you to specify regions within a Project and create a different playlist of those regions, rather than playing the Project in a linear fashion. And there are improvements to how plug-ins behave, Midi Machine Control slave and master behavior, as well as redesigned windows for Device Setup, Synchronisation and the Metronome.
AAF
Nuendo 3 now supports AAF (Advanced Authoring Format) interchange. With so many digital audio workstations on the market these days, each with its own proprietary file format, interoperability between different systems has become increasingly important. Nuendo allows you to export or import selected tracks in AAF format.
AAF was devised by a group of companies including Avid and Microsoft as a file format designed to aid the workflow of users who need to transfer both data and metadata between different systems. Like OMF, AAF can either embed or link to audio (and video) files, and stores information about how those files are used in a project, as well as other project data such as start times, fades, automation and more. If you want to know more about the format, visit the AAF Association’s web site at www.aafassociation.com.
But does Nuendo’s AAF implementation work? Given the dominance of Pro Tools, I was especially curious to see if I could export an AAF file from Pro Tools and import it into Nuendo. I created a test session in Pro Tools 6.9.2 containing eight mono audio tracks and a few short audio files recorded on tracks one, two and eight. I’m pleased to say that the AAF file I exported from Pro Tools imported nicely into Nuendo, with the audio files time-stamped to the correct locations. The Nuendo 3.1 downloadable upgrade gives you the option of installing an AAF compatibility module that allows you to import and export with Pro Tools systems back to 6.4.
Other than AAF, Steinberg have also improved the import and export features introduced in Nuendo 2 for AES31, OpenTL and OMF files, most notably with the ability to import and export specific tracks rather than simply every track. The program’s ability to import and export AES31 is of particular interest, since the AES31 spec uses Broadcast Wave format audio files.

EVERYBODY INTO THE POOL
The Pool feature has been part of Nuendo since the beginning, and it has always been searchable. What’s new and significant in version 3 is that you can now add user-definable attributes to your files, which can store data in one of three formats: as text, a number, or a check mark. In the example pictured (page 16), I’ve added two searchable checkboxes for Licensed and Owned. One small problem, though, is that these user-definable attributes aren’t saved with the audio file, meaning the attributes are only relevant for the files in the Project in which they’re used. However, there is a workaround.
Using Nuendo’s Library function that lets you create, load, and save stand-alone Pools independently of a Project, you could add user-definable attributes to the Library and use this as your master Pool to make the attributes given to files accessible in all Projects. The only other thing that would be nice with regard to user-definable attributes is the ability to use presets in the window in which they’re defined, rather than just being able to store and recall a single default set. Since most other areas of Nuendo now offer presets, it’s disappointing to find that they aren’t offered here.
RENAME
One of the most useful features in Nuendo 3 is the Rename Objects window. Although it might seem fairly uninteresting on the surface, this simple addition has the potential to save hours of work over the course of a project. Rename Objects (Edit/Rename) allows you rename either a collection of multiple Parts and Events or multiple tracks in a single pass, based on a common naming scheme.
In the Rename Objects window you can choose eight different rename elements from top to bottom, that affect the naming from left to right. If you use Rename Objects from the Project window, each element can be one of five options: Free Text, literally a field of text added to the name; Original Name, which adds the original object name and can remove numbers or non-alphanumeric characters; Number, to add a number that increments or decrements within a specified range with each object named; Project Time, which adds the start time of the object in a user-specified time format; and Date, which adds the current date in a format of your choice. All the options except Free Text include both Prefix and Appendix fields to add text before or after the text generated by the relevant option.
If you use Rename Objects from the Pool window, though, you get all the options you have in the Project window, plus attributes that concern information about the file, such as the file extension, bit depth, sample rate, and tempo (if musical mode is being used for real-time time-stretching). A nice touch is that you can also add any of the user-definable attributes you’ve created — so if you want to name all the files according to the Department they came from, to continue the example, this is also possible. In fact, it would be useful to have the User Attribute option available in the Project window as well.
In the land of Pro Tools (or even Nuendo), we usually find ways of providing the Rename Objects functionality by using additional applications such as QuicKeys, which is somewhat inflexible and basically requires the user to create scripts to improve their workflow. Having this kind of feature built right into the application, no matter how boring and simple it might seem, is a clear sign than Steinberg are listening to users and a Real Good Thing in general.
AUDITIONING THE BUSS
Nuendo 2 featured a brand new audio engine that brought with it the VST Connections window, a new, consolidated way of setting up Input, Output and Group channels. Nuendo 3 has two new tabs added to this window: External FX, for incorporating external outboard hardware units as if they were plug-ins into the VST mixer, and Studio, which currently features a single buss known as the Audition buss. Each audio-based channel on the Mixer now features a Listen (L) button just below the conventional Mute and Solo buttons, which adds after- or pre-fader listening (AFL and PFL) functionality to Nuendo. There’s a button on the Audition channel on the mixer (also, usefully, available as a Key Command) that, when active, selects AFL, and when not enabled sets PFL so that when Listen is enabled on a channel, that channel’s audio is routed to the Audition channel (in addition to its standard Output buss) either before or after the fader has processed the audio on the given channel. It’s worth pointing out as well that, although the Audition buss is stereo by default, you can right-click it and use the Change Bus command from the context menu to set it to a mono or multi-channel configuration.

MIXMASTER GENERAL
The fact the Default Output can use an auxiliary send to route audio to the Audition buss illustrates another important feature in Nuendo 3 — the ability for Output busses to route audio to other Output busses to the right of them via sends. So if you have four Output busses labeled one to four, left to right, output one can send to outputs two, three and four, while output three can only send to output four. Despite the limitation, being able to route outputs still has many uses, and could be especially useful for creating headphone mixes within Nuendo or sending mixes to multiple speaker configurations.
Another improvement in Nuendo 3 is the ability to quickly assign the Input and Output busses to audio channels. Holding down Alt/Option while selecting an Input or Output assigns all selected channels to that Input or Output, while holding Shift while selecting an Input or Output assigns Input or Output busses incrementally to the selected channels. Another real time-saver.
MORE TO COME
As I am finishing this review, the company has announced that Nuendo 3.2 will be downloadable before the year is out. I can’t put my hands on the following features to check ‘em out for you, but I can at least tell you what they say is coming:
“Nuendo 3.2 features a full Control Room section that provides up to four separate Studio outputs, extra Mix, Headphone and Control Room busses as well as configurable Input Returns and user definable Monitor Setups. Each Nuendo audio, group, FX return and VSTi channel now includes new Studio Sends allowing each signal to be routed to any of the four Studios. The integrated talkback functionality enables engineers and producers to speak directly to musicians, narrators or other performers in any of the studios, automatic dimming and separate Talkback levels are also provided.
Should playback from external sources such as DAT, Tape or CD be required for a performer, up to six playback inputs can be instantly selected and routed to any Studio, Track, Headphone or Control Room bus. User definable Monitor Configurations can be setup for quick changing of monitoring setups and extensive fold-down and solo operations such as “Rear to Front” or “Solo to Center” grant easy audition of compatibility on the output side.”
Sounds good to me, and according the company, this will be free upgrade.
THE WRAP UP
I like Nuendo, and find it satisfying to use in ways that Pro Tools is not. It certainly has some killer features that I wish Pro Tools had, like the built-in Pool and Library functions. And with the upcoming Studio Controls features and a nice multichannel interface, Nuendo looks like it may be the centerpiece of a no-compromise mixerless studio. On the downside is the price, which has now skyrocketed to $2499, with the upgrade from version 2 being $399. That’s one heck of a lot of money, and the jobs that Nuendo does elegantly can certainly be done more cheaply.
But if you’re running a full-line production room, if you want to be completely prepared for surround, or if you ever deal with picture, then Nuendo is well-worth a look. Check out the user forum at www.nuendo.com for the current buzz.
Steinberg’s Nuendo 3 carries a suggested list price of $2,499.00. For more product information, visit www.stein berg.de.
♦