Fire It Up
Installing Peak is a trouble-free experience, even with its Pace copy protection scheme. The Pace system uses a separate floppy key disk to authorize your hard disk installation. Once authorized, you can run Peak without the key disk, but as I’ve said before, hard disks crash and authorizations occasionally become corrupted. Maybe some day we’ll not have to deal with this kind of protection.
Peak opens to a main window with an icon-laden toolbar across the top, an info window, counter and meters at the bottom, and a floating palette of different cursors. When you open or record an audio file you then get a waveform overview of the entire audio piece on the top, and a scroll-able and zoom-able waveform display on the bottom (see figure 1). The buttons on the toolbar are a bit small, and the icon doesn’t always tell you what the button does. Fortunately, when you pass the mouse over a button, its function is displayed in the info window in the lower left corner of the screen.
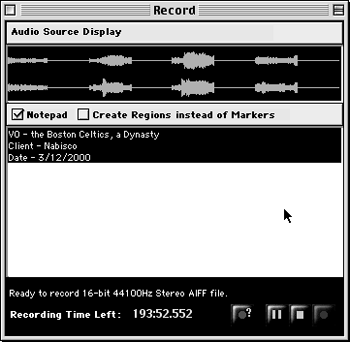
 Recording is simple and direct. Clicking the Record button in the toolbar brings up a dialog box that displays the waveform of the incoming audio (see figure 2). That box also includes a virtual note pad for recording client and date information. It’s a nice touch.
You can play back your file by clicking on the Play button in the toolbar, by hitting the spacebar on the keyboard, or by double-clicking in the waveform window. Clicking in the overview window plays the file from whatever point you clicked.
To scrub through your sound file, you hold the Control key on the keyboard and drag the cursor across the waveform. Peak plays a short loop at the cursor location, and you can set the length of the loop between 10 and 600 milliseconds. I’ve found that a 45 millisecond loop gives the cleanest-sounding scrubbing, with none of the artifacts you get when cueing a CD for example. Holding the Option as well as the Control key makes Peak perform “jog scrubbing” where moving the cursor further away from the insertion point makes the audio play faster.
While scrubbing is useful, Peak’s big waveform display lets me do most of my editing visually. I’ve become adept at identifying breaths and mouth noises by sight, and seldom have to scrub to find ugly noises that need to be reduced or eliminated.

Editing Madness
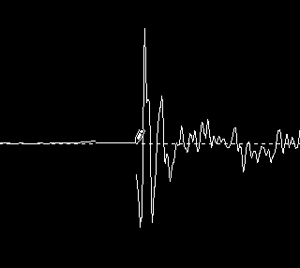
The zoom buttons in the toolbar let you view as much or as little of the waveform as you need. There’s even a button that zooms to the maximum sample level, which is useful when using the Pencil tool to smooth out a click (see figure 3). As you can see, here I’m using the Pencil tool to literally draw the click out of the waveform at the sample level. That’s some seriously precise editing there, son.
To select a region for editing, you click and drag in the waveform view. You can then cut, copy, paste, insert, delete, loop, or silence that region using the Edit menu or an associated key combination. There’s even a Blending option that lets you specify the shape and length of the crossfade between edits, which helps to smooth the transition at a cut or paste point.
Since Peak stores as much audio as possible in RAM, edits are almost always instantaneous. Edits are also interactive, in that you can actually edit or process audio while playing back the very audio that you are editing. All edits can be undone, and there is no limit to the number of undo’s. This means you can sequentially undo dozens of edits and get all the way back to square one, provided you haven’t saved your file. When you save the file, all edits are written permanently to disk. But up until that point you can go wild, secure in the knowledge that you can undo whatever silly business you may have committed upon your audio file.
There’s even more editing power available under the DSP menu. In particular, I use the Change Gain function early and often on voiceovers to reduce the aforementioned breaths and mouth sounds without cutting all the life out of a performance. Invoking Change Gain brings up a dialog box where you can enter a positive or negative gain value in dB, and hitting return performs it. It’s fast.
Other useful DSP functions include Fade In and Fade Out, and Remove DC offset which is often useful for cleaning up recordings that will become RealAudio files. There are also commands to change Mono to Stereo and vice versa, as well as to change the Sample Rate of a file. Every one of the DSP commands is also a button on the toolbar, so there’s no need to go to a menu if you’re flying through an editing session.
Fun Factor
There are a lot of user preferences you can set which contribute to Peak’s Fun Factor. For example, you can choose from several pre-set color schemes in the Colors... menu. Blue waveforms on a turquoise background with highlighting in green, red waveforms on yellow with orange highlighting, or whatever. It may sound trivial, but if you have to stare at the screen for eight or ten hours straight, it’s nice to be able to change the scenery now and again.
Several of the DSP tools also contribute to Peak’s Fun Factor. In particular, Convolve uses one sound to modify another, by reinforcing the frequencies that are in common between the two. I’ve used it to produce some pretty bizarre noises that worked well in imaging projects. Other wacky DSP tools include Reverse Boomerang, which mixes a reversed copy of the selected audio in with the original, and Rappify, which applies extreme filtering to an audio file, turning almost anything into a beat-box. It’s nuts, but it’s fun.
