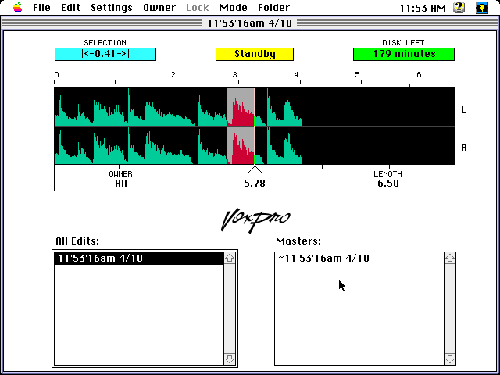
The Main Screen
VoxPro’s main screen, and only screen for the most part, has so much empty white space, it looks like something is missing from the display. But this is just a representation of how little there is to learn about using the program. The Sound Window takes up most of the top half of the screen and displays the active file’s amplitude waveform. The window always displays six seconds of audio, regardless of the length of the soundfile. If the soundfile is less than six seconds long, it simply occupies a small section of the display. If you have a longer file, let’s say sixty seconds, the timeline at the top of the window displays the total time of the soundfile. A small indicator on the timeline indicates the current cursor position and enables fast navigation within the file. The cursor position remains fixed at the center of the window. Below it, a time display shows the current time from the beginning of the file. A time indicator to the right shows the total length of the active file. Each channel of the waveform is labeled to the right with L and R. Clicking between the L and R sets playback to mono.
Click-dragging the mouse anywhere on the waveform in the Sound Window activates the VoxPro’s scrub function, which is very responsive and vital to marking tight edit points. For more precise marking, press the Zoom In key on the remote control panel. This zooms in to show about a half-second of audio. Though you can’t scrub on the zoom screen, it is easy enough to locate exact edit points visually.
Two windows at the bottom list files available for editing. The left window lists Edits and the right window lists Masters. When a recording is made, the original file is called the Master and it shows up in the Masters window. At the same time, a “working copy” of the original file is placed in the Edits window. Actually, the file on the Edits window represents the editlist file or the set of pointers that represent the edits to the master file. In other words, VoxPro doesn’t actually make a copy of the file just recorded, which would use up lots of disk space, but it gives the appearance of automatically making a backup copy of every file recorded, which is then used for editing. As a result, all editing on the VoxPro is non-destructive. At any time, after editing a file, you can always reclaim the original file.
When a Master or Edit is selected, the waveform appears on the screen quickly, within about a second. There is virtually no load time, and this makes moving from one sound file to another a very quick process. Simply highlight the desired file, and it’s ready for editing. Compiling a project from segments of many other recordings is extremely easy and fast on the VoxPro.
Three large indicators at the top show the length of the selected area, the current operating mode of the program (Standby, Record, Playback), and the amount of recording time available on the disk drive. The title bar above the three indicators shows the current filename. At the very top of the screen are the VoxPro’s pull-down menus. More on those in a moment.
The Remote Control
The VoxPro’s dedicated Remote Control panel has 41 keys that provide access to all of the most used functions of VoxPro. For most operations, the only time you’ll need the keyboard is to name files. All the functions on the Remote Control are also accessible from the keyboard and/or mouse, making it possible to run VoxPro without the Remote Control. But if the object is to present your staff with a user-friendly machine, the Remote Control is a primary step in that direction.
Across the top of the Remote Control are ten keys labeled Cart 1 through Cart 0. They mirror the number keys at the top of the keyboard. These are assignable “hot keys” and simulate having ten cart machines loaded and ready to go. Each producer/jock can have their own set of audio files assigned to the Cart keys. The Cart keys are handy both in the on-air studio and in production for assigning often used elements to such as IDs, music beds, sound effects, etc.. In production, they also serve as convenient temporary “storage areas” for audio to be used later.
At the bottom of the Remote Control panel are five large transport keys. The bright red Record key is a one-key record start function. There’s no dialog box to deal with when recording, no files to name, no parameters to set. Naming is done after the recording. Press the Record key, and you’re recording. There’s also an Insert Record key that provides a very cool function. Select a point in the middle of a soundfile, press Insert Record, and your new recording is inserted in the middle of the file, without overwriting any existing audio. The green Play key is hard to miss and initiates playback of the active file at the cursor or cue position. The Stop key exits the Record and Playback modes. Either mode can also be exited by pressing the Record or Play key again. The Cancel key acts much like the Escape key on a keyboard to cancel a current operation. The OK key simulates the Enter key on the keyboard.
Other transport controls include the Goto Beginning key, which instantly puts the playback cursor at the beginning of the file, likewise with the Goto End key. A set of fast forward and rewind keys act very much like a tape transport and provide that familiar fast forward/rewind tape sound. A second set of reverse/forward keys engages normal speed playback in either direction. And a third set provides 1/2-speed playback in either direction. These six keys offer tape transport in the digital domain that is as close to the real thing as you can get. I was impressed.
Up and Down arrow keys scroll through the filenames in the Edits and Masters windows. The Edit/Master key toggles between the two windows. The Play Beginning and Play Selected keys quickly audition the beginning of a file and the selected area of a file. Ctrl, Opt, and Shift keys, when used together with other keys, provide shortcuts to many functions of VoxPro without having to access the pull-down menus or the keyboard.