Projects are stored in the VS-880 as Songs which is no surprise considering that this unit is targeted directly to the huge market of musicians with small studios at home. The unit will store up to 200 Songs if disk space is available. To start a project, press the SONG button. Listed under the SONG button are the eight functions available in the SONG Edit mode. Here you can Select an existing song, make a New one, Name or rename a song, Copy a song, Erase a song, and Optimize a song. The Optimize function frees up disk space occupied by unused audio in the selected song. The Song Edit mode also accesses the DAT Backup and Recover functions. However, it is faster to backup projects using the Copy Song function which lets you select a source drive such as an external SCSI drive.
When a new project or Song is created, you are given the option to set the sample rate and the Record Mode for the project. Available sampling rates are 32kHz, 44.1kHz, and 48kHz. The Record Mode can be set to Mastering, Multitrack 1, Multitrack 2, and Live. These Record Modes are different data compression algorithms, though Roland prefers to call it "coding" rather than compression. The official name for the process is Roland Digital Audio Coding, and when in Live mode offers greater than 3 to 1 compression. For example, a 1G drive at 44.1kHz sampling with no coding yields 202 track minutes. (This is the Mastering mode, and in this mode the unit operates in 4-track only mode; all other modes are 8-track.) In Multitrack 1 mode you get 404 minutes. In Multitrack 2 mode you get 539 minutes, and in Live mode you get 646 track minutes. Roland was pretty quiet about exactly what the coding was doing, and one technician explained it as compression in the "time domain rather than the frequency domain" as is the case with algorithms such as the one used in the MiniDisc format. From what I could gather, the process basically looks for repeated elements and eliminates repetition as opposed to algorithms that eliminate frequencies it determines the human ear can't hear. Personally, I don't care what they do to get more recording time, as long as I can't hear the difference. So, I recorded some classical music in the Mastering mode at 44.1kHz, and recorded the same piece in the Live mode at 44.1kHz. I was expecting to hear some difference, but I could not. The manual does suggest that if the "Disk Too Slow!" message appears on the display, this is because "the drive is not able to keep up with the rate at which the data needs to be written or read" and that you should "use a lower sample rate or recording mode." Apparently, the trade-off is not in quality of audio but in how much you ask the processor to do. I used Multitrack 1 mode for everything and never came across the "Disk Too Slow!" message. And in the Multitrack 1 mode, you get 404 minutes from a 1G drive. That's plenty when your projects are thirty to sixty seconds long!
Once you've set the Record Mode and sampling rate, the display prompts you through a few yes/no questions answered with the YES and NO buttons. After about ten seconds, the new project is initialized. One more step before recording: you must set up the unit's internal I/O configuration unless you want to use the default settings. Press SHIFT and the Track 1 EDIT/SEL button to get to this screen. The system defaults to sending inputs 1 through 4 to tracks 1 through 4 and tracks 5 through 8 respectively. For most radio production, it's necessary to reset the inputs for tracks 3, 4, 7, and 8 so they get their audio from inputs 1 and 2 also. You also get the option to set Channel Link on or off for each channel. When Channel Link for track 1 is on, it is paired with track 2, and adjustments made to EQ, effects, levels, etc. affect both channels. Channel 3 links to 4, 5 to 6, and 7 to 8. There is no way to change the default settings permanently, so it's necessary to perform this little chore at the beginning of each project (something a quick software upgrade could fix). Or, you could create a "song master" that has no audio but only the initial settings you prefer. Then, when it's time to start a new project, simply copy this master and rename it.
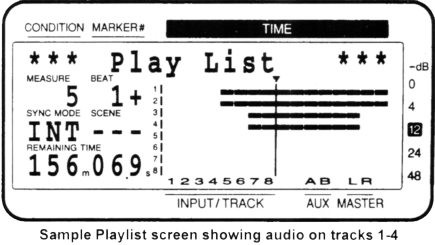
Now it's time to record. To check your levels, press SHIFT and DISPLAY. You can view pre-fader levels or post-fader levels on the display. To record some music to tracks 1 and 2, press the STATUS button for each track until their LEDs are blinking red. If the tracks are in Channel Link mode, pressing one button will arm both tracks. Press RECORD and PLAY and you're in business. Press SHIFT and DISPLAY again to switch to Playlist display mode. The screen draws horizontal lines to indicate audio on each track.