
by Jerry Vigil
There are two schools of thought regarding microphone voice processors. One doesn't even consider using them, and the other doesn't work without them. It's probably safe to say that most who adhere to the latter school are reared in radio where more compression, more "bottom," and more crispness and "presence" are all good. The more the better. Obviously, there are limits, but you'll find very few, if any, of today's top radio voice talents using NO processing on their voice. If you're the type that wants the voice you're working with, whether your own or someone else's, to sound different, sound "improved" on the finished product, you need a voice processor like the Rane VP-12. You get high and low-cut filters, a de-esser, a gate/expander, a compressor, and a 2-band parametric EQ section, packaged in an easy-to-use single rack-space unit.
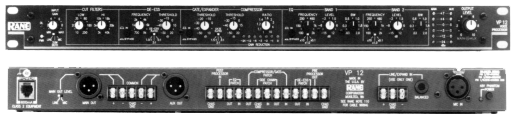
The input section of the rear panel accepts both mike and line level inputs. The mike level input is balanced XLR and the line level input is 1/4-inch active balanced/unbalanced. A terminal strip can also be used to access the line level input. A unique feature of the VP-12 is the ability to use both the line and mike level inputs simultaneously, making it possible to process more than one signal, although the processing will be identical for both inputs. A phantom power switch and LED are at the far right of the rear panel.
There are two outputs, the Main output and the Auxiliary output. Both are balanced XLR, and both are also available on a terminal strip between the two XLR connectors. The Auxiliary output delivers the same signal as the Main output, but you get independent level control for each. The terminal strip outputs can be used simultaneously with the XLR outs when driving high impedance loads. A MAIN OUT LEVEL switch on the rear panel selects Mic or Line output level.
All the functions of the VP-12, with the exception of the high and low-cut filters, are brought to a large 13-screw terminal strip at the center of the rear panel. The panel is factory configured with a set of jumpers which have all functions enabled. This terminal strip makes it possible to disable any of the functions and even rearrange the order in which the individual function blocks affect the input. Disabling any of the functions takes that function's circuitry completely out of the picture. A Side Chain Patch is provided on the strip and individual functions can be patched to external devices for additional processing. A ground connector and AC power connector complete the rear panel. The power connector looks like a telephone jack and connects to the external power supply.
The front panel features controls from left to right in the order in which the input signal is affected (unless the order has been rearranged on the rear terminal strip). At the far left, the Power LED indicates whether or not the AC power is connected. There is no power on/off switch. The OL (overload) LED lights whenever the signal is within 4dB of overloading the circuitry and monitors five different stages of the unit. Therefore, an OL indication means the signal is too hot somewhere in the path, but it's up to you to figure out if it's the input level or perhaps the output of the EQ section, etc.. Next to these LEDs is the MIC INPUT GAIN control. The range is +15 to +60dB. The INPUT SELECT switch below selects either Mic, Line, or Both, which, as mentioned, lets you use both the mike and line level inputs simultaneously.
Next in the path are the LOW CUT and HI CUT filter controls. These are always active and cannot be disabled from the rear panel terminal strip. The low cut frequency range is from 10Hz to 250Hz. The high cut range is from 3kHz to 40kHz. This is the only section without a bypass switch, but setting the low cut filter to 10Hz and the high cut to 40kHz is the equivalent of bypassing since all audible frequencies are passed. These are the settings you'll probably use for most studio applications. The low cut filter can always be used to eliminate hum coming from the mike, but that's hardly the right way to go about that. The manual suggests using the low cut filter to eliminate the sound of wind blowing across the mike when recording outdoors.
The de-esser section is next. The FREQUENCY control can be set from 700Hz to 9kHz. This sets the frequency range the de-ess effect is applied to. For de-essing, this is more range than you'll ever need. Most de-essing is needed in the 6kHz to 9kHz range. Setting this below 6kHz starts to reduce much more than sibilance, especially when the THRESHOLD control is set low. The range on the THRESHOLD control is -50dB to +20dB. When a signal reaches the threshold, the de-esser becomes active and an LED below the THRESHOLD control lights. The RATIO switch selects Mild, Norm, and Max and sets the amount of limiting. The BYPASS switch bypasses the de-esser and sends the signal directly to the Gate/Expander and Compressor section.
There are two controls for the Gate/Expander. The THRESHOLD control can be set from +10 to -50dB. An LED lights when the signal falls below the threshold at which point the signal is lowered by an amount set by the GATE RATIO switch. Choices are 1.5:1, 2:1, and 3:1. The gate (or downward expander) works like a charm and is ideal for working with mikes in studios filled with noises from computer fans and hard drives, air conditioners, etc..
Next in the path is the compressor. The THRESHOLD control is variable between -50dB and +20dB. An LED below the control lights when signals go above the threshold, at which point levels are attenuated by an amount determined by the RATIO control, variable between 1:1 and 10:1. Below this control is a seven-segment LED GAIN REDUCTION meter which shows the amount of gain reduction applied by both the expander and the compressor. The expander and compressor share the same BYPASS switch. However, you can effectively bypass the expander by setting the threshold to +10 or bypass the compressor by setting the ratio to 1:1.
The final stage of the VP-12 is the EQ section. This is a 2-band parametric EQ. Each band has a control for FREQUENCY, LEVEL, and BW (bandwidth), and a switch that sets the range of the FREQUENCY control. The FREQUENCY control can be set from 100Hz to 2kHz as labeled on the front panel. The switch below it can be set to x10, x1.0, or x0.1. When set to x10, the FREQUENCY control range becomes 1kHz to 20kHz. When set to x1.0, the range is as displayed on the panel, 100Hz to 2kHz. When set to x0.1, the range is 10Hz to 200Hz, or 1/10th the values shown on the panel. The LEVEL control cuts or boosts the EQ from -15dB to +12dB. The BW control sets the bandwidth between .03 octaves and 2 octaves.
The advantage of this type of EQ arrangement is that either band can be set up to be a low, mid, or high-band parametric EQ. In fact, both bands can be set to the same frequency range so that a boost/cut range of +24dB to -30dB is possible. The disadvantage is that you can't have a 3-band parametric EQ as found on other voice processors and mixers. This is not a problem if you don't do a lot of contouring of the voice with EQ. If you normally just add a few highs and maybe a small boost or cut at the low end, this EQ is fine. On the other hand, if you like to boost some lows, cut some mids, and boost some highs, you're out of luck. Then again, if you like to cut some lows, cut or boost the mids, and boost the highs, use the low cut filter to cut the lows. Then use band 1 of the EQ for the mids and band 2 for the highs. Likewise, use the high-cut filter when possible to free up one of the EQ bands. Both EQ bands share a single BYPASS switch.
At the right side of the front panel are two six-segment LED level meters, one for the Main output, and one for the Auxiliary output. To the right is the dual concentric control for the Main and Auxiliary output levels.
The VP-12 lists for $599 and packs a lot of processing power and versatility. Individual tastes will vary, especially when it comes to voice processors, but for me, the VP-12 performs nicely. I connected it to a Neumann U87, AKG 414, EV RE-20, and Shure SM5B and tested several voices. I found it very easy to use and very clean. I liked the effect I got from the compressor, and the EQ section suited my needs, although I'm a bit spoiled by 3-band parametric EQs. If you're looking for a competitively priced, multifunction voice processor, give the VP-12 a test drive of your own. Specs include frequency response of 20Hz to 20kHz, THD+noise at 0.01%, and S/N ratio at 97dB.
One final item worth mentioning is the manual for the VP-12. There are only six pages dedicated to the operation of the VP-12 which is more than enough. What is noteworthy is what Rane added to the manual. There's an eight page section called "Sound System Interconnection." It discusses in detail, "the cause and prevention of ground loops, interfacing balanced and unbalanced, proper pin connections and wiring, chassis ground vs. signal ground, and ground lift switches." The text is written in English, the kind most of us understand, and it is an excellent guide, especially for anyone doing any "home studio" wiring. It probably comes with any Rane manual, so look for it if you have some Rane gear in the studio. It's also available on their Web site at www.rane.com in the "Library" section.
♦