
![]() Last month we talked about compression, which sparked some interesting email conversations. In my column, I asserted that there is an important distinction between compression and limiting, although the signal is affected similarly. Several emails contested that view and I must admit, they were persuasive. I must concede that limiters can be used to compress a signal very effectively, however, I stand by my original point that a ‘true’ compressor can be fine-tuned to great advantage using Attack, Release and Hard or Soft Knee. Given that much of what we do in radio is like the “hamburger surgery” they do in emergency hospital units near the front lines of battle, a really good limiter like the Ultramaximizer™ series by WAVES makes a lot of sense for radio production. So…point taken, but when I have a little bit of extra time to dive deep into the mix, I’ll go to the full-on compressor.
Last month we talked about compression, which sparked some interesting email conversations. In my column, I asserted that there is an important distinction between compression and limiting, although the signal is affected similarly. Several emails contested that view and I must admit, they were persuasive. I must concede that limiters can be used to compress a signal very effectively, however, I stand by my original point that a ‘true’ compressor can be fine-tuned to great advantage using Attack, Release and Hard or Soft Knee. Given that much of what we do in radio is like the “hamburger surgery” they do in emergency hospital units near the front lines of battle, a really good limiter like the Ultramaximizer™ series by WAVES makes a lot of sense for radio production. So…point taken, but when I have a little bit of extra time to dive deep into the mix, I’ll go to the full-on compressor.
This month, I thought I’d follow up with a Beginner’s Guide To EQ. Hopefully, we can generate some more great conversation with this one. I don’t want to discourage direct emails, but please don’t be shy about using the posting mechanism below, so everyone can share ideas.
The original reason equalization was invented was sound reinforcement at the movies and live performances. Every venue is different. Some use a lot of curtains, many have vast expanses of open wall space and some even have windows. The style of the furnishings (glass vs. wood or plastic) and how crowded the seating might be all have an impact. Being able to hear and comprehend the sound very much has to do with how the venue is designed. Even today, a high quality sound system installation comes with an engineer who will measure frequency response in all the nooks and crannies of the room it’s in. He or she will then add electronics, usually a graphic equalizer, to the system and make adjustments to give as much balance to the sound frequencies as possible, based on the natural acoustics of the room. It’s generally an hours long process to fix the sound. And THERE is the first reason EQ was invented: to fix the sound to match the venue.
Audio engineers in recording studios immediately saw some advantages to the handy little tool. They could also ‘fix’ sound to make it sound better in the mix. Perhaps some doofus used a dynamic mic for recording a saxophone and you can plainly hear the keys clicking on the instrument while it is being played. (Shoulda used a ribbon mic!) Doing a sweep can isolate the key click frequency and you can quickly notch the EQ to reduce them in the mix.
I’m reasonably certain it was a radio producer who first decided to stretch the boundaries of what EQ can do to something way beyond fixing the sound, but that’s just how we roll. Heh. See what I did there? Umm, maybe not. Let’s start over again…at the beginning with some definitions.
Equalization (EQ) is the act of boosting or reducing (attenuating/rolling off) the levels of different frequencies in a signal.
Bass/Treble – a single knob was the original method of adjusting the frequencies in a signal, which is still in use today on many low-end, consumer audio devices. The original EQ device used a series of resistors and capacitors to boost/reduce upper and lower frequencies along a continuous spectrum.
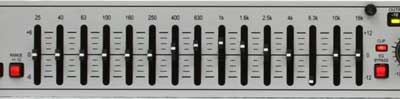
The Graphic Equalizer was next in the evolution of EQ.

As you can see in this shot of a rack-mounted dbx-215S outboard graphic equalizer, each channel (the ’S’ stands for stereo) has 15 “bands” that can be adjusted as much as ±12dB (relative). All of these controls are at parity, meaning nothing has been adjusted. Going back to our saxophone example, the audio engineer might give a slight boost to the sax ‘sweet spot’ at around 1kHz, with some boost to surrounding frequencies from 400Hz to 2.5kHz, creating a little bump in the line of controls. The engineer can then look at the unit and see how the frequency response is curved, thus giving a ‘graphic’ representation. Thus, the name. Those pesky key clicking noises are probably up in the 6.3kHz range, so the single controller for that frequency would be down, probably all the way, ‘notching’ that frequency out of the mix. (These are ALL approximations. I have no idea what the final changes would be. This is simply a representation of where I’d start.)
 The Q Factor is how WIDE the frequency manipulation is for the given ‘sweet spot. However, it’s not a term that even existed until we were presented with…
The Parametric Equalizer. This was a much smaller unit that was originally designed by British console makers so that each channel on a Rupert Neve console (for example) could have an individual EQ unit. It is out of respect for these UK console designers that you will often see equalizer spelled with an ’s’ rather than a ‘z,’ the way our friends on the other side of the Atlantic spell equalisation.
After studying the way most sound engineers used EQ over a long period of time, they broke down the controls to much broader bands into Low, Mid and High frequencies and added the Q-Factor knob to the equation. The Notch filter I showed you in the picture has a very narrow Q-Factor, which I will explain more about. The Parametric EQ also gave rise to some terms that had been in use with Graphic Equalizers, but were quantified for more universal use.
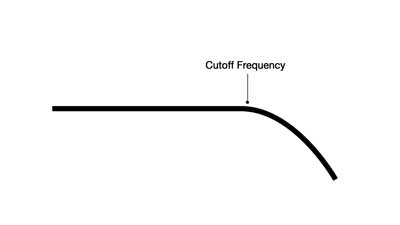 LoPass – HiPass filters do what their name implies. A LoPass filter allows any frequency below a designated point to pass, while blocking all other frequencies. A HiPass filter does the opposite, allowing any frequency above a designated point to pass while blocking all frequencies below that point.
PRO-TIP: If you have a “man-on-the-street” interview and there is a lot of wind blowing across the mic, a HiPass filter set to 100Hz will pretty much do away with the sound of the wind, allowing the conversation to pass through with little interference.
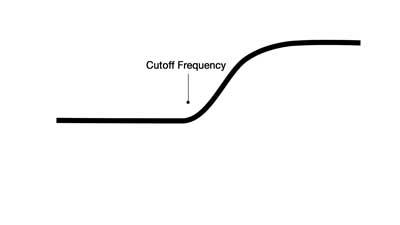 Shelving EQ is similar to Hi and LoPass, but not as extreme. A buzzy bass line will become much more manageable with a Shelf set to 250Hz. (All of these numbers are approximate, but pretty close.) Unlike the HiPass, which allows nothing below your frequency choice, the Shelf allows you to control how much of the reduced frequencies come through on the signal. Shelves can be Hi or Lo and be positive or negative.
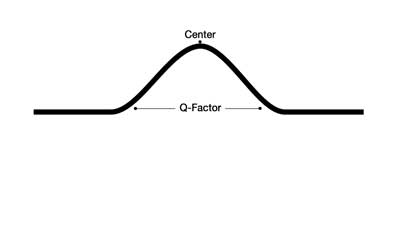 The most common type of EQ modeling is the Bell EQ. This is what I showed you in the picture above. Just think of the Bell Curve. The middle point is the sweet spot I talked about. The surrounding frequencies are also boosted to a lesser extent. The more frequencies you include in the curve, the wider the Q-Factor. Like the Shelving EQ, The Bell EQ can be positive (boosted) or negative (attenuated) at either end of the frequency spectrum.
Most of the plug-ins you will encounter on your workstation are variations on the Parametric model. Some come with graphic interfaces that will demonstrate the curves you’re dealing with. This is an incredibly valuable tool as you can see how you’re bending the frequencies in real time. To my way of thinking, this incorporates the best features of both systems (graphic and parametric), making it an incredibly powerful tool in your quest for audio dominance.
One of the best features of DAW plug-ins is a library of pre-sets. For example, the example I wrote about earlier talked about a ‘notch’ filter, but the plug-in versions often take into account harmonics! THIS is way cool. If you have an AC buzz in your recording, the primary frequency will be either 50Hz or 60Hz, depending on the power source at the point of recording. If you can notch the right frequency, you can eliminate about 80% of the buzz without breaking a sweat. The funny thing about sound is, you’ll spend about 80% of your time dealing with the primary frequency, but when you add harmonics to the equation, it can get really tricky. You don’t hear the harmonics most of the time, but they still play havoc with the rest of your signal, making it dirty or glitchy. Some of the better plug-ins I’ve worked with don’t just notch the primary frequency…they create notches for all the natural harmonics, thus cleaning up the rest of your track substantially. Obviously, you’ll need to balance the amount of cutoff the EQ module applies to the signal, but if you’re careful, you can make the signal sound downright pristine.
One of my favorite EQ plug-ins is the Native 7-Band that comes with Pro Tools. I very often will drop it onto a VO track and select a preset called Vocals>Add Presence. This adds a nicely shaped boost in the 3.5kHz range with a fairly wide Q-Factor. It adds just a bit of gain so you have to reduce the fader just a couple of VU, but it really makes the VO fairly POP, without making it sound artificially bright.
I sincerely hope that you’ve taken good care of your ears over the years, because getting a flat response out of a compromised recording absolutely depends on it. This is one tool that you’re going to need to play with a lot before you can claim any sort of mastery. Just make sure you take baby steps and for all your good intentions, remember that your radio station/video channel/stream has its own bit of processing that can really change the impact of what you do. So, listen critically when your new creation plays back online or on the air. If you don’t get the same sound coming back, you’ll need to make adjustments and try again until you hit the perfect sweet spot.
I DO have some sound for you this month. It’s a promo I did for Most Requested Live in support of a flyaway to see BTS at an undisclosed location. However, I wasn’t allowed to say “secret” location, so I took the opposite tack and said, “Does it really matter?” I love it when I can say the unexpected. There is some very careful EQ on the VO too. I wanted to match the BTS drop I had with my voice to make it seem we were in the same room. I think I did OK.