SLICE ‘N DICE
The first thing to understand about Reaper in its current incarnation is that editing may be a little different than what you’re accustomed to. This is not to say it’s difficult, just different. Reaper conforms to the model of the contextual cursor; that is, the cursor acts as a multi-tool and changes depending upon where you hover or click it. So simply clicking in the middle of the waveform will select the entire recording, and dragging while clicked will move the audio on the timeline. To select only a portion of the waveform, you either a) click and drag below the track (in an empty space), or b) hold Cmd/Cntl and right-click on the audio, then drag to select a specific area in the waveform. You’ll notice that the selection snaps to the time ruler by default. To change that behavior simply click the Snap icon to turn it off... it’s next to the Lock icon in the Toolbar.
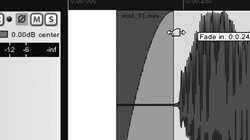
 Let’s explore some other cursor modes by doing some editing work. Firstly, to trim the front of your recording just move the cursor to the lower left corner until the cursor turns to a trim tool (see Fig. 4 Trim). Click and drag to the right and you’ve trimmed the head. Now add a fade to what’s left by hovering over the upper left corner of the waveform until the cursor becomes a fade tool (see Fig. 5 Fade).
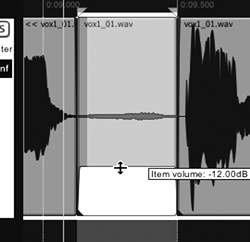
 Drag to the right and you’re done again. Now let’s reduce the volume of a breath noise. Select a breath section by dragging across it while holding Cmd/Cntl right-click. Separate the selection by hitting shift-S on the keyboard (hitting just S will separate the audio at the playhead). Now hover the cursor over the top of the wave until it becomes a vertical double-arrow icon, and pull the volume down as needed (see Fig. 6 Soften).
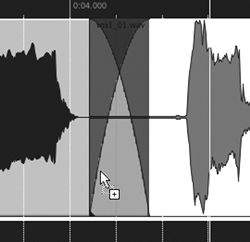
  Should you prefer to just remove the breath altogether, the Delete key on the keyboard will do the job by removing the separated breath. Need to shorten some silence between sentences with a crossfade between ‘em? Just separate the silence at the midpoint, grab one region with the arrow cursor (unchanged) and drag it over the other region -- a crossfade will be created automatically (see Fig. 7 Crossfade).
 By the way, this last behavior is programmable in Preferences, including being able to disable the crossfade.
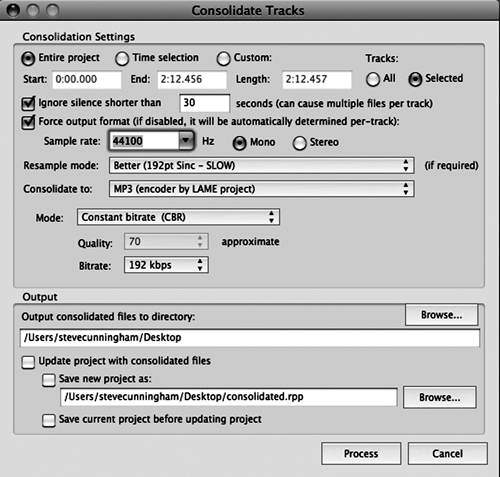
Once the editing’s done, the last step is to consolidate the finished VO track and export it as an mp3 that you can email to your agent. Hit the File menu and select “Consolidate/Export tracks...” (see Fig. 8 - Consolidate) and choose your format, what to export, and where to put the exported file. Click the Process button and it will do its work in disk-time rather than real-time (ummm... Pro Tools?). You’re done.
The above paragraph describes about 90% of the editing work I do on dialog and on my own voiceover work. Other than having to separate the breaths before either turning them down or deleting them altogether, the procedures I’ve described above are no more trouble than what I do in Pro Tools or Audition. Keep in mind that we’ve not applied any audio processing, haven’t added a music or SFX track to make a produced piece, or anything else... we’ve just recorded and edited a dry VO track. Believe me, it took much longer to describe it than it did to actually do it. And we haven’t even touched on the musical or video applications of the program; only the very basics of audio.
THE REPLACEMENT(S)
Okay, so doing that in Reaper is a tad more complex than doing it in Sound Forge, but not much more. Since we last looked at the program, Cockos has issued a free PDF manual for those who feel unsure, and it’s 418 pages of explanatory goodness. Once I got my head around selection and the contextual cursor, I didn’t need it again. But please feel free to download it from the website, where Cockos also sells several third-party books that have been written about Reaper.
Reaper has some quirks compared to other software, but the learning curve is gentle -- a little practice and you’ll be quick. Overall it is an amazing tool, particularly when you consider that a non-commercial license for it currently sells for $40. If you’re actually making money with it then you should be buying a full commercial license, which is $150, but still quite the deal. These prices will rise to $60 and $225 respectively with the release of Reaper 4 sometime in the next half year. In both cases licenses get you two versions, so my 3.71 license is good through version 4.99, and a v4 license will be good through 5.99.
The demo is fully functional, the program is small enough to fit on a USB stick, and it pretty much rocks. Steve sez check it out.
♦
