by Steve Cunningham
It’s been just over two years since we looked at Cockos Reaper, a multitrack recorder and editor software program. During that period, the company has updated the software about 150 times, taking it from version 1.86 in the previous review, up to version 3.71. That’s not a typo -- there have been some 150 revisions in just over two years! The overall buzz on the street has some audio folks abandoning their Pro Tools rigs as well as other editors for Reaper. It’s not hard to understand the reasons -- besides being ridiculously cheap, Reaper runs on both Windows and Mac platforms, in either 32-bit or 64-bit mode. But the important question for you, dear reader, is this: Has the most cost-effective multitrack editor currently available finally grown up? Is it suitable for radio production, and moreover, is there any reason to abandon one’s long time choice for this relative upstart? Let’s see if we can find an answer.
GENERAL SPECS
First introduced in 2005, Reaper comes from a small team of developers based in San Francisco. Between them, these guys have created a respectable number of developer and geek programs, as well as a surprising number of audio plug-ins (more on those in a future review). But clearly Reaper is their flagship product. The system requirements are as modest now as they were in the beginning. The 32-bit version runs on Windows 98 or ME (both with limited support, however), Win 2000, XP, Vista, Win7 or WINE. The 64-bit version works on XP, Vista, and Win 7 x64, and of course requires 64-bit drivers. On the Mac side, it runs on OSX 10.4, 10.5, and 10.6 (the 64-bit Mac version is in public beta, and also requires 64-bit drivers). It likes ASIO drivers and seemed to work with every interface I could find to throw at it. Supported sample rates run from 8 kHz to 192 kHz with a capable interface, and bit depths from 8 to 24-bit in PCM linear, 32 and 64-bit floating point, and even 2 and 4-bit ADPCM (for IVR phone use, I suspect). Formats include WAV, AIF, MP3 via LAME, OGG, and a couple I’ve not heard of. In other words, it will record and play back just about any format you can think of.
The maximum number of tracks in Reaper is 64, but these can be divided in a number of ways. You see, what sets Reaper apart from other programs is that many of its functions are open-ended, allowing the user a great deal of control over how they work. Most important for the non-technical user is the fact that there is only one kind of track or channel in Reaper, which can carry multiple streams of audio simultaneously and route them to any other audio stream on any other channel. This means that you determine whether a track is an audio track, an effects return track, a group track or whatever by how you connect it up. Plug-ins can then be applied to separate MIDI and/or audio streams within a given track to create complex matrixed effects that in other applications would take multiple tracks to implement.
The package comes with a nice selection of audio processing plugs, including dynamics, EQ, a convolution engine, an automatic pitch-corrector, reverb and echo, and an insert utility to incorporate hardware into the software chain. All these have sophisticated automatic delay compensation, and you can reduce native CPU load further by offloading specified effects chains to other computers on a network using the included ReaMote software. If the standard plug-ins don’t do what you want, you can actually script your own FX chain via a built-in scripting environment, debugging and recompiling your code while Reaper is running. Further mixing power is provided by the innovative Parameter Modulation function, a kind of adjunct to the dynamic automation system that can control any effects parameter on one track according to signal levels on another. The look and feel of the program can be changed extensively by virtue of interface settings and skins, collectively known as Themes, while keyboard-triggered shortcuts called Actions and screensets are available to speed up your workflow as well.
The point is that Reaper is a highly capable multitrack audio recorder and editor, with nearly all the features of the Big Guys, and including some that production and VO folks will never use (think extensive MIDI recording and editing functionality). But do all those features add so much to the complexity of the software that it becomes hard for mere audio mortals to use?
In an attempt to quantify how easy (or not easy) it is to begin doing useful work in Reaper, I’m going to describe the precise steps involved in recording and editing a simple voice over project from scratch, and from the first boot. Imagine you’re a non-technical voice talent-type, working up an audition for your agent in your home studio. You’ve just downloaded the software and are about to have a go. The demo is not crippled in any way, so you have access to every function and feature. Will Reaper get the job done for you, without having to call tech support? Let’s try it.
FIRING UP A BASIC VO SESSION
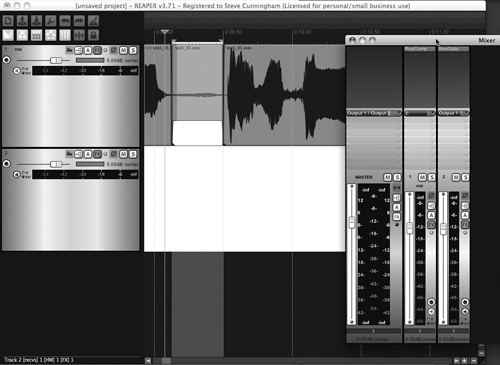
With an interface connected to your computer, you fire up the demo. After Reaper’s splash screen disappears, you are presented with an empty project screen. There’s a toolbar in the upper left corner with a dozen plus icons on it, transport controls and counter displays which are located along the bottom, and a big empty track window that occupies the majority of the right side of the screen with a ruler at the top. The default ruler comes up displaying bars and beats on top, and minutes and seconds on the bottom -- we want just minutes and seconds for this work.
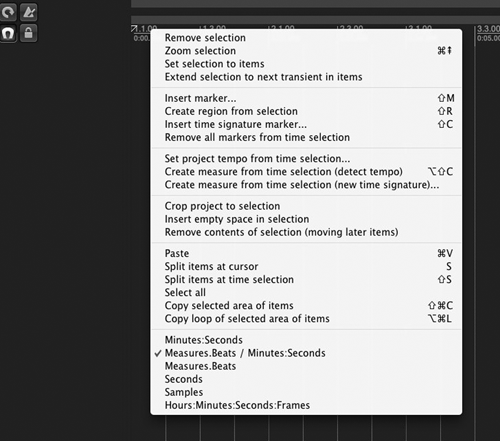
To select a different timescale, right-click directly on the ruler, and a large menu of edit functions will immediately appear (see Fig. 1 Menu). At the bottom of this menu, choose Minutes:Seconds, release the mouse and it’s done. This step also illustrates a fundamental rule when working with Reaper; right-click everything. Chances are good you’ll find exactly the parameter you’re looking for.
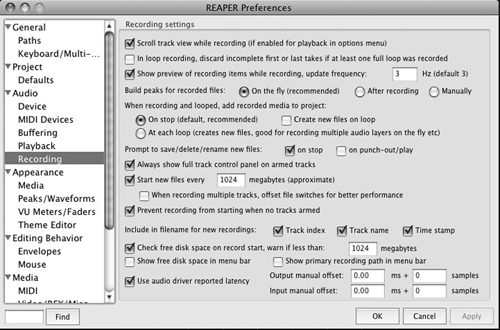
Before recording for the first time, you’ll need to take a moment to deal with interface settings and file management. In case you haven’t yet told Reaper about your audio interface, it’s a good idea to open the Preferences dialog (see Fig. 2 Prefs). From the list on the left, choose the item labeled Audio, and click on Device. Make sure your audio interface appears and is selected in the drop down list at the top; if it isn’t, either select it from the drop down menu to Make It So, or check your connections, power to your interface, and the other customary troubleshooting steps. The interfaces I tried all showed up in the list, so I just had to select one. You may also want to click the Playback item and the Recording item to confirm or change how Reaper will behave during the session. Finally, close the Prefs window, and click on the wrench icon in the Toolbar. Use the Audio Settings tab to tell Reaper where to store your recorded files, as well as your preferred audio format, sample rate, and bit depth. That takes care of the basic file management issues, and once that’s all set up it would be wise to save your project as a Template. Hit the File menu, scroll to “Project templates”, and click “Save project as template...” and you’re done.
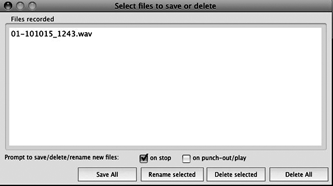
Next, create a new track by selecting “Insert new track” from the Track menu, or hitting Cmd-T/Ctrl-T from the keyboard. Click on the red Track Arm button on the left side of the new Track’s header (that’s the leftmost part) and you’re ready to go, so press Cmd-R/Ctrl-R to begin recording. As you record, you will notice that the waveform draws on the screen as you would expect and the Track’s meters bounce appropriately. The timeline may or may not scroll to the right, depending upon how you set up your Preferences (the default is to scroll). When you’re done, press the spacebar to stop Recording. Reaper will immediately display a window with the name of the file you just recorded (see Fig. 3 Confirm). This is also default behavior that allows you to save, rename or delete the take you recorded. If you would prefer not to see that window again, just uncheck the box marked “on stop”. You’re done now, so it’s time to cut ‘em up.
SLICE ‘N DICE
The first thing to understand about Reaper in its current incarnation is that editing may be a little different than what you’re accustomed to. This is not to say it’s difficult, just different. Reaper conforms to the model of the contextual cursor; that is, the cursor acts as a multi-tool and changes depending upon where you hover or click it. So simply clicking in the middle of the waveform will select the entire recording, and dragging while clicked will move the audio on the timeline. To select only a portion of the waveform, you either a) click and drag below the track (in an empty space), or b) hold Cmd/Cntl and right-click on the audio, then drag to select a specific area in the waveform. You’ll notice that the selection snaps to the time ruler by default. To change that behavior simply click the Snap icon to turn it off... it’s next to the Lock icon in the Toolbar.
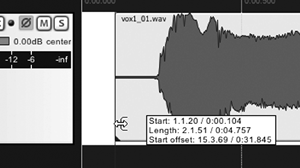 Let’s explore some other cursor modes by doing some editing work. Firstly, to trim the front of your recording just move the cursor to the lower left corner until the cursor turns to a trim tool (see Fig. 4 Trim). Click and drag to the right and you’ve trimmed the head. Now add a fade to what’s left by hovering over the upper left corner of the waveform until the cursor becomes a fade tool (see Fig. 5 Fade).
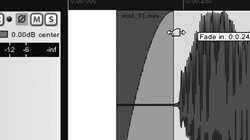 Drag to the right and you’re done again. Now let’s reduce the volume of a breath noise. Select a breath section by dragging across it while holding Cmd/Cntl right-click. Separate the selection by hitting shift-S on the keyboard (hitting just S will separate the audio at the playhead). Now hover the cursor over the top of the wave until it becomes a vertical double-arrow icon, and pull the volume down as needed (see Fig. 6 Soften).
 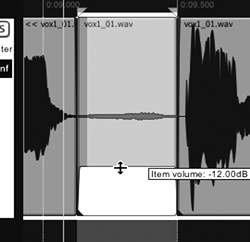 Should you prefer to just remove the breath altogether, the Delete key on the keyboard will do the job by removing the separated breath. Need to shorten some silence between sentences with a crossfade between ‘em? Just separate the silence at the midpoint, grab one region with the arrow cursor (unchanged) and drag it over the other region -- a crossfade will be created automatically (see Fig. 7 Crossfade).
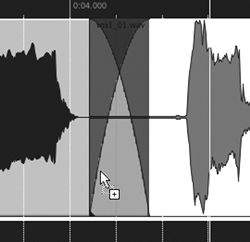 By the way, this last behavior is programmable in Preferences, including being able to disable the crossfade.
Once the editing’s done, the last step is to consolidate the finished VO track and export it as an mp3 that you can email to your agent. Hit the File menu and select “Consolidate/Export tracks...” (see Fig. 8 - Consolidate) and choose your format, what to export, and where to put the exported file. Click the Process button and it will do its work in disk-time rather than real-time (ummm... Pro Tools?). You’re done.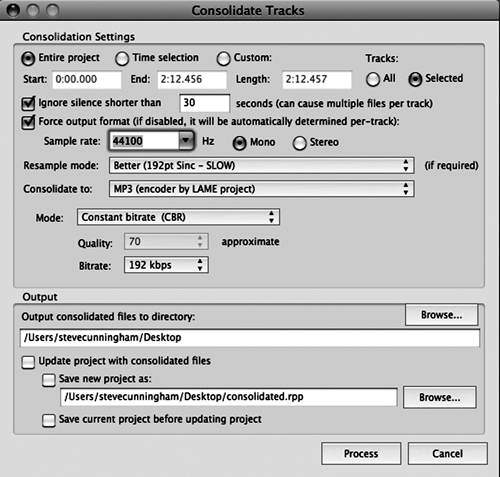
The above paragraph describes about 90% of the editing work I do on dialog and on my own voiceover work. Other than having to separate the breaths before either turning them down or deleting them altogether, the procedures I’ve described above are no more trouble than what I do in Pro Tools or Audition. Keep in mind that we’ve not applied any audio processing, haven’t added a music or SFX track to make a produced piece, or anything else... we’ve just recorded and edited a dry VO track. Believe me, it took much longer to describe it than it did to actually do it. And we haven’t even touched on the musical or video applications of the program; only the very basics of audio.
THE REPLACEMENT(S)
Okay, so doing that in Reaper is a tad more complex than doing it in Sound Forge, but not much more. Since we last looked at the program, Cockos has issued a free PDF manual for those who feel unsure, and it’s 418 pages of explanatory goodness. Once I got my head around selection and the contextual cursor, I didn’t need it again. But please feel free to download it from the website, where Cockos also sells several third-party books that have been written about Reaper.
Reaper has some quirks compared to other software, but the learning curve is gentle -- a little practice and you’ll be quick. Overall it is an amazing tool, particularly when you consider that a non-commercial license for it currently sells for $40. If you’re actually making money with it then you should be buying a full commercial license, which is $150, but still quite the deal. These prices will rise to $60 and $225 respectively with the release of Reaper 4 sometime in the next half year. In both cases licenses get you two versions, so my 3.71 license is good through version 4.99, and a v4 license will be good through 5.99.
The demo is fully functional, the program is small enough to fit on a USB stick, and it pretty much rocks. Steve sez check it out.
♦

