by Steve Cunningham
Last month we took a look at how to raise your website’s Google ranking by using a combination of social networks and SEO, or Search Engine Optimization. This assumes that you have a website or are in the process of building one. If you fall into either of those categories, then one of the things you must have is an embedded audio player that looks good and makes it easy for potential clients to hear your demos or works in progress on your website. This month we’re going to take a look at several embedded audio players, for use in HTML websites as well as those based on blogging software like WordPress.
Nearly all of these players require MP3-formatted audio to work, although some will play other formats in addition, and the players themselves are based on Adobe’s Flash technology combined with some Java scripting. The reason for this is simple; nearly 97% of all online users have Adobe’s Flash player already installed on their computer, and all modern browsers know how to handle javascript properly. Using Flash insurers that your clients will be able to hear your demos without the annoyance of having to stop and install yet another plug-in in their web browser. These players represent one less thing that you and your clients have to think about.
One of the first questions that you have to ask yourself is whether or not you want your files to be downloadable by your clients. In the case of demo reels this may not be a bad idea, but if what you’re doing is loading audio files that represent works in progress for client approval, you may explicitly want them to be able to play it, but not be able to download it. The beauty of these Flash players is that most do not allow files to be downloaded, unless you explicitly set them to allow it.
But if you do want your file to be downloadable, the simplest thing to do is to simply add a link on the page near the player. The link can be the name of the file in text or a graphic button, and it should be linked to the absolute URL of the file, in the form http://www.mysite.com/audio/downloadme.mp3.
Assuming that you or your webmaster have not implemented some form of kryptonian password protection to your website files, any user should be able to right click that link and download the associated MP3 files directly.
GOOGLE AND YAHOO PLAYERS

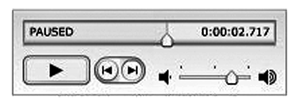
The first players we’ll look at come from the two big guns of web search -- Google and Yahoo. You’ll find an article here http://www.labnol.org/internet/design/html-embed-mp3-songs-podcasts-music-in-blogs-websites/2232/ that lays it all out, including the code. The Google player is part of Google Reader, the company’s RSS feed reader, but it also works on non-Google webpages (like yours!). The player itself is nothing to write home about in terms of appearance (see figure 1). But it is quite functional, displaying the file name and elapsed time as it plays your audio. You still have to supply a URL to the specific audio file you want to play, and it cannot play more than one title at a time.

Yahoo’s more sophisticated media player can be found here: http://developer.yahoo.com/mediaplayer/ (see figure 2) [yahooplayer.tif]. It has the benefit of being able to handle multiple audio files, with a snazzy interface that pops out from the lower left corner of the web browser. The HTML code to implement it is available at the Yahoo site referenced above.
The main drawback to both of these players, and it is a significant drawback, is that the actual JavaScript that runs the players is located on the Google and Yahoo Web servers, respectively. What that means to you is that if either Google or Yahoo are not available for some reason, then neither are your audio files. It’s not that your files are gone -- they are still on the server with the rest of your website -- but the actual player will become unavailable. As far as I’m concerned this is not acceptable. But hey, they are free...
 COMMERCIAL PLAYERS
If setting up even the free players listed above from Google and Yahoo seems to be too much trouble, commercial products are available that essentially allow you to buy your way out (see figure 3). A good example of those would be the AudioRazor product, available at http://www.yoursitecantalk.com/ for $34.95, as well as from other outlets. The main difference between this product and doing it yourself is that AudioRazor puts a friendly control panel on the process of specifying your audio files and their location and generating the code that you will paste into your webpage. I would encourage you to check it out, but I don’t believe that it does much that I cannot do myself, and that brings us to the do-it-yourself option.
ROLL YOUR OWN
If you’re anything like me, you like to get in and roll your own. If you don’t, you can certainly take this article to your webmaster and have him or her get elbow deep in tags and classes. But this is for those that do like it.
![]()
One of the more popular free players started life as a plug-in for WordPress blogging software, from a developer whose home is 1pixelout.net (the exact address is www.1pixelout.net/code/audio-player-wordpress-plugin/). This is also where you can download the plug-in as a .zip file. Take a look at figure 4. I’m quite sure you’ll recognize the player. It starts as a small icon, but when you click the play button, it extends to the right and begins playing. It has the added benefit of displaying the audio file name and counting down the elapsed time.
Because it’s actually a plug-in for WordPress, some minor surgery needs to be done in order to get it to work in a standard HTML file.
The good news is that the surgery is well documented and explained at http://www.macloo.com/examples/audio_player/. The process is simple; the first step is to download the plug-in and unzip it. All you need are two files out of the resulting folder -- one called player.swf and the other called audio-player.js. These are the Flash player and the JavaScript necessary to make it work, respectively. Now create an audio folder at the main level of your website (which we call the root), and put those two files plus an MP3 file that you wish to embed in that new folder.
Next comes the slightly messy part. The HTML code you need to add to your page can be copied directly from the macloo.com site listed just above. Remember, all of this code has been put into the public domain by the author under a Creative Commons license. Here’s the HTML:
<script language=”JavaScript” src=”http://www.fakedomain.com/myname/audio/audio-player.js”></script>
<object type=”application/x-shockwave-flash” data=”http://www.fakedomain.com/myname/audio/player.swf” id=”audioplayer1” height=”24” width=”290”> <param name=”movie” value=”http://www.fakedomain.com/myname/audio/player.swf”>
<param name=”FlashVars” value=”playerID=1&soundFile=http://www.fakedomain.com/myname/audio/music.mp3”>
<param name=”quality” value= ”high”>
<param name=”menu” value= ”false”>
<param name=”wmode” value= ”transparent”> </object>
All you have to do to the above code is paste it into your page and replace all of the instances of the “fake domain.com” URL information with your own domain and folder structure. It’s not a difficult thing to do.
To place multiple players on the same page, each playing a different audio file, you simply change the number of the audio player in the code above from “1” to “2”, and make sure to change the sound file appropriately for each player. You can copy that changed code from the same webpage at the macloo.com site. If you scroll to the bottom of that page, you’ll find a link to change the default colors of the player as well.
MORE SOPHISTICATED
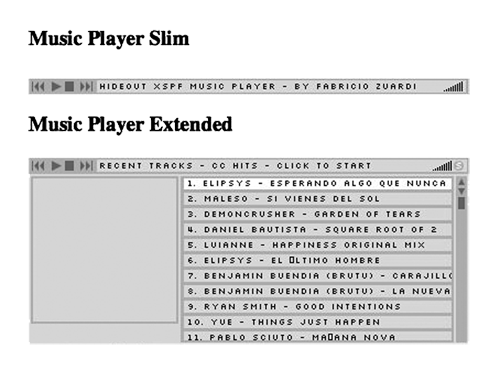
Another free player, this one with more bells and whistles, can be found at http://musicplayer.sourceforge.net/ (see Figure 5) [XSPF Web Music Player.tif]. The XSPF player is available as open-source software, which means that not only can anyone use it (but not resell it), but the source code is made available for programmers who wish to modify it. There’s an organization built around the XSPF player (pronounced “spiff”), and a quick start guide for how to implement it can be found at http://www.xspf.org/quickstart/.

The XSPF player is slightly more difficult to implement, because it requires that you build a specialized playlist from which the player gets the information about each file it will play, including the file name, total running time and on. But the open source community has built an online page that will generate playlists for you interactively, and that can be found at http://emff.sourceforge.net/playlistgenerator/.
The primary benefit of the XSPF player, besides its cool looks, is that if you use the extended version then your client can click on any one of the audio files listed and it will play. One player can then handle all of the demos or works in progress on a single webpage, and potential clients have random access to all of the sound files. Mind you, like the player above, sound files are not downloadable from the XSPF player.
A NEW SKILL SET
Getting in and tweaking your own website code has several advantages -- first, it will force you to learn some basic HTML skills, and given the current state of radio it might be a good idea to develop a new skill set along the way. If nothing else, it may make you more valuable to the extent that you can actually do work on your station’s website. Second, you not only get exactly what you want, but you get some sense of satisfaction at having done it yourself. Learning basic HTML is far from rocket science, and there are a wealth of resources on the Web that can help you.
There are certainly other players out there, but the best of them use Flash and Javascript. Since this topic continues to be a moving target, I’ve set up a page on my site so you can see them in action.
Just visit http://www.acmevoiceworx.com/Audio/RAP to check out these and several others.
And by the way, I’m available for consults...
SIDEBAR: File Prep and Watermarking
In a recent conversation I had with voice actor Harlan Hogan, I was reminded that there are a few important steps necessary to prepare audio files for the Web, which are a little different from prepping for broadcast. It’s important to roll off frequencies below 100 Hz and above 10 kHz and then to normalize, before uploading files to a website for playback in an embedded player. For starters, there’s little to no information below or above those frequencies in the human voice, and there can be room rumble. Keeping in mind that low frequencies require the most energy, by eliminating them you’ll be able to increase the volume level of the entire file so you end up with a nice loud, present demo track. By rolling off the high frequencies, you eliminate any noise that may be present in the original recording and will certainly be made more audible during the mp3 encoding process.
There have been a large number of conversations amongst VO talent, mostly on messaging boards, about the issue of watermarking. Their understandable concern is that an unscrupulous client may ask for a sample recording of a script, and end up airing that very recording without paying the talent for the use of it. Several different methods of making a demo file listenable but unusable for broadcast have been suggested, including inserting annoying tones every five seconds, adding noise to the recording, and even more onerous methods.
The most effective method of preventing that unscrupulous client from using your work may be to change some of the key names and numbers. If talent is asked to submit a sample read of a script, the simple act of changing the client’s phone number, address, or even the company name will render that file useless without destroying the audio quality.
♦

