THE MIXING CONSOLE
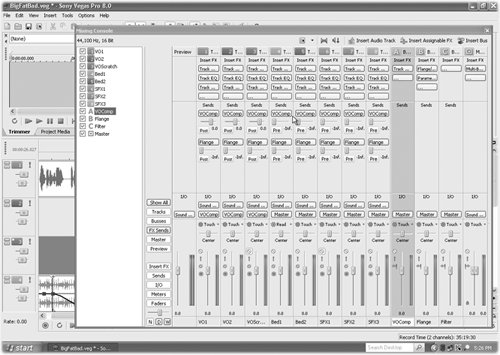
Vegas users now have a legitimate case for adding a second monitor and a dual-head video card to their editing rig. The new Mixing Console window does not replace the current Mixer window, but allows you to see the entire mixer in a single window, which is invaluable for setting up complex bussing schemes, and as far as I am concerned, turns Vegas into a much more capable audio production tool.
The new Mixing Console window is home to the same set of controls as the Mixer window shows, including buttons for Properties, Downmixing (from surround to stereo or stereo to mono), Dim Output, and Insert Audio Track/Assignable FX/Bus. In addition, a list down the left hand side displays all available channels (based on your tracks) with a checkbox to show or hide any or all of them. The show/hide checkbox works on whatever tracks are currently selected, and it’s easy to see at a glance which tracks are not visible. One small quibble is the re-sizeable dividing line between this list and the rest of the Mixing Console display — I tend to use succinct labels for tracks (which of course become the channel names in the Mixing Console), but the dividing line can’t be moved leftward past a certain point. In my case that point leaves the list about twice as wide as it actually needs to be, and wastes valuable screen real estate in the process.
Between the track list and the Preview channel are two groups of vertical buttons that let you show or hide tracks or functions selectively, with the top button labeled Show All. The upper group lets you hide tracks by their type, while the lower buttons let you hide sections by function. Don’t want to see any buss tracks? Just press the busses button. Pressing the I/O button from the lower group will hide those buttons and extend the meters/faders to fit. You will note that some of the lower function show/hide buttons may not seem to work, depending upon your screen resolution. For example, on my 800x600 display I could not hide the Meter Control section unless I hid the Sends first — evidently there just wasn’t enough vertical room. When I did hide the Sends, pressing the Meter Control button actually moved the meters up into their own section, where they became as wide as the channel strip itself. The faders remained below, sans meters. Pressing the Faders button after that caused the faders and pans to disappear, and the meters filled the vertical height where the faders used to be. I like big meters, I really do, but this was a bit over the top even for me!
With the Mixing Console Window fully extended vertically and all Show buttons enabled, the mixer shows the aforementioned Properties, Downmixing, etc. buttons along the top, then the Insert FX group, then the Sends group, then the I/O, and finally the Faders with meters alongside. Moreover, the dividing lines between the Insert FX group and the Sends group, and between the Sends group and the I/O group are both moveable with the mouse. You can set up what you see and what you hide to suit your style of workflow and tastes. Very nice.
WHY YOU SHOULD CARE
Gone are the days when you had to move between the Track window and the Mixer window to work with subgroups or effects, since the original Mixer shows only properties for the Preview buss (which controls volume in the Media, Trimmer, Explorer, and Manager windows), Master buss, Assignable FX, and active Busses themselves. Now you can see all that in a single window, greatly simplifying Vegas’ interface overall.
Also gone is the need to check the outputs of your tracks from the Track display itself, where the track you need to check is invariably located below the bottom of the window, and you have to scroll down through other tracks to find it. With the Mixing Console window you can simply look across the visible channels and find the information you need.
The case for a second monitor is not only legitimate, it borders on being mandatory. While you can dock the Mixing Console window just as with the Mixer, it actually makes more sense to let it float. As a floating window, the Mixing Console will of course cover up a good portion of your Track window and any other docked windows you may have in your layout.
The trick to getting the most from all this new eye candy is to use the Window Layout feature early and often. If you don’t use it, then you’re not getting as much from Vegas as it has to offer, and learning to use it effectively will speed your workflow, I promise. I’ve included here three of my favorite layouts for your dining and dancing pleasure. You’ll notice that yes, they’re Pro Tools-ish, but after years of using PT on a daily basis it’s what I’m used to. Your mileage may vary, but here they are.

The first figure (My PT Layout) is a complete rip of Pro Tools, with a big Mixing Console window on top of a Track window that has no docked items. This layout begs for a second monitor, and the Mixing Console window could be slid rightward onto it. The bonus here is that your second screen can be smaller (and cheaper). If your main monitor is 21 inches or more, you could easily add a very inexpensive 17 or 19-incher just for the Console, and then tweak the individual elements of the Console so as to get maximum visibility for the things you use most often. Remember that as you slide the big Console window around it’s going to try to dock with the Tracks window — to avoid this, click on the Console window then press Control before you move it to keep it from docking.
