by Steve Cunningham
This month I’ve decided to focus on a couple of software enhancements that significantly speed up my Pro Tools workflow on the Macintosh computer. For those of you on Windows, fear not — I’m putting together a collection of workflow utilities for the PC as well. If you have a favorite workflow enhancement for Windows, please drop me a line at
SNAPPER
How many times have you wanted to quickly capture a sound bite that is part of a longer audio file, right from your desktop without firing up your editor? Sure, you can fire up your editor, wait for a minute or more while it opens up and configures itself, load the long file and export the small selection, but that’s a pain. Heck, Pro Tools can take a couple of minutes to completely load and initialize itself. Other programs like Audacity are quicker to open, but I don’t want to wait... I want my sound bite right now.
While I was evaluating AudioEase’s Speakerphone plug-in (see the Feb ‘08 issue of RAP), I noticed a 100 second video of an unreleased product called Snapper — the video is still online and linked from the home page at www.audioease.com — which promised to pop up a waveform window right in the Finder, allowing one to play, select and export, and convert any kind of audio file. Snapper is now out, and it’s just one of those no-brainer products that I had to have to speed my workflow. As promised, it does exactly that.
WHAT’S A SNAPPER?
Snapper is an application, so it doesn’t clutter up your System or Library folder with a lot of extra junk that might de-stabilize your computer, which is always a potential problem with audio utilities. Because it’s an application, you have to run it to have its functions available, although you can set a preference to have it start up automatically. Once it’s active, you can just hide it in the background and let it do its work.
Snapper is copy protected via an activation key, which simultaneously registers your copy on Audioease’s website. It’s all quite painless, but note that you must have a copy of Snapper for each computer on which you want to use it.
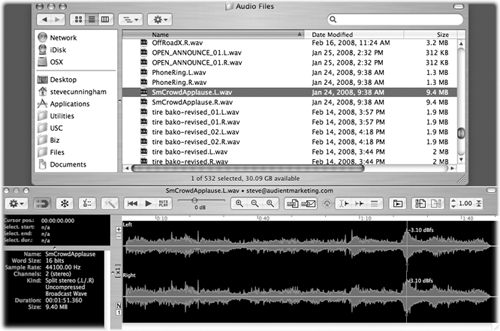
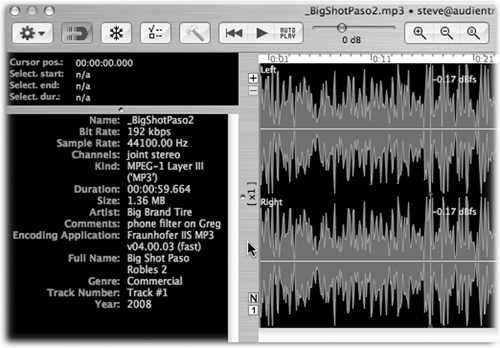
When you select any audio file in the Finder, Snapper brings up a resizable window and generates a waveform display within it, and a Toolbar above the waveform. This may take a moment if the file is long, but Snapper caches the waveform data so it appears instantly the next time. It also generates a marker per channel indicating where the maximum amplitude is located, and its value in dB.
Pressing the spacebar or clicking the Play/Pause button will start playing the file from the beginning. The “playhead” is represented by a green vertical line, and the waveform display moves to the right underneath the playhead. Pressing the spacebar again or clicking the Play/Pause button stops both playback and the moving display. Pressing Play again resumes from the last stop point. Pressing the Rewind button takes you back to the beginning. Toggling the AutoPlay button to on causes any file selected to begin playing automatically.
You can also double-click on any part of the waveform display, which will cause playback to begin from that point. A slider to the right of the transport controls sets the playback volume, and a button on the far right of the Toolbar controls playback speed, from half-speed to double-speed.
NAVIGATION
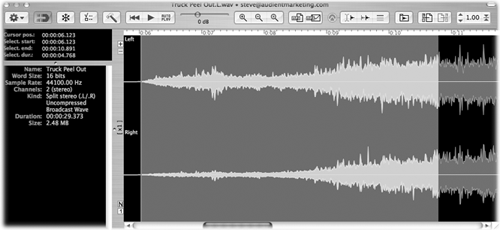
Clicking and dragging on the display creates a selection (there is no scrub function). Selections always play from the beginning, so there’s no pause function with a selection. The three zoom buttons with magnifying glass icons allow you to zoom in, out, and out to display the whole file, respectively. Snapper allows vertical zooming with the plus and minus buttons just to the left of the waveform display, and below that is a numeric that displays the level of vertical zoom. At the bottom is an “N” button (for Normalize View) which will zoom the vertical display to fill the screen, and a “1” button that will return the vertical scaling back to its regular level.
If the audio file is used in Pro Tools and as a result contains regions, then colored markers will define any Pro Tools regions, markers, or loops that exist within the audio file. While you can create a selection by clicking on one of these markers, you cannot edit them from within Snapper.
To the left of the waveform display is an information box whose lower half shows all the pertinent statistics for the currently selected audio file, including name, format, number of channels, sample rate, and that sort of thing. If the selected file is an mp3, then the info box will also display any ID3 tag information. If the file is a broadcast wave with annotations, then the annotations will appear. The upper half of the info box shows the current location of the cursor plus the start point, end point, and duration of any selection.
THE TOOLBAR
The Toolbar is home to the aforementioned transport and zoom buttons, but there’s quite a bit more there as well. On the left is a gear icon that triggers a drop-down menu of commands, most of which are duplicated in the icon bar, but is handy and lets you quickly see the key equivalents.
To the right of the gear is a magnet icon. When selected, the Snapper window will attach itself to the bottom of the folder window containing the selected audio file. Turning the magnet off lets the Snapper window float, and it will appear wherever it was last placed. Next on the right is the Freeze button. When activated, this button forces Snapper to remember and display the currently selected file only, perfect for when you want to fish around for other audio files while keeping Snapper focused on only one file. The next two buttons call up Preferences and the Toolbar Customization prefs, respectively.
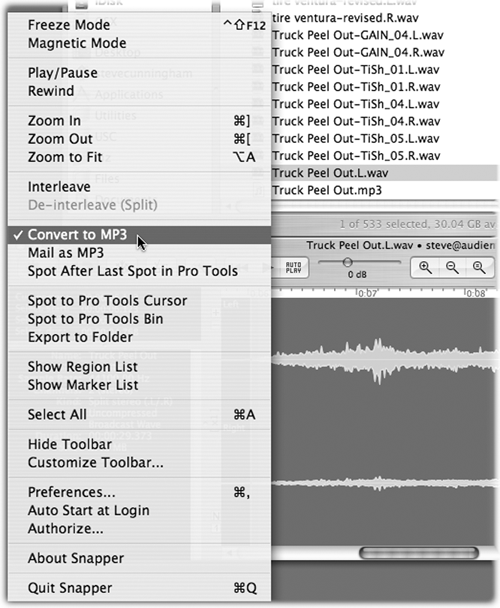
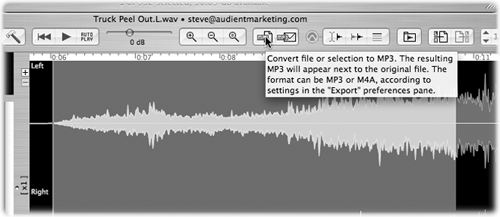
The right side of the Toolbar is where all the really cool stuff lives. Just right of the zoom buttons are two buttons with “MP3” on them. The first converts the current selection to an mp3 file, and places that file wherever you’ve told it to in preferences. This is one of the primary functions of Snapper, and it’s quick and easy. The conversion is done using the LAME MP3 engine, which you download and install separately using links provided within Snapper. The preference panel gives you access to the quality settings for the encoding, and you can also tell Snapper to use Apple’s AAC encoder instead of the LAME MP3 encoder. Keep in mind that Windows users cannot play AAC files without at least installing Apple’s Quicktime, so I keep mine set to mp3 format.
The next button performs the same conversion process, but puts the resulting file into a new email message using Apple’s Mail program, so it’s ready to be sent. Of course, if you use Entourage or web-based mail, this will be of little use to you, but if you do use Apple Mail (and I do) then you’ll like it.
The next three buttons will send the selected audio directly into Pro Tools. The leftmost button will spot it at the cursor on whichever track is selected in Pro Tools, and the center button will place the audio right next to the previously spotted audio, leaving a .10 second space between the regions. The rightmost button sends the selected audio to the region list, where it appears with the same name as the audio file open in Snapper. You can then spot the audio wherever you want it in Pro Tools.
EXPORTING
The folder icon exports selected audio to a folder (instead of into Pro Tools). Option-clicking the folder icon lets you specify which folder the export process should use, and you can export any file in Broadcast wave, AIFF, or Sound Designer II format. The two icons to the right of the folder let you split an interleaved stereo file or interleave a split stereo file, and Snapper will put the resulting file in the same folder as the original.
On the other hand, I couldn’t easily find a file format that Snapper could not read, and I tried lots of them. Snapper also correctly reads split stereo files that have “.L” and “.R” in their filenames. The only one it had trouble with was a proprietary format used only on Sony dictation recorders, as far as I can tell.
Snapper is not yet perfect, as one would expect with a first release. But based on AudioEase’s past performance, I expect that Snapper will improve with time. Version 1.0 does occasionally hang up in the Finder, and requires that a Force Quit command to Snapper to get things moving again. But when that does occur, it doesn’t “crash” the computer and I’ve not lost any work or had to restart.
A stereo file sent to Pro Tools 7.4 spots correctly in a track but the region names don’t have the “.L” and “.R” delimiters, so they appear as two mono files in the region list. AudioEase says that is a limitation of Pro Tools, and renaming the two files with the delimiters solves the problem. Also, if you split an interleaved stereo BWF or interleave a split BWF file, the BWF metadata is lost. Audioease knows about this and it’s on a list of bugs to be fixed. If these issues make you nervous in any way, you may want to wait for version 1.1. But I have to say that the utility of this application far outweighs these considerations, and I’m quite certain that they’ll be addressed shortly. One user request that likely won’t be implemented is a Windows version, but then again you never know.
BIG FUN
Snapper’s strong suit is in its abilities to read anything, and to crop and convert parts of an audio file quickly and accurately. It’s not an editor, and there probably isn’t much that Snapper can do that you can’t do with your existing software. But I guarantee that what Snapper does, it does faster and easier than anything else you may own. I can grab a selection and almost instantly send it to my client for approval, or pull a drop from a YouTube video and slam it into Pro Tools without thinking.
Snapper is $79.95 in US dollars, or 59 Euros. That’s a bit pricey for what it does, unless you’re in as big a hurry to get done as I am. Then it’s well worth it. For more information, visit www.audioease.com, and make sure you download their 100 day demo to see if you like it.
PT PLUG-IN MANAGER
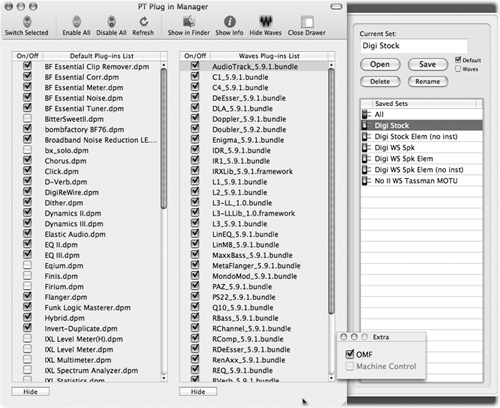
I’ll wrap this up with a little tool that saves me time and is cheap. From MaisonSonique comes PT Plug-In Manager, a little utility that makes a list of all your Pro Tools plug-ins, and lets you organize them into sets. If you have any number of third-party plug-ins (particularly Waves plugs), this will save you gobs of time.
If all you want to do is some quick editing, you can build a preset with stock Pro Tools plugs and save it. Then build another preset that has all the plugs you own in it. Before you begin, just call up PT Plug-in Manager and open the stock preset — Pro Tools will open and configure itself in record time. When you want to use ‘em all, open the big preset in PT Plug-in Manager, and go get a coffee. It works, trust me.
PT Plug-in Manager is donation- ware (really!), and can be found at www.maisonsonique.com. Go get it. Now.
♦

