NOW THE GOOD NEWS
All the cool tools from previous versions are still there, including high-quality audio scrubbing and assignable key commands, so let’s start with the new stuff. The most noteworthy addition to WaveLab has to be the two new display modes. In addition to the familiar wave display, you can now choose to view audio in Spectrum or Loudness Envelope modes. Spectrum shows a spectrographic image with frequency on the vertical axis and intensity represented by color, and a Spectrum editor allows you to define and select specific frequency regions for editing.
What’s more, you can view the frequency content in color with the most intense frequency ranges in yellow and the least intense in blue, or you can view the entire thing in grayscale. You can change the vertical scale of frequencies from logarithmic to linear, and scale the color range in such a way that only the loudest frequencies show brightly. This is great for highlighting troublesome transients.
The Loudness Envelope displays a graph of RMS loudness over time for the overall signal, as well as within three definable frequency bands. Besides presenting loudness more accurately than the waveform, the Loudness Envelope shows you areas that have likely been compressed. Both these displays are independent in the overview and main windows, so one can choose to view Loudness Envelope in the overview window and Spectrum in the main window.

SURGICAL EDITING
Together these two modes make quick work of cleaning up audio. The Spectrum option is particularly useful because it shows things that may not be visible in any other view, and the editor allows for surgical removal. For example, low rumble due to air conditioning is usually visible as a line running through the Spectrum view. With the Spectrum selector you can select a portion of that line that appears in a quiet passage, and extend that selection through the entire audio file.
The selected noise can be “damped” or filtered out in the editor with a linear phase filter whose slope is variable up to 96 dB per octave, or can be set to “infinite” which Steinberg says gives a slope in excess of 1000 dB/octave. The selection can also be faded out and back in for a more subtle approach. By adjusting the crossfade time, WaveLab smoothes out the areas where the filtered audio meets the unfiltered. The results are every bit as good as I get using a broadband noise reduction plug, but without the artifacts.
The Loudness Envelope shows vocal plosives quite clearly for editing, and the Spectrum editor takes care of those as well. By editing the lower frequencies only, nasty P- and T-sounds can be tamed without affecting the intelligibility of the audio. Adobe Audition has had spectral editing since version 1.5, but my experience is that WaveLab’s version works better on plosives.
Both Spectrum and Loudness Envelope modes completely recalculate the display when you scroll or zoom. This process can be slow, especially when working with long audio files. To avoid this, switch to the Wave view before scrolling or zooming, then switch back to Spectrum or Loudness Envelope mode. The default key commands for Wave, Spectrum, and Loudness Envelope modes are 1, 3, and 5 on the upper keyboard row, so this quickly accomplished.
ENHANCED PROCESSING TOOLS
Several of WaveLab’s DSP functions have been enhanced in version 6, and a few new ones have been added. Keep in mind that both old and new DSP processes can be assigned to work in a Batch Processing mode, allowing you to process, rename, and even encode a folder full of files automatically.
The new Loudness Distribution window plots loudness levels by incident rather than by an average. This gives you a graph of what levels exist in your file, and how often each appear. A compressed audio file will yield a graph with a large lobe around the compression threshold, while an uncompressed file will be more evenly distributed.
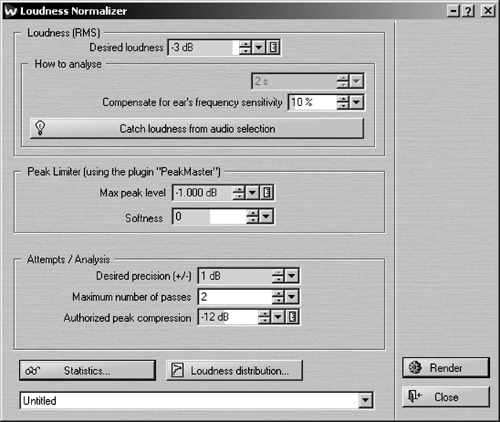
WaveLab’s old Normalize process has been renamed Level Normalizer, making room for the new Loudness Normalizer. This process works with RMS levels instead of peaks, and uses the program’s PeakMaster limiter to tame transients while the process normalizes the RMS loudness. As a result, it is far more useful than regular normalization, which simply raises the entire volume until the loudest peak reaches max level.
The new Pan Normalizer is a close cousin to the Loudness Normalizer. This process will balance the left and right levels using either peak or RMS levels. This works well for leveling stereo sound effects that are significantly louder on one channel than on the other, without simply turning them into mono files.
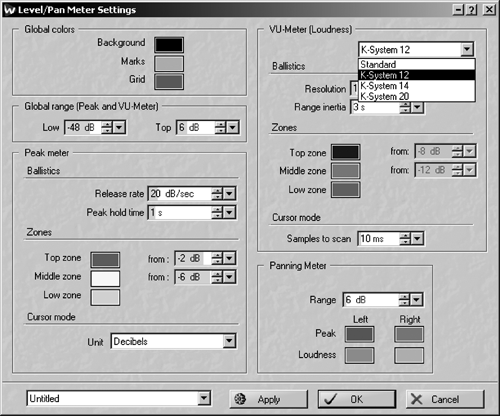
With version 6, WaveLab has included K-System metering options to all of its VU and PPM loudness meters. Developed by mastering engineer Bob Katz, this is a metering scheme that recognizes the reality of modern digital production where exceeding 0dBFS means trashed sound. The K-System re-calibrates the VU scale and defines OdB on the meter as equal to 83dB SPL, while full scale on the meter is defined +12dB for broadcast, +14dB for home theater, and +20dB for movie houses. You can find more information on the K-System at www.digido.com (and you will probably want to before relying on it), but it is a nice addition and a must-have for mastering.
Sometimes it is necessary to add some space between lines of dialog, or to remove a cough without affecting the timing of the surrounding sentences. The expanded Silence command adds an option to insert room tone instead of pure silence. Just save a small file of clear room tone and load it into the Silence dialog box. You can either insert the tone at the cursor or use it to replace a selected region. If the room tone is shorter than the audio to be replaced, WaveLab will loop it for you, and you can specify both the level of the tone and its fade times. This process also makes quick work of beeping obscenities; just load a 1kHz beep tone instead of room tone.
WORKFLOW ENHANCEMENTS
When working in WaveLab, it is important to create presets — a lot of them. While not new, one of WaveLab’s strengths has always been that it lets you create presets for many (if not most) operations. WaveLab 6 now stores the plug-in settings as well as their order in Master Section presets, so if you find yourself using the same plug-ins more than once, then create a preset for that chain of effects. I’ve built a half dozen versions of a compressor-tube saturation-EQ- compressor-again chain for an in-your-face sound, each using different compressors and different settings, and everything is stored in the preset. It is far faster to recall a preset and tweak settings than it is to rebuild an effects chain from scratch. The same advice holds true for normalization, window layouts, and time stretching.
Speaking of time stretching, WaveLab’s time-stretch and pitch-shift windows now include an innocuous check box labeled “Use DIRAC processor.” DIRAC is probably the best time-stretch and pitch-shift algorithm on the market today. There are six presets of the DIRAC algorithm available in WaveLab 6, each of which is optimized for a specific type of material — voice, instrument, classical music, etc. In casual comparisons with the native time-stretch in Pro Tools, WaveLab’s DIRAC algorithms produce far fewer artifacts even at extreme settings.
Two new plugs appear in the Effects Section’s ASIO folder; both require that your interface uses an ASIO driver. Audio Input improves on the previous “Live Input” feature, and lets you record audio through Master Section effects, from any of eight input channels at your choice of sample rate. The External Gear plug turns any unused pair of ASIO inputs and outputs into an aux send and return for connecting external hardware boxes.
Version 6 even comes with some goodies that make it seem faster even when it isn’t. WaveLab creates .gpk “audio peak” files to accurately display a waveform. Previous versions displayed a blank screen while creating this file, and the only indication was a creeping progress bar at the bottom. In version 6 WaveLab displays the waveform as it is being created. While this does not appreciably speed up the process of creating the wave display, at least it makes it feel faster.
Besides, version 6 lets you specify one folder for all your .gpk files, which goes a long way towards cleaning up hard disk clutter. The program’s disk I/O operations actually are faster than previous versions, and the old 2GB limit on individual audio files is completely gone. The Master Section’s plug-in list has been re-organized in version 6 into folders, first by type (ASIO, DirectX,
VST) and then by manufacturer (Sony, Waves, and so on). This makes finding one plug in a sea of plug-ins far faster than before. Finally, key commands can now be assigned to MIDI events, making it possible to fully utilize external controllers like Frontier Design’s Tranzport with WaveLab. For a controller addict like yours truly, that’s a huge improvement.
TO UPGRADE OR NOT
If you’re a current WaveLab user, it would be just plain foolish not to upgrade to version 6 for the Spectrum editor alone. Add to that Master Section presets that store plug-in settings, improved time-stretch algorithms and a better-looking display overall, and the upgrade price verges on a bargain. For new users, WaveLab’s full-version $700 retail price looks steep for a stereo editor. However, considering how it excels at CD and DVD mastering and burning, audio restoration, stereo editing, and multitrack editing with the Audio Montage feature, WaveLab 6 is my favorite editor and well-worth the price.
WaveLab 6 is available in three configurations. The full WaveLab 6 carries a US suggested retail of $699.99 and has all the goods. WaveLab Studio 6 is $399.99, but its Montages are limited to eight tracks. It also lacks the Spectrum editor, background file saving, DVD-Audio creation, Loudness Distribution and a few other goodies but hey, it’s almost half the price. WaveLab Essential is basically just the stereo editor and some plugs, but its suggested retail is only $149.99 and it is still one of the better stereo editors on the market, period. Upgrades from the full version start at $199.00, and competitive upgrades are also available.
For more information worldwide, visit Steinberg’s website at www.steinberg.de.
♦
