TRACK INFLATION
Sony’s Oxford Inflator is a billed as a “loudness enhancing” plug-in. Normally one “enhances” loudness through the use of compression or limiting, but Sony says that Inflator uses a statistics-based algorithm to bring up the level of quieter elements within a sound.
This is so different from the way a compressor or other dynamics processor works that it can even make full-scale white noise sound louder. Sony’s manual claims that Inflator can increase the loudness of virtually any recorded material, even if it’s already been compressed. In addition, Inflator has some non-linear attributes that can be used to create the type of “warmth” that one usually associates with analog devices.
I’m not at all sure what goes on under Inflator’s hood, but the PDF manual tells me that “The Inflator process functions by changing the relative probability of the samples in the program such that there is a greater predominance and likelihood of larger values than the original signal. The full dynamic information of the music is largely preserved despite the increase in average modulation density.” Alllll-righty then. I think what this means is that instead of simply turning down peaks that are over a Threshold level, the plug-in intelligently turns up some of the lower-level signal, but does so in a way that masks the gain-riding.
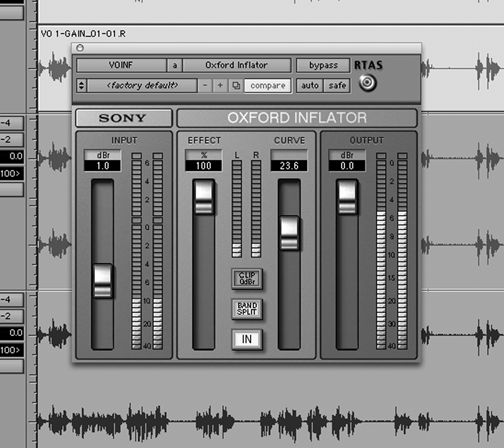
It goes on to say that Inflator doesn’t rely on signal compression, so you don’t get any of the pumping or transient degradation you get using compressors. However, you can overdrive it in much the same way as a tube circuit, so it may add some harmonics to the signal as well as to make it sound louder. All this is done using just a couple of buttons and four sliders, two of which control levels and two of which adjust the way the process is applied.
You can get Inflator to process signals that would otherwise exceed digital zero by switching off the red Clip 0dBr button, which enables what might be described as a 6dB soft limit zone. The extent of this extra level shows on the ‘above 0dB’ upper part of the input level meter. When the Clip 0dBr button is on, Inflator works in the normal range of a digital signal with hard clipping at full scale (0dB).
Pressing the Band Split button causes Inflator to work something like a multiband compressor. The split-band process works independently on three frequency bands, but can result in more obvious clipping at the output stage. What’s interesting is that Inflator seems to reduce the subjective effect of clipping, whether it’s present in the input signal or due to processing with the Clip 0dBr button turned on.
ONCE AROUND THE BLOCK, INFLATED
The best way to hear Inflator in action is to download the demo version from Sony’s website, install it, and proceed as follows: first make sure Inflator is set to direct mode (with the Band Split button off), set the Effect control to maximum, set the Input control to just hit the maximum level (so the first red point on the input meter just lights up), then set the Output control to maximum to get full modulation, and finally set the curve control to the center 50% position (this is the neutral position).
If you now work the IN button to bypass the effect, you should hear an increase in loudness of around 1.5 to 2dB — but without any apparent loss of dynamic range. Also note that there is no increase in peak output level at this point — the output red light should not come on despite the apparent increase in volume. And there is an apparent increase, believe me... it’s not subtle.
If you now advance the curve control up from neutral the loudness will increase even further, but at the expense of greater distortion and a reduction in apparent dynamic range. It sounds a bit like instantaneous mild compression with a short attack and release.
Decreasing the curve control below center causes the reverse effect in that the loudness gain will be reduced, but the dynamic range will apparently increase with the loud stuff seeming proportionately louder with respect to the quieter passages. This sounds like mild expansion with a short attack and release.
Once you find a setting that suits your track, you can try pushing things even harder to get yet more loudness. To do this, make sure the clip 0dB function is inactive, increase the input level control so that the peak level increases to around +3dB into the over drive range (beyond the original red mark on the meter, towards the overall red mark at the top).
Depending on the track or tracks you’re processing, it may be possible to increase the input peak level by 3dB or more without any apparent loss of the peaks or dynamic range. If you can achieve this level of boost without too much loss of quality, the total overall apparent loudness will have increased by 4 to 5dB. The amount by which you can do this will depend on the relationship between the duration of the peaks with respect to the average levels in the track. You’ll get the best results when the over-limit peaks go by relatively quickly.