
by Steve Cunningham
For me, some of the best-sounding effects are discovered more-or-less by accident. Perhaps I’ll apply a seemingly ill-suited plug-in to a VO track, and what comes out is very different, and in a Good Way.
This describes my experience with this month’s plug-ins from Sony, the Inflator and the Transient Modulater. Both are part of Sony’s Oxford series of effects, named after the effects in their Oxford digital consoles.
I’ve had some experience with other Oxford plug-ins, which are available in Pro Tools TDM and RTAS formats for Mac and Windows, as well as for TC Electronic’s Powercore effects systems. The Oxford compressors and equalizers are solid enough, although I have found the EQs to be a bit sterile. But a mastering engineer at USC suggested I’d find the Inflator and Transient Modulator “interesting” for imaging work, and that sent me off to Sony’s website to get a demo version. (I won’t keep you in suspense — I bought ‘em.)
Both these plug-ins are designed for mastering music, and they both essentially make things louder. But Sony has put a spin on them that sets them apart from most compressors and limiters that simply make loud sounds softer, allowing you to raise the overall level of a track. More importantly, they greatly increase presence in VO tracks, and can even add a bit of warmth.
INSTALLATION
While both plug-ins come in their own CD packaging, you won’t need the disc... all you really need is the postcard-sized note that has your Activate Key printed on it. A trip to www.sony plugins.com register and you’ll soon be downloading and installing the plug-ins — don’t forget to download the PDF manuals as well, as that’s the only way they come. As you’re doing that, Sony will deposit the iLok licenses in your iLok account, assuming you have one. If not, you’ll need to sign up for one and buy an iLok USB dongle. If you’re a Pro Tools user, you probably already have one or more of these little beasties and will have no trouble dealing with it. If not, the process is simple enough, and www.iLok.com can walk you through it.
The iLok and other USB dongles are here to stay, especially since Digidesign has now standardized on the iLok for many of its products, including the entry-level m-Powered version of Pro Tools LE. The days of serial numbers and disc authorizations are numbered as more plug manufacturers follow Digi’s lead.
Once you’re done with installation and authorization, and with your iLok firmly planted in a USB port, you’re ready to experiment.
TRACK INFLATION
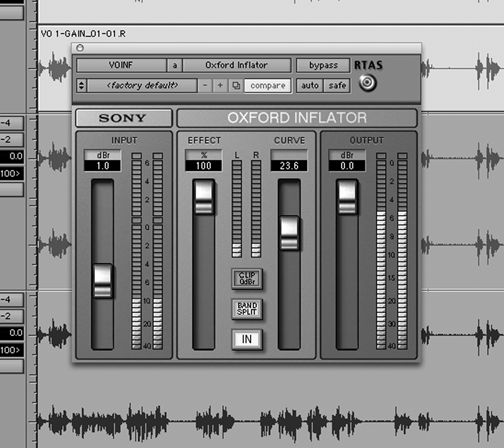
Sony’s Oxford Inflator is a billed as a “loudness enhancing” plug-in. Normally one “enhances” loudness through the use of compression or limiting, but Sony says that Inflator uses a statistics-based algorithm to bring up the level of quieter elements within a sound.
This is so different from the way a compressor or other dynamics processor works that it can even make full-scale white noise sound louder. Sony’s manual claims that Inflator can increase the loudness of virtually any recorded material, even if it’s already been compressed. In addition, Inflator has some non-linear attributes that can be used to create the type of “warmth” that one usually associates with analog devices.
I’m not at all sure what goes on under Inflator’s hood, but the PDF manual tells me that “The Inflator process functions by changing the relative probability of the samples in the program such that there is a greater predominance and likelihood of larger values than the original signal. The full dynamic information of the music is largely preserved despite the increase in average modulation density.” Alllll-righty then. I think what this means is that instead of simply turning down peaks that are over a Threshold level, the plug-in intelligently turns up some of the lower-level signal, but does so in a way that masks the gain-riding.
It goes on to say that Inflator doesn’t rely on signal compression, so you don’t get any of the pumping or transient degradation you get using compressors. However, you can overdrive it in much the same way as a tube circuit, so it may add some harmonics to the signal as well as to make it sound louder. All this is done using just a couple of buttons and four sliders, two of which control levels and two of which adjust the way the process is applied.
You can get Inflator to process signals that would otherwise exceed digital zero by switching off the red Clip 0dBr button, which enables what might be described as a 6dB soft limit zone. The extent of this extra level shows on the ‘above 0dB’ upper part of the input level meter. When the Clip 0dBr button is on, Inflator works in the normal range of a digital signal with hard clipping at full scale (0dB).
Pressing the Band Split button causes Inflator to work something like a multiband compressor. The split-band process works independently on three frequency bands, but can result in more obvious clipping at the output stage. What’s interesting is that Inflator seems to reduce the subjective effect of clipping, whether it’s present in the input signal or due to processing with the Clip 0dBr button turned on.
ONCE AROUND THE BLOCK, INFLATED
The best way to hear Inflator in action is to download the demo version from Sony’s website, install it, and proceed as follows: first make sure Inflator is set to direct mode (with the Band Split button off), set the Effect control to maximum, set the Input control to just hit the maximum level (so the first red point on the input meter just lights up), then set the Output control to maximum to get full modulation, and finally set the curve control to the center 50% position (this is the neutral position).
If you now work the IN button to bypass the effect, you should hear an increase in loudness of around 1.5 to 2dB — but without any apparent loss of dynamic range. Also note that there is no increase in peak output level at this point — the output red light should not come on despite the apparent increase in volume. And there is an apparent increase, believe me... it’s not subtle.
If you now advance the curve control up from neutral the loudness will increase even further, but at the expense of greater distortion and a reduction in apparent dynamic range. It sounds a bit like instantaneous mild compression with a short attack and release.
Decreasing the curve control below center causes the reverse effect in that the loudness gain will be reduced, but the dynamic range will apparently increase with the loud stuff seeming proportionately louder with respect to the quieter passages. This sounds like mild expansion with a short attack and release.
Once you find a setting that suits your track, you can try pushing things even harder to get yet more loudness. To do this, make sure the clip 0dB function is inactive, increase the input level control so that the peak level increases to around +3dB into the over drive range (beyond the original red mark on the meter, towards the overall red mark at the top).
Depending on the track or tracks you’re processing, it may be possible to increase the input peak level by 3dB or more without any apparent loss of the peaks or dynamic range. If you can achieve this level of boost without too much loss of quality, the total overall apparent loudness will have increased by 4 to 5dB. The amount by which you can do this will depend on the relationship between the duration of the peaks with respect to the average levels in the track. You’ll get the best results when the over-limit peaks go by relatively quickly.
It’s interesting to compare this method of increasing loudness with what can be achieved with a conventional limiter. The Inflator can actually provide useful loudness increase even when used after a limiter, but the increase will be less. And of course, the peaks lost by the limiting cannot be recovered afterwards.
Since the Effect Level control adjusts the increase in perceived volume, the trick is to use as much as you can without compromising the tone of the track or adding unacceptable distortion. You can then get a further increase in loudness by switching off the Clip 0dBr button and using up some of the soft-clip headroom. The manual suggests the best results are usually achieved by setting the Effect Level to maximum and then adjusting the input level and Curve controls for the best subjective results. And the Curve control affects both the perceived loudness and tonal quality of the track.
At its minimum setting, the amount of loudness enhancement is quite small but some “enhancement” still takes place, mainly adding an impression of warmth. When used on a mix, the louder elements stand out more and the overall sound is tightened up, which is useful when trying to lift the VO out of a mix. In analog terms, this is similar to expansion, but without the side-effects.
Note that the inflator will only process cleanly any output overs when the Band Split button is off, and with the Effect control at maximum setting. Reducing the Effect control or operating the bandsplit function will always produce higher levels and will force you to reduce the output gain, which of course defeats the aim of maximum loudness.
Loudness enhancement should always be the last thing in the signal chain, whether you use it on a single VO track or on your entire mix. Putting EQ or compression after it may ruin its effect, cause distortion and accentuate any artifacts. And while it’s okay to use it on single tracks to fatten or add weight to a VO, and then use it again on the mix buss for loudness enhancement, you don’t want to use two Inflators directly in series on complex material lest you end up with artifacts.
Note that the Band Split mode is intended to add weight and presence to complex mixed music, and isn’t primarily intended to increase apparent loudness significantly. Also note that sounds consisting almost exclusively of extreme high-frequencies will highlight the added harmonic artifacts created by the Inflator, and probably won’t sound good.
TRANSIENT MODULATOR
Transient modification is not a new concept. When you think about it, engineers have shaped the transient response of music since the introduction of attack and release controls on compressors. What is new is the proliferation of hardware and software devices that take that concept and control to new levels.
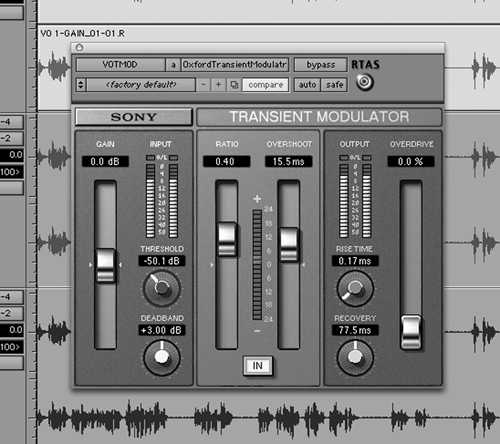
Sony’s Transient Modulator (or TransMod) lets you modify a signal’s dynamic level by adjusting the relationship of transients within the track. This can be approached in two ways: to emphasize the transients in the program, or de-emphasize the same events in the track in relation to the rest of the material.
Like the Inflator, the TransMod is standard-issue Oxford plug-in blue with clearly marked parameter controls. The usual suspects (gain control, threshold control, input switch and I/O meters) all function as you might expect. The other controls are specific to TransMod’s operation. The Deadband control manages the range in which transient variations are ignored. A Ratio control monitors the overall effect in regard to raising or lowering the transients within the program.
The Effect meter displays the peak overall gain and loss of transients. The Overshoot control determines the period of time the transients will be modified... for example, a short overshoot period will affect only the leading edge of a transient. The Recovery knob controls how quickly the levels return to normal. An Overdrive control adds harmonics (read: distortion, yet again) that can be added to the output signal. Rise Time controls how quickly transients are detected, and lets you either ignore the shortest transients or affect them all equally.
Setting the ratio to a positive value can dramatically increase the gain of a signal. For example, when the ratio control is set to +1, an attack that has a peak of 10dB gain will produce a level of 20 dB at the output, so use this with caution.
TransMod really shines when it comes to fixing over-compressed production tracks and pop songs for promo use. In every case, I could make the music seem more present without making it substantially louder in the mix. The TransMod proved itself very useful in the fix-it and creative categories, and it’s earned a spot in my plug-ins folder.
IT’S ALIVE!
As you might have noticed, I’m really stoked about the Inflator, while I find the Transmod a useful (if somewhat less exciting) tool, especially for fixing squashed music beds. But both are worthy of a good test drive.
Inflator really does make everything sound bigger and louder, but it does so in a “musical” and not too overstated way. Comparisons with compressors and expanders fall down because there are no time constants involved and so there’s no pumping, and there’s almost always a positive tonal change that accompanies the increase in level. I used the Inflator on complete imaging spots to make them “pop”, but I also found it really interesting on voiceover tracks. I have a feeling that this is one of those plug-ins that the more you use it, the more reluctant you’ll be to work without it, so if you are a Pro Tools or Powercore user, you’re probably going to want it.
Both the Inflator and the Transient Modulator carry a suggested retail price of $495 for Pro Tools TDM, $210 for Pro Tools LE and m-Powered, and $395 for Powercore. For more information worldwide and for demo versions, visit www.sonyplugins.com.
♦