
![]() By Dave Foxx
By Dave Foxx
I watched a producer in Amsterdam set up a new session in Pro Tools a few weeks ago, to record a VO session I was doing, and was astounded to see that he didn’t have a template. “No template?” I asked. He looked at me like I had two heads. When I related this story to a few producer friends, they all had a similar reaction, “What do you mean, ‘template?’” I’d always come back with, “You know… a basic session, already set up as a stationery file, with everything already set up to go.” Again, I got the “you’ve got two heads” look.
If you don’t use a template, or if you do and are curious about how I set mine up, this column is right up your alley. For those who don’t, the advantage will become obvious almost immediately. And for all those producers who use what I call “alternative” work stations, you’ll have to pardon me for showing all this in Pro Tools. I really don’t want to come off sounding like a digidesign® snob. Most, if not all of the features shown, are available in other applications.
The main advantage to using a template is being able to have all of your standard plug-ins already instantiated, all of the bussing squared away and knowing exactly where everything is before you even begin to record. Check out the picture of my template mix page. This is where 99% of everything gets set up. (You can also do most of this on the Edit page, but this is a little neater and more compact.)
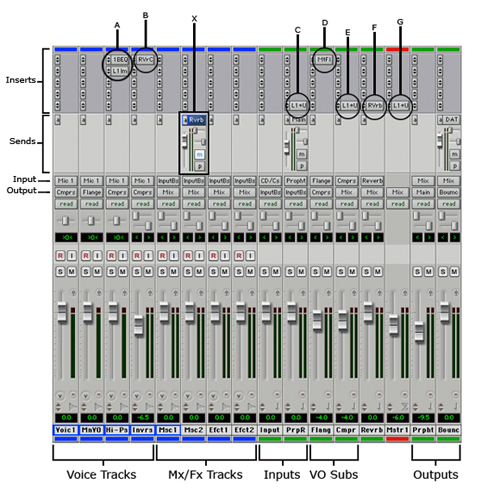
First, let’s look at the inserts. For those who aren’t sure about the difference between Inserts and Sends, an Insert puts the plug-in directly on that track and nowhere else. It is inserted into the signal path for every audio file that plays on that track. A Send sends a copy of the signal from that track to a selected bus so that it can be manipulated elsewhere and then thrown back into the main mix. I’ll talk more about Send a bit further on.
Insert A. This shows two inserts on the same track. The first, 1BEQ is a simple high-pass filter, set to 1kHz. Nothing below 1000Hz comes through at all. When you want to “hear what the talent is thinking,” you drag that audio file to this track. The second plug-in, L1lm, is a compressor to help make up for the lost gain from the first plug-in.
Insert B. This is my somewhat infamous “Inverse Masking” plug-in. It is, in fact, the Compact Renaissance Reverb plug-in with a factory pre-set called “Non-linear Reverse.” Any time I need the inverse masking stunt, I simply copy the audio from any other track and nudge it 200ms earlier in the timeline. Note that the gain is reduced -6.5db so that it doesn’t drown out the original track.
Insert C. Here at Z100, we’re using the NexGen® (Prophet) system which runs at -10db, while my system runs at 0db. The plug-in shown is the L1+Ultra Maximizer, the premier comp/limiter plug-in from WAVES®. In this case, the input is set to -9.5db, which gently lifts the input close to my system level. The output is at -0.3db, which handles all of the little extra peaks that seem to always sneak through. This track is actually a sub-master fader, which I use to control the input of NexGen® to my system so that it’s already set to parity, or 0db. Other input sources, like CD, DAT, Zephyr or Cassette all come in at parity, so I have a second input sub-master for those, without any plug-ins at all. (The output of both sub-masters is set to Input Bus, which you’ll see on the inputs of the music and effects tracks.)
Insert D. This and the next (compression) insert are on VO sub-masters. ALL voice tracks go through these subs. If you look at the output of the first four (Voice) tracks, you’ll see they either go directly to the Compression sub or the Flange sub. The Flange sub also goes to the Compression sub. In the end, every VO goes through the same Compression scheme. This insert, MtFl, is called MetaFlange, which is a stereo flange plug-in with a pre-set flange (non-moving) on it. This is the main VO style I use. If there is an “Update” track, I send it to the Flange sub as well, keeping it in the main VO style. Note that the High-Pass and Inverse tracks go directly to Compression. I also keep one “clear” track (labeled Voice 1) for drops and other mono sounds.
Insert E. This is the master compression insert for all voice tracks. This allows me to adjust the overall VO level, without going to the individual tracks. It also guarantees me that all VO tracks are getting equal treatment.
Insert F. This is my master reverb for the session. I’ll talk more about this in a moment.
Insert G. Compression for the final mix. This is minimal compression, designed primarily to simply control peaks. The input on the plug-in is set to the same level as the Master, -6db. The output is set to -0.3db.
Sends. Using a send is particularly ideal for things like reverb, where you want to be able to control the mix of the original signal separately from the affected signal. It also allows you to have one instantiation of the reverb plug-in, which means that the relative size and decay of the reverb will be constant throughout the piece. For example, if you’re featuring your VO talent, walking through a warehouse, you want the reverb on his voice to match the reverb on his footsteps. If one sounds like a bathroom and the other like a cathedral, they would sound like they are totally unrelated. If you send them both to the same plug-in, you know they’ll totally match. Then, you’ll also be able to adjust exactly how much reverb there should be, by simply adjusting the gain on the reverb sub-master. All of this has an added benefit of using one less instantiation; helping you conserve your DSP for other effects.
The first send is exactly that, a send to the Reverb bus. The sub-master for Reverb is just to the left of the Master fader. Note that the output of Msc 1, the track this send is on, is going to mix, which is controlled by the Master fader. In fact, all music and effects are going directly to mix. I generally don’t want any extra compression on these items. I want them to be as open as the original material so they remain dynamic.
The second send is a work-around to allow me to listen to Prophet while I’m still in my session. (Main is the main output of my system, which plays on my monitors and – after some adjustment – to Prophet.)
The third send is another work-around that allows me to send a full signal to my DAT recorder.
The output of the VO Compression goes to mix. The music and effects tracks go directly to mix. This is where the actual mixing (duh!) takes place.
The two output sub-masters are there for the same reason that I have two input subs. Mix is sent to both. One feeds Prophet at -9.5db and the other is what I use for bouncing to a single SDII, WAV, AIFF or MP3 file. Engineering types reading this will probably ask, “Why do that when you can set Pro Tools up to operate at -10db?” Good question. I just want my stuff to use the whole spectrum. When I send an MP3 to someone, I want that extra 10db. I want it to be loud.
OK. So that’s the basic layout. After I’ve set up the session, labeled all the busses and gotten everything where I want it, I save the session with a name like Template. I guess I could call it TheBigKahuna, or some equally nonsensical name. I leave that to you.
On the Macintosh, it’s stupid-simple to make this session a working template. Simply highlight the session file and hit [command] + [I]. This will open a small box with information about that file. Look for the check box labeled Stationery Pad and check it. Close the box. The next time you open that session, a box will pop open asking whether you want to start a new session or modify this one. Click on new session and you’re off to the races.
Windows and Macintosh folks can also create a new session and then use Import Session Data, which opens a special dialogue that allows you to pick and choose what tracks, plug-ins and routing information you want from your template session. Hint: Simply [option] + {click} on one of the tracks and select New Track. They’ll all turn to new track. Hit return and you’re set.
For this month’s audio selection, which was created on a session just like the one I’ve been talking about, I’m posting a promo that had its inspiration in a promo I got from a friend working at country radio station KNIX in Phoenix. In fact, the first part IS Garry D’s original promo, followed by mine. You’ll even notice the “almost” direct lift of the “If you can read this…” line. Obviously, the styles are different, but they’re pretty much the same promo.
♦