by Steve Cunningham
This month we’re going on a bit of a scavenger hunt. We’re gonna scour the World Wide (and often, time-wasting) Web looking for some things we can really use — more free effects! That’s right, if you are willing to navigate through hundreds of strange and sometimes poorly-designed web sites (not to mention the odd porn site), then you too can find some great-sounding effect plug-ins at a price even your GM will like.
If you prefer, you can save yourself all that time and eyestrain and just read this brief roundup. Gathered here are three of my current favorite free plug-ins for your dining and dancing pleasure. Each plug-in meets a relatively short list of qualifications: it performs a useful task in the production room, it sounds good, it’s available in multiple formats and can be downloaded directly from the Web, and it costs absolutely nothing. So let’s get started.

FROMAGE
Our first stop is the home of a group of wacky French code-jockeys, Ohm Force (www.ohmforce.com). They offer several radical effects plug-ins including Fromage, their free sound mangler. There’s nothing subtle about any Ohm Force plug-in, and Fromage is no exception. It’s twisted.
Technically, Fromage is a multi-band resonant filter, followed by a distortion stage. The filter itself consists of a resonant low-pass filter (LPF) running in parallel with multiple band-pass filters (BPF). All of the bandpass filters are equally spaced across the frequency spectrum, but you can set the number of bandpass filters from zero up to 15. The low-pass filter is always active.
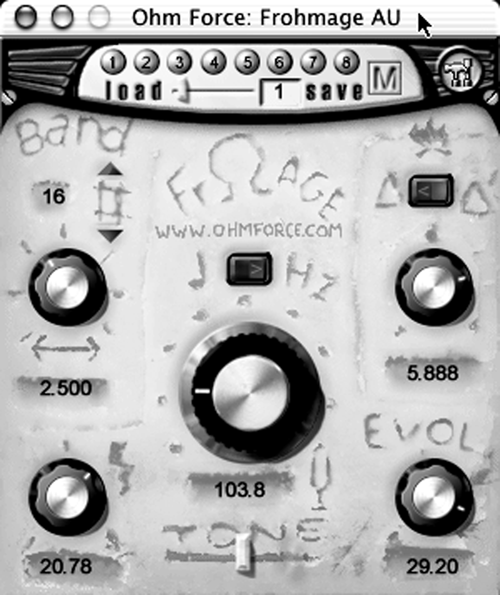
Fromage’s interface is retro-crude, but fun (see Figure 1). You’ll probably have a tough time figuring out some of the knobs, although the important ones are obvious. The big knob in the center controls the LPF’s cutoff frequency, and the rocker switch above it calibrates the cutoff frequency in Hz or in musical pitch. The smaller knob in the lower left controls the LPF’s resonance. The knob in the upper left controls the spacing of the BPF bands, while the up-down buttons above that set the number of bands with “1” meaning that only the LPF is active.
The knob in the upper right quadrant sets the level of distortion. Fromage’s distortion section softly clips the signal — this is not a guitar-type fuzz box, although cranking it up will give you a decidedly grungy overdrive effect. The rocker switch just above the knob sets the routing of the distortion. The distortion processes the entire signal with the switch in the left position, or only the LPF’s output if set to the right position. The latter gives you the ability to generate a distorted VO that is still intelligible, since the bandpass outputs that carry most of the consonant sounds remain clean.
The Evolution knob is in the lower right quadrant of the panel, and it generates some of the more interesting effects in Fromage. It applies delay to the bandpass signals when the knob is moved off the 12 o’clock position. Turning the knob to the left delays the lower-frequency bandpass filters, while turning it to the right delays the higher-frequency BPFs. The Evolution control creates some delightfully odd robotic/ring-modulated effects that can properly thrash a VO track without turning it to mud. You imaging guys should like this one a lot.
The little slider at the bottom of the panel is labeled Tone, but it’s not tone in the way most of us understand it. It’s really a mix control that changes the balance between the LPF output and the BPF output. Slide it to the left and you’ll hear just the low-pass filter; slide it to the right and you’ll hear only the bandpass filter (or filters).
All the controls on Fromage are manual, and there is no low-frequency oscillator to rhythmically sweep the filter. You can automate the parameters via MIDI if you’re using an editor that supports MIDI controllers like Pro Tools, but the knobs are smooth enough that you can get away with changing them in real time.
The eight numbered buttons across the top represent presets, and each is always active for editing. To save a setting as a preset you click the “M” in the top panel, then click one of the buttons. Banks of eight presets can be saved and loaded from hard disk using the Load and Save buttons.
Not to be missed is the small slider just below the preset buttons. When you switch between Fromage presets, the effect “morphs” between the two presets, over a time period set by that slider. You can set the morph time in seconds between 0 (no morph, an immediate switch) and 99 seconds. This feature is Big Fun, especially considering the lack of automation in Fromage.
The Ohm Force web site is decidedly offbeat and features an annoying excess of Flash animation. Once on the site, head for the Downloads section and click the link to find Fromage. It’s available in darn near every format you could want — Windows, Mac, Unix, and even the BeOS. You do have to register and get a password to gain access, but all they want is a working email address. Give them your spare Hotmail address, fetch the password from the email they’ll send you, and go download the software. You’ll also want the manual, which is available in the Documentation section. Download the PDF labeled “Ohm Force Experience.”
While you’re there, check out the commercial software plug-ins from Ohm Force. These can be purchased directly from their website, or you can get boxed versions through music dealers via their US distributor, eBlitz Audio Labs (www.eblitzaudiolabs.com).
While most software audio editors provide filter effects, Fromage is not your ordinary filter plug. You can get anything from your standard telephone filter effect to some seriously munged tracks with this one, and it provides enough sonic mayhem to become a significant time-waster. It has been stable on both my Mac and Windows computers, and doesn’t seem to put an undue strain on the CPU. More importantly, it has provided me with Hours Of Audio Fun. Get it.

TRANSVERB
Transverb is one of the bizarre plugs available from Destroy FX, who have written quite a few strange effects processors, and release them all as freeware under GNU licensing. All they ask in return is that you tell them when you use it, presumably so they can hear how their stuff works in your stuff.
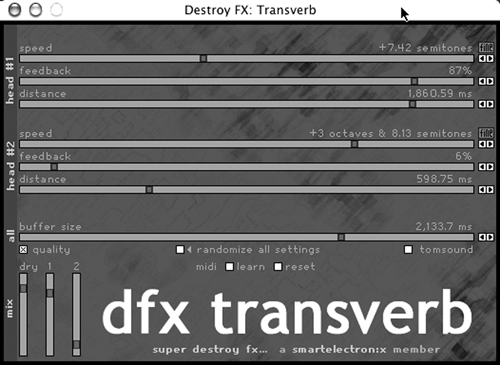
Transverb is like a delay plug-in, but it can play back the delay at different speeds. It’s like a tape loop with two independently-moving play heads. There are lots of parameters to control and a parameter randomizer for the impatient. The interface is rough, the controls are somewhat obtuse, and the whole thing is Big Fun (see figure 2).
The interface is crude but effective. The panel is covered with sliders, which are roughly divided into two sections, each for one of the two virtual playback heads. The part labeled Head #1 is the section of controls for one of the delay playback heads, and Head #2 is the section of controls for the other. Each control consists of a slider and two fine adjustment buttons to the right of the slider. The three sliders in each section correspond to parts of a tape delay, and are labeled Speed (as in tape speed), Feedback, and Distance (from the virtual record head). Below these is a buffer size parameter that sets the total amount of delay that is available to each of the two play heads.
Below that is the mix section, which allows you to set the relative volumes of the original sound vs. each of the two playback heads. The Quality button gives higher quality playback as the two delays transpose the pitch of your sound. Turning on Quality results in better sound quality, but uses more of your computer’s processing power. Besides, sometimes you just want a grainy lo-fi sound. An “X” in the quality box indicates regular hi-fi mode, while an “!” indicates “ultra hi-fi” mode. Ultra hi-fi mode reduces the aliasing noise that occurs when generating very long delays, but carries an even higher CPU price tag.
In addition, you can create complete chaos by randomizing the other parameters. There are two ways to do this — you can press the “randomize all settings” button, or you can choose the “random” preset.
Transverb sounds like a tape delay box on crack. No, seriously, it’s strange, but in a good way. The randomize button is particularly effective for creating animated effects that speed up and slow down in pitch, all in real time. It’s quite effective at processing those tired old sound effect drops into something completely different. And it’s... free.

INSPECTOR
Technically, the Inspector plug-in doesn’t meet the requirements in the list, since it doesn’t sound good. In fact, it doesn’t “sound” at all, but it can help your recordings sound good. And it’s absolutely free.
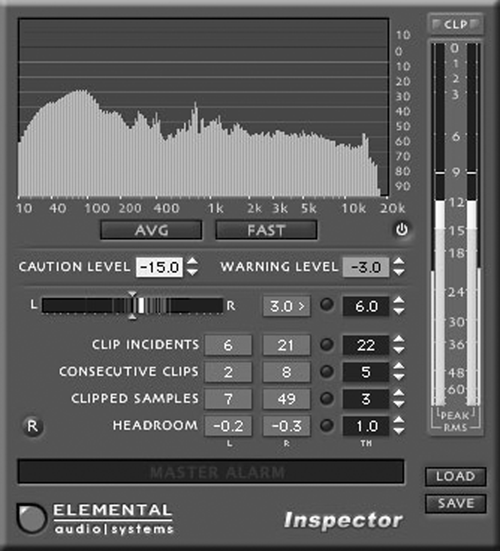
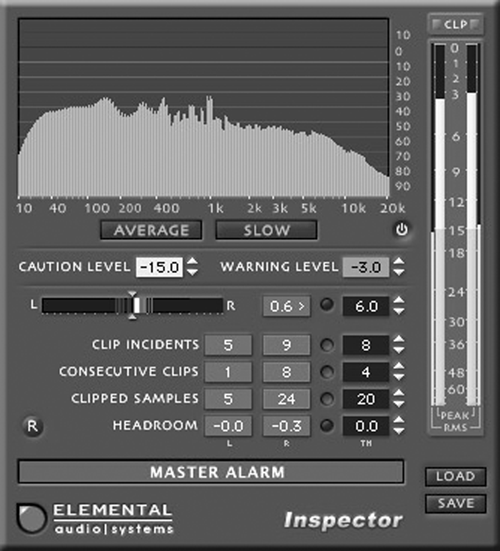
Inspector combines a frequency analyzer with a comprehensive set of meters and clip indicators (see figure 3). Its primary job is to keep track of what you’re recording and ensure that you don’t end up with either digital distortion or too low a level. To nudge you when something has gone over range, Inspector has a Master Alarm bar that goes from dark and unobtrusive when off to bright blood red when on. It will definitely get your attention (see figure 4).
The top third of Inspector’s panel is home to a real-time frequency analyzer (RTA). Although it’s hard to tell here, this is a stereo RTA with the left channel in blue and the right channel in red. Where left and right are the same, the display is purple. The two buttons below the display let you set its mode. Choose between measuring Peak or RMS levels, and between fast and slow decay times which affects how “jumpy” the RTA appears. The RTA does use some computer power, so you can disable it altogether to save CPU cycles using the small button below and to the right of the display.
The meters are on the right-hand side, and Inspector features both Peak and RMS flavors. You can set the color of the meter sections to reflect your comfort zone with respect to level, using the Caution Level and Warning Level parameters. The Caution Level is the volume at which the meters change from green to yellow, and the Warning Level is where the meters go orange. There’s a separate indicator on top of the meters that lights up in red upon clipping.
Below the RTA is a Balance Meter. The white vertical bar in the meter shows you the average balance of your audio at any given moment. Peaks that skew to the left or right are shown as smaller bars in either blue or red according to the channel, and these remain visible until you reset them. The numeric readout next to the meter shows you the highest average balance in dB, and indicates the channel with a “<“ for left and a “>” for right.
To the right of the balance readout is the first of several alarm settings, each of which activates the above-mentioned Master Alarm bar. In this case, setting the balance alarm on the right causes the Master Alarm bar to visually shriek at you if your channel balance exceeds the threshold you’ve set up.
Below the whole Balance Meter assembly are three clipping indicators; each has an associated alarm setting. The most useful of these is Clip Incidents, which measures how many times you clipped during recording. The other two measure the number of Consecutive Clips, and the total number of Clipped Samples in your recording.

The Clip Incidents is most useful because it literally tells you how many times your audio signal exceeds 0dB, irrespective of how long each clipped section may be. If your audio goes over range, you may have clipped only one sample, or several samples in a row, or just some samples and not others. One or even a few consecutive clipped samples is probably not audible, and may not be a cause for concern. But the total number of Clip Incidents is a very good indicator of audible distortion, and may indicate that you need to record again at a lower level. The number of Consecutive Clips is also useful, since in my experience more than ten or twelve clipped samples in a row can be heard. You can set a threshold for each of these clipping conditions, and exceeding that threshold will activate the dreaded Master Alarm bar.
Finally, there’s a headroom indicator below the clipping indicators that tells you exactly how close to 0dB your audio came during recording. It too has its own threshold setting.
Inspector makes no noise, but definitely passes the usefulness test. The RTA can help find peaks in microphone response with a particular actor, and the Stereo Meter is a must-have for checking mono compatibility. The clip indicators are very useful during mixdown, as it helps me keep radio spots as hot as possible without fear that they’ll go all fuzzy and clipped during the MP3 encoding process. Headroom is a Good Thing.
You can download Inspector at Elemental Audio System’s web site (www.elementalaudio.com/). Just click on “Inspector” and follow the links. If you’d rather not hear from Elemental again, you don’t have to provide an email address to download Inspector. The plug is available in Audio Units format for the Mac, and in VST and RTAS (for Pro Tools) formats for both Windows and Mac. Don’t forget to download the PDF manual, which presents a good treatise on clipping and the proper use of meters.
RESOURCES
There are literally hundreds of free plugs on the Internet to get your production juices flowing. Be advised that some of them are just too weird, or don’t work well, or will conflict with other programs on your computer. But there are several web sites that feature well-written effects plug-ins that cost you nothing, and while they may not be to your taste, you may find a gem among the stones.
The mother of all plug sites is K-v-R (www.kvr-vst.com). While the site leans toward the VST format, it links to a wide variety of items in DirectX and Audio Units formats as well. Click on the Instruments/Effects/Hosts tile on the left side navigation bar to find the goods.
A complete collection of free VST plugs for both Windows and Mac are available at Maxim Digital Audio (www.mda-vst.com/). Distortion, filters, panners, compressors, EQs, are all represented. A few are outstanding, most are serviceable, and couple are buggy, but it’s another good place to look for something that doesn’t sound like what shipped with Sound Forge, ya know?
♦

