

By Tom Richards
Goofy Name, Great Product
Not “if,” but “when?” That was the question. Just when would Sonic Foundry enter the multi-track market? After all, for years, their Sound Forge has been considered one of the premiere two-track digital editors, with gratifying updates that brought enhanced power and connectivity. Then, with last summer’s release of their audio looping tool, ACID, Sonic Foundry introduced a whole new breed of editor that flanked the field with its imagination, innovation, and ease of use. “OK,” we said, “that’s fine. But when are you going to build the multi-track we know you’re capable of? One that will raise the bar for all multi-tracks—even the Mac-based ones?” “Patience,” came the reply from headquarters in Madison, Wisconsin. “Vegas Pro will come and it will answer your prayers. But we’re not going to release it until we’re sure it’ll beat the pants off any multi-track out there.”
They rolled a seven. Vegas Pro brings fast, accurate multi-track editing to your Windows PC while rivaling editors costing up to ten times more. It even scrubs!
Start up
Vegas Pro loads cleanly, neatly. Your startup screen presents a textured workspace that invites your audio to come out and play. At the bottom part of your screen, an explorer window displays the available audio files. Highlight them to auto-preview—Vegas plays the file without loading it, so you can choose just what you’re looking for. Then, simply click it and drag and drop it onto your workspace. Use the Edit Tool to paint your file across the workspace, loading as many files as your computer will handle. How much computer do you need? Vegas Pro requires a 200 MHz processor and 32MB RAM, and Sonic Foundry recommends 400 MHz and 128 MB. But Vegas runs happily and incredibly smoothly on my Pentium 233 at home.
As long as we’re talking about smoothness, let’s consider it for a moment. The “feel” of an application is almost as important to me as what it actually does. Sure, it’s nice if an editor helps you get the job done, but when the software feels intuitive, like it knows where you want to go and how you want to get there, it reminds me why I got into radio production in the first place. Vegas gives me moments where I can just fly all over the workspace, hurling audio around like a demented artist flinging paint on his canvas. Not only does Vegas keep up with my audio impulses, it indulges them and pushes me to go even further—to tweak a bit more here, add a little effect there, or insert that loop at just the perfect point. Where some multi-tracks patronize you with the warmth of a customs inspector in an eastern European war zone, Vegas shows you a chair, curls up in your lap, and asks you where you’ve been all its life.
And isn’t that what we’re looking for? Totally non-destructive editing—Vegas doesn’t edit the files themselves. It just edits the way it interprets them. So no matter how goofy we get, no matter how much we grease up a file with edits, crossfades, plug-ins and who-knows-what, we’re only playing with a representation of the file, while the original remains intact. That’s a major reason why Vegas allows us to work so fast.

Here’s an example: I took “Intro,” from Todd Rundgren’s 1972 album, Something/Anything?, where, in typical Todd fashion, he explains some of the lousy things that can go wrong in an analog studio, complete with examples (things like bad edits, audible punch-ins, tape hiss—all those rotten anomalies that pros like you and I have left far behind). Total time to suck the audio track off the CD via my CD burner, then dump it into Vegas: about a minute. Then, I took Cliff Noble’s 1968 instrumental, “The Horse.” Maybe another minute to suck that .wav file from the CD and dump it into Vegas. Now the magic happens. I pull Todd’s voiceover past the horn statement at the beginning of the song and run him over the rhythm section groove, edit the music so the horns return at a natural point in Todd’s narrative, then split Todd’s file so I can slide him back after the horn part and over the next groove (Fig. 1). A couple of judicious edits to make the Toddster match up with the song’s slammin’ beat (Fig. 2), and voila—we’re done! We’ve created a fanciful audio design with a serendipitous synergy between voice and music. Hey, sounds suspiciously like radio station imaging, doesn’t it? Total edit time: around five minutes.
Your PD will think you’re a genius. It’s about time he noticed…
Nuts & Bolts
You start by dragging a file from the Explorer onto the workspace, or Track View. If you choose, Vegas displays the audio as a waveform within the block, called an Event. Vegas also allows you to place your Event at any time point, important if you need to synch to video (for our purposes here, we’ll focus primarily on audio).
Once you’ve added a file to the workspace, the Track List appears on the left. This is where your basic track control occurs. Gain, Pan, and FX sends are controlled here, along with Mute, Solo, and Arm for Record. Use the available Scribble Strip to name your track, just as you’d write on a strip of tape on an audio console to identify a channel’s input. The title of the track is whatever you write, independent of the name of the file your track actually references. If you choose, Vegas will display the file name within the Event on your workspace. The Track List is also where you choose the color that your file will display on the workspace. When you have several files of similar types—voices, music, sfx—the color feature is useful in helping to recognize your tracks according to type.
Another way to start, of course, is to actually record a track. Just right-click your Track List to Insert an Audio Track—or press Ctrl+Q—and a new track pops up on the list. From there, click the Arm For Record button, which then blinks red, indicating you’ve enabled recording. A programmable VU meter pops up, too. At this point, you can choose your input. Vegas recognizes my Sound Blaster card on my home system and my Zefiro ZA-2 digital card at my B101 studio. In each location, an icon appears to the left of the Arm For Record button, which allows me to select stereo, left, or right input when I click it, permitting stereo or mono recording. So let’s record!
Just beneath the workspace are your transport buttons. Hover your cursor over them, and their names appear, along with their corresponding keyboard shortcuts:
Record (Ctrl + R)
Loop Playback (L)
Play from Start (Shift + Space)
Play (Space)
Pause (Enter)
Stop (Space)
Go to Start (Ctrl + Home)
Go to End (Ctrl + End)
Skip Backward (Page Up)
Skip Forward (Page Down)
To actually begin recording, click the Record button. Your waveform displays in real time. When you stop recording, a dialog box shows you the default name and location Vegas that has assigned your file. You can then Delete, Rename, or Delete All files from that folder. Since I’m eager to edit once I’ve recorded, this is a feature I’m not crazy about. My preference would be to name the file and its location prior to recording, as in ACID, then let me get right into editing once I’ve completed tracking. Call it a minor speed bump; after all, I’ve got to name my file anyway.
You can also enable as many tracks to record as your computer can handle. This has significant multi-tracking possibilities, depending on your sound card. I’ve heard of musical instrument folks who record a whole band onto Vegas with each instrument routed to its own track. While these features don’t apply to my particular brand of radio production, it doesn’t take a genius to see what a powerful capability that is.
Also (as in using Vegas, I almost forgot when writing about it here), you’ve got to remember to turn off your Arm to Record button! If you go on to record other tracks, you’ll continue to record over that original track unless you disable it—just like analog (insert rueful sfx here). Perhaps that suggests a future Vegas feature—“Click Yes or No: Disarm when Done.”
Editing
This is where the fun starts. First we’ll talk about editing a single track, and then move on to editing a series of tracks that form a production.
Track editing is characteristically streamlined. Using the ripple cut feature is a snap. The key is to use the Marker Ruler, which is just above the Time Ruler above the workspace. Once you’ve found the section you want to nuke, click and drag the cursor along the corresponding area of the Marker Ruler, where a Selection Bar will appear. At this point you’ll want to try the Vegas Scrub Control. No, it’s not quite the same as rocking a pair of 10½-inch reels, but it’s at least as accurate. Scrub up to 2x normal speed or as excruciatingly slow as you please. Knock yourself out! Back to the edit…you’ve highlighted an audio segment that’s got to go. You’ve got choices: either remove the offending segment and leave a gap of silence, or have the two resulting sections snap together to form a seamless edit. The second choice is referred to as a Ripple Edit, which has a corresponding icon on the Toolbar. Ripple edits will, however, split your event into as many pieces as necessary to get your take the way you want it. Once you’ve finished editing, you’d be wise to Group all those events together so you can maintain the continuity of your take without scattering it.
Remember, too, that the audio you’ve deleted can either be trashed or sent to the clipboard for pasting. To trash it, use your Delete key. To Cut it, use the Cut icon from the Toolbar, or the Ctrl + X keyboard shortcut; for Copy, use the Copy icon or the Ctrl + C shortcut; for Paste use the Paste icon or Ctrl + V.
So now you’ve got a bunch of audio events scattered across your workspace. Time to arrange them in a fashion that will amaze, entertain, and communicate. Vegas awaits! Simply grab ‘em with your cursor and slide ‘em where you want ‘em. If you need to maintain a particular cadence, try using the Snap feature, which will let you snap your Events to the grid that appears on your workspace. The tighter you zoom, the finer the grid. Choose the format that makes sense for you: Samples, Time, Seconds, Time & Frames, Absolute Frames, Measures & Beats.
There are also five SMPTE formats and two “Feet and Frames” formats for synching to video and film.
One of the many things Vegas has going for it is that it’s such a totally Windows-based application. There’s probably not a single Windows convention that you can’t use somewhere. The trick is figuring out which ones work in which places. One of my favorite methods is to right-click on anything on the workspace. For example, right-clicking on a file in the work area gives you an array of choices:
Show in Trimmer. This will display your audio file in Vegas’ Trimmer, where you can zoom in for fine-tuning. Or maybe experiment with a loop idea. Whatever you highlight in the Trimmer can be dragged back onto the work area, especially handy if you only need a portion of the total file.
Open in Sound Forge, or whatever audio editor you’ve installed that Vegas recognizes. Use this option, for example, when you need to make a permanent repair to a flawed file.
Cut, Copy, Paste, Delete. Nothing unusual here. Basic Windows-style editing.
Switches. A submenu of this gives you the option to Mute, Lock, Loop, and Normalize your file—any combination, or all. The Lock feature anchors an Event—helpful when you’re moving around others.
Take. Another submenu lets you Rename, Choose, or Delete the Active Take.
Group. Lets you attach certain audio events to each other, so that if you move one, you’ll move the others. You can also release events from a Group, or Clear it altogether.
Very cool feature: Vegas has an auto-fade/gain adjust feature that speeds you down the road. At the beginning and ending of each Event, when you click the notch in the upper corner, your cursor becomes a Fade Handle to let you drag the fade-in or fade out. Then, as you place your cursor at the upper end of the Event, it changes into a pointing hand that lets you adjust its gain (Fig 5). Big time saver.

Processing
Now it’s time to really boogie, especially if you’ve got DirectX plug-ins. Assign your FX either through Envelopes throughout the Event, or through the Multipurpose Fader on the Track List.
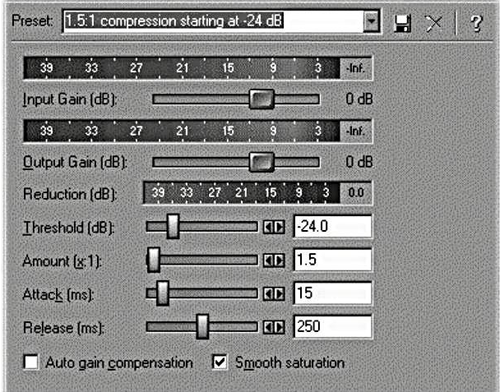
 For each track, Vegas gives you creamy-smooth four-band EQ and compression along with dithering, which adds noise to a signal to mask quantization noise. The EQ is a model of programmability, enabling you to quickly find the frequencies you need to effect, and, if desired, save the resulting curve (Fig 3). The compression is just as smooth (Fig 4).
Adding DirectX plug-ins puts your processing power to the test, which is probably why Sonic Foundry recommends 400 MHz and 128 MB RAM. The most I’ve been able to run is one or two plug-ins on an FX bus, in addition to track EQ and compression. Beyond that, my Pentium II 300 with 64 MB rig at my B101 studio wilts under the load. Wait till I install Vegas on my new home system: Pentium III 500 with 128 MB. Can’t wait!
Saving As:
Your Vegas project can be saved in a bunch of formats:
Windows Media Format (*.asf) — Microsoft’s standard format for streaming media on the Web.
Wave (Microsoft) (*.wav) — The standard audio file format for digital audio on Windows computers. The entire project can be rendered into a single Wave file by choosing this option.
Video for Windows (*.avi) — Microsoft’s video file format for use on Windows computers.
Windows Media Audio (*.wma) — An audio-only format that uses Microsoft’s new MS Audio codec.
AIFF (*.aif) — The AIF or AIFF format is a popular format on the Macintosh. The entire project can be rendered into a single AIFF file by choosing this option. When this option is chosen a new drop down list called Attributes will be displayed. From the Attributes list, you can choose the desired sample rate, bit depth, and number of channels for the output file.
RealMedia G2 (*.rm) — Real-Networks’ standard format for streaming media on the Web.
MP3 (*.mp3) – The hottest audio format on the planet.
Vegas Project (*.veg) — Contains all of the information about a single project. All of the layout of Tracks, Envelope adjustments, effects parameters, etc. are saved in this project file. This type of file does not contain any audio, only references to audio files.
Vegas EDL (*.txt) — Creates a simple text version of the placements of events in the track view. It allows you to import a text description of a project into a database or another text manipulation tool for modification or other purposes.
The Big Question:
Is it better than Pro Tools? Or Orban’s Audicy? Or the SAW products? Dollar-for-dollar, I’d have to say Vegas Pro comes out on top. If they all listed for $699, it’d be another story. But when you consider the few things Pro Tools and Audicy arguably do better, then figure what you have to pay for that performance, there’s simply no comparison. And I haven’t seen a SAW version yet that I can feel good about. Vegas brings killer multi-track production to today’s desktops at a price no one can beat. Look for this product to grow quickly in acceptance as Sonic Foundry’s developers mature the product. After all, we’re just talking version 1.0 here. And maybe that answers my other question: Why the goofy name? Because with a start like this, the sky’s the limit. Anyone wanna take my bet?
♦