
by Jerry Vigil
How many times have you needed to make a dub from DAT to DAT and had to transfer the audio to another medium first because you only had one DAT deck? With DAT becoming a standard several years ago, it’s surprising that a dual DAT deck didn’t appear much sooner. Tascam figured it was time, came up with a versatile unit, and priced it at an affordable $1,999 list.
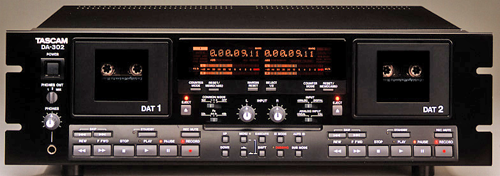
At first glance, the DA-302 Dual Digital Audio Tape Deck is rather unique. On either side of its handsome, black front panel are the two decks, a little narrower than the decks of a dual cassette unit, and each with large dark windows for easy viewing of the loaded DAT. And there are quite a few keys totally new for a DAT deck. Even loading a DAT into the DA-302 is a bit unusual at first. The DAT is inserted downward into the holder with the top label side of the DAT facing outward instead of inward, as is the case with many other decks.
Connections
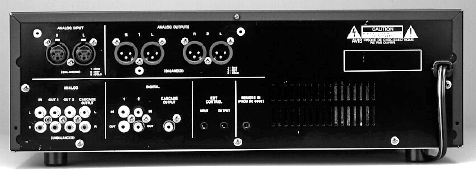
The rear panel of this 3U rack-mount unit provides unbalanced analog I/O on RCA connectors. There are two outputs, one for each deck, and one input which is shared between both decks. The Cascade output is another set of unbalanced RCA outs that is used when additional DA-302s are connected to each other. The signals at these outputs can be selected between the signal at the analog input or the playback output of either deck. An optional LA-D302 balanced analog I/O kit is available with XLR connectors.
RCA connectors also provide the digital I/O. There are separate inputs and outputs for each deck as well as a digital Cascade output which provides digital versions of the signals mentioned earlier for the analog Cascade outputs. Both AES/EBU and S/PDIF formats are supported.
External Control connectors use an optional cable for connecting additional units to each other. Finally, the Remote In connector connects to the wired remote control (no wireless infrared available).
Front Panel Controls
The loaded front panel has separate transport controls for each deck, and most other controls are shared by the two decks. There are the usual Rew, FFwd, Stop, Play, Pause, and Record keys. Pressing the Record key sets the unit in Sampling Monitor mode which lets you monitor input signals. This is the same as the Record-Pause mode except the tape head is not rotating or in contact with the tape. When pressed once, the Rew key provides 2x normal reverse playback cueing. When pressed again, the speed is 4x normal. The FFwd key works the same way but speeds are 3x or 6x normal playback.
Left and right Skip keys locate to the next or previous Start IDs. Several presses locate forward or backward the number of times the key is pressed, which is shown on the display. The Standby key, when on, puts the DA-302 in the Play-Pause mode after a program is located. When off, the unit is in an auto-play mode. The Record-Mute key adds four seconds of silence to a recording before entering the Record-Pause mode. The ID Mode key selects the type of ID you want to manually write or erase (Start or Skip) as well as the Renumber function. The Auto ID key enables automatic writing of the Start ID when audio is sensed at the inputs (or after three or more seconds of silence between programs) and allows setting the input threshold.
From here on, the familiarity of the controls begins to fade. The Common Mode switch selects between 1&2, 1>2, and Off. The 1&2 position is used for simultaneous recording or playback on both decks. In this mode, the transport controls for Deck 1 also control Deck 2. So, starting and stopping both decks only requires pushing one key. When the Common Mode is set to 1>2, continuous recording and playback is possible. With two 2-hour DATs, four hours of continuous recording/playback is possible, or eight hours when the Long Play (32kHz sampling) mode is selected. Of course, additional DA-302s can be connected to extend this time. With the Common Mode switch in the Off position, both decks can be operated individually. However, in this mode, analog signals can only be recorded to Deck 1.
The Fs switch sets the sampling frequency (32kHz, 44.1Khz, and 48kHz). The Input switch selects between digital and analog inputs. The Analog Input switch selects between Uncal and Cal and sets input level control to either the internal calibrated levels or to the external Input Level controls on the front panel.
The large display at the top center of the front panel features readouts for both decks, including individual level meters, time displays, ID indicators and more. There are a few display controls directly below the display. The Counter Mode chooses between four time-display modes: Counter, Absolute Time, Program Time, and Remaining Time. The Reset/Memo(ABS) key resets the counter to zero when in the Counter display mode, or stores the current absolute time to an autolocate memory location when in the Absolute Time display mode. There are Counter Mode and Reset/Memo(ABS) keys for both decks. Each deck has margin indicators on the display (which actually share display space with PNO indicators). The Margin Reset key resets the margin indicators when in the record mode. During playback, pressing and holding this key displays the current margin levels on each deck. The Select 1/2 key is used to select which deck various menu functions will be applied to. Large indicators appear on the display to show which deck is selected. A headphone jack is provided on the front panel with level control. A switch permits selecting headphone audio from Deck 1, Deck 2, or a Mix of both.
What’s On the Menu?
The menu functions are accessed with a set of controls at the bottom center of the front panel. Sixteen parameters can be set for each deck. Set the Skip ID function on or off. Set the Single function on to cause the unit to enter the Play-Pause mode each time a Start ID is sensed. This is much like the Single Play mode of some CD players except that the 302 will play back a half-second or so of the next program before backing the tape up a bit and entering the Play-Pause mode. The Repeat Mode can be set to Off, All, or Single for repeat play of all programs on a DAT or a single program. The autolocate memory point mentioned earlier can be edited in the menu mode. Start IDs can be written manually on the fly and can also be written using menu functions to set the Start ID more accurately (within 5 frames).
Program Play is on the menu. Up to fifty program numbers can be programmed for playback on each deck in any order. An Error Rate display is available for both decks. This is a handy way to check and see if a tape is bad or if the deck needs cleaning. The DrumT menu selection displays the deck’s drum rotating time since day one—used for maintenance scheduling or for finding out just how used a used machine is!
The digital format is selected from the menu (S/PDIF or AES/EBU). The Copy ID selection sets restrictions on digital copying. Digital copying can be completely prohibited or just one generation can be allowed. Or the prohibit function can be removed altogether. Peak Hold for the level meters can be set on or off. The display brightness can be set to Dim, Normal, or Bright. A Seqtime parameter lets you set the absolute time at which deck 2 will start during continuous record/playback functions. When another DA-302 is connected and in the continuous record/play mode, this parameter will send a start signal to the connected unit. In this same situation, when the Loop selection is set to On, continuous record/playback will loop back to the first deck when it’s through with the last deck in the chain. Finally, the Cascade Output signals are selected from the menu between the input signals and the playback output signals, as mentioned earlier.
Dub Mode
DAT to DAT dubs are what the DA-302 is all about. Press the Dub Mode key to set the mode between High, Normal, Program, and Append. Red indicators light in the otherwise amber display to easily show that the unit is in the dub mode. To make an exact duplicate of a DAT, either the Normal or High dub mode can be used. This is digital dubbing, so the quality is not affected by the speed of the dub. High speed dubbing is twice normal speed. When copying a tape recorded in the Long Play mode, high speed dubbing is four times normal speed. When the Dub Mode is selected, a red LED flashes next to the Dubbing key. Press this key to begin the dub. Both tapes are rewound and dubbing begins. During normal dubbing, the audio is output at both the digital and analog outputs. During high speed dubbing, audio is only present at the analog outs. When a tape recorded in Long Play mode is being dubbed at high speed, no audio is available at either digital or analog outputs. Normal speed dubbing makes sense when you want to hear what is being dubbed. Otherwise, the high speed mode is the way to go.
The Append Dub mode permits dubbing from any point on one tape to any point on the other. It’s the same as the Normal Dub mode above except that the tapes are not rewound first. The high speed mode is not available in the Append Dub mode.
The Program Dub mode is handy. This mode allows you to program up to fifty programs on one DAT that will be recorded in any sequence to another. When started, the left deck will search out the first program. When located, the dub begins. When done, the second deck enters the Record-Pause mode and waits for the first deck to locate the next program in the sequence, and so on. The second deck knows to stop once the first deck senses the next Start ID. Then it stops recording, backs up a couple of seconds, and enters the Record-Pause mode while the first deck begins its next search. This function can be used to select, let’s say, your favorite promos for a demo from your master DAT and dub them to another DAT…while you work on something else. Pull selected spots from a commercial master for a specific client. Again, dubbing occurs without user interaction, and programming is fast and easy.
Remote Control
If you like kicking back with your feet on the desk while operating your equipment, the DA-302 gives you a wired remote control. You get about fifteen feet of cable attached to a remote control about the size of most large VCR remotes. There are 54 keys on the remote. Each deck has its own transport controls, counter keys, Standby key, Sampling Monitor key, and Locate key. Pressing the Locate key locates that deck to the time stored in the Memo(ABS) memory. The Dub Mode and Dubbing keys are also brought to the remote.
A set of keys at the top of the remote provide full access to the menu functions. The ID Mode and Auto ID keys are available on the remote as are the Margin Reset and Select 1/2 keys. A numeric keypad and two Start keys (DAT 1 and DAT 2) provide access to programs without pressing the Skip key twenty times to get to program #20. Press 2, 0, and the Start key for whichever deck has the DAT. For this reason, the remote is necessary as there is no keypad on the front panel. One advantage of the remote being wired is that, if you prefer a keypad on the front panel, the remote can be mounted next to the front panel with two-sided tape, Velcro, or some other means. Since there’s no infrared receptor to aim at, the remote can be mounted without concern for which way it’s pointing.
Summary
I’ve used nothing but dual-deck cassettes for at least the past ten years. I like the convenience of making two dubs at once and dubbing from one deck to the other, especially at high speed. The DA-302 is the DAT counterpart to its analog cousin. It’s easy to use, and a brief visit with the manual will have you familiar with all of its functions in no time. If your studio uses DAT a lot, the DA-302 will certainly come in handy. If you need high quality, extended recording, like recording entire shows for air-check purposes, two DATs in Long Play mode provide eight hours of continuous recording.
On the downside, there is little to mention about the DA-302. There is a rather long delay between hitting Play and getting audio. Most DAT decks tend to begin playback a second or two after Play is pressed (when cued to a Start ID). The DA-302 takes about three seconds to output the audio. Also, when recording, and you make a mistake and want to go back and re-record a program, the DA-302 doesn’t reset its Start ID auto-number register. If you’re recording program 3, for example, and press Stop during the recording and want to re-record that program at the point of the original Start ID, you must first press the Standby key (to enter Play-Pause mode) then the backward Skip key to cue to the original Start ID for program 3. When it gets there, the unit enters the Play-Pause mode. To enter the Record-Pause mode, you must press Stop, then the Record key. When you press Record and Play to begin recording and input the source audio, the auto-number function writes ID #4 instead of 3. The workaround is to use the Renumber function (which is time consuming, especially if you’re into high program numbers). Or, you must go back to the Start ID for program #2, let the unit register that ID, then go to the end of program 2 and begin recording program 3 as if from scratch.
The DA-302 feels sturdy. Eject buttons for each deck open the doors without much delay, and once a DAT is inserted, the doors can be quickly and firmly shut with your hand, as opposed to dealing with an Open/Close function. The transport mechanism was surprisingly quiet and smooth, though sluggish at times. For example, after recording, I often press Stop and backward Skip to quickly audition or cue up to the recording. The DA-302 takes a couple of seconds to get out of the Record mode after Stop is pressed. If you press the backward Skip button during those two seconds, the unit will not store that key-press and execute it when ready. Instead, you must wait until the unit is fully out of the Record mode before pressing that key.
Specs on the DA-302 include an S/N ratio >89dB, THD <0.007%, channel separation >85dB, and a typical frequency response of 20Hz-20kHz at 44.1kHz and 48kHz sampling, and 20Hz-14.5kHz at 32kHz sampling. Quantization is 16-bit linear in Standard Play mode and 12-bit non-linear in Long Play mode.