
USER REVIEW by Todd D. Boss
It's the age of digital audio workstations, or should I say the age of dreaming about using a digital audio workstation for those of us resigned to work in smaller markets or markets where the funds don't flow. We've seen all the big names and drooled over the glossy color photos of the big workstations in the trade magazines, only to lose the dream when we found a price tag of $25,000 to $35,000 attached. We headed back to our analog studios with the GM's laughter ringing in our ears.
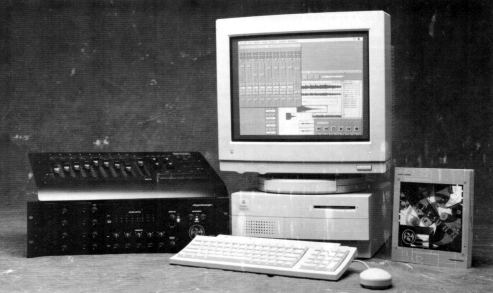
Well, thanks be to the gods or a lucky twist of fate, a little over a year ago, my analog 8-track finally bit the dust at about the same time the station owner/GM was in the process of purchasing another AM/FM combo. We knew we had to get serious about our production capabilities. That's when I called John Francombe and Doug Dyer at Sound Thinking in Portland, Oregon and found the Session 8 by Digidesign. Session 8, in my opinion, is the most powerful personal digital recording system ever introduced for the home, project, or small market studio. Finally, a complete 8-track digital audio workstation is within the price range of the small market station.
A complete Session 8 system, featuring direct-to-disk multi-track recording and digital audio sequencers can be yours for under $10,000. It's PC or Mac based with 16-bit resolution, a sampling rate of 44.1 or 48 kHz, a signal to noise ratio >93dB, and an audio interface with twenty ¼-inch and four XLR analog inputs, eight ¼-inch analog outputs, four additional inserts and a 10x2 analog sub-mixer on the input side. The digital in and out is handled through an S/PDIF port and is processed with the Motorola 56001 digital signal processor. The program software is stored on the computer's "C" drive while all of the sound files are stored on the external SCSI drive. (The size of the SCSI determines how many minutes you can record before needing to archive or dump the disk. Digital audio uses five megs per mono minute at 44.1 kHz.) The session 8 can also be ordered with the optional Digidesign R1 remote controller, which provides hands-on control for your Session 8 system with transport controls, faders, autolocaters, and assignable function keys. This sophisticated controller is a powerful alternative to mouse control. Sounds like a lot of stuff, right? It is.
Is this system complex? No. When I called John and Doug at Sound Thinking and ordered my Session 8 -- a turn-key system including a 486 DX/33 PC and a 1.2 gigabyte SCSI drive -- they brought it to me at 8 p.m. on a Friday night. After setting it up quickly and showing me the basic controls, they headed off to the hotel to get some sleep before my "real" training session the following morning. When we met back at the station the next day, I had already produced four spots that I needed on the air that weekend. If you have a basic knowledge of Microsoft Windows, your learning curve is very shallow. In the year and a half I've been using the Session 8, it has yet to let me down. In retrospect, I don't know how I handled the outside agency work and my station's work load without it.
The first thing you have to do once you have the Session 8 is decide what setup you need. Two are available: Internal Mix mode and External Mix mode. With the External Mix mode active, you have an eight-in/eight-out system and must route all of your effects and processing equipment through your analog board (assuming you don't have a digital board). In this mode, the Session 8 handles just like an analog 8-track, with the exception of track slipping and non-destructive waveform editing. You still record direct to disk, but keep in mind you not only record your source's inherent analog noise (however slight that may be) but the analog board noise as well. Even with this in mind, you might still feel more comfortable with your old analog controls.
In the Internal Mix mode, you have almost unlimited options. In the Internal Mix mode, the Session 8 opens up to the Route window. From this window you route in your mics, effects boxes and processors to one or more of the available eight tracks. If it's a digital source, like a CD or DAT (and you wish to stay in the digital domain), it must be routed to channels 1 and 2 by assigning them to the digital I/O. This screen looks like a grid map. Just click with your mouse, in the corresponding box, and the source you are recording from is routed to the desired track. In this window you also drop in your inserts like compressors and effects to the source you are recording from. Once you have assigned all your sources to the proper tracks, click with your mouse on the Mix icon or press "M" on your keyboard, and Session 8 jumps to the Mix window without hesitation.
This window looks just like an 8-track mixing board and makes tracking and mixing simple. Because Session 8 is disk based, it has features not possible on tape based systems such as unlimited track bouncing (without generation loss) and the ability to load and unload tracks to try dozens of alternate takes, to name only two. There are eight faders, four assignable fader groups, four pre or post fader effect sends per track, and eight returns, each with four effect sends. There are six parametric EQs (you can assign up to four per track) and a separate cue mix. At the top of the screen are the play, record, fast forward and rewind buttons. It should be noted that these controls remain accessible to you in all three windows -- Route, Mix and Edit -- and allow you to play or record at any time. Once you have turned on the tracks to be recorded, simply click on the record button; when it flashes, push the space bar or click on the play button and the Session 8 is now recording. A simple press of the space bar stops it. If it's the take you want, save it. If not, simply click on the record button again; Session 8 automatically deletes the unsaved take. Now, here is where it gets fun. Once you have everything you need for your spot recorded on the disk, move to the Edit window. Click on the Edit icon, or hit E. Session 8 now jumps to the Edit window.
Think of Session 8's Random Access Editing window as a sequencer for digital audio. It's here that you do most of your work. Cut, paste, move, and rearrange your sound files with speed and precision. Edit music beds, rearrange the VO, place the phone ring SFX in just the right place, make pauses or remove pauses, all with the click of the mouse and, voila, the perfect spot. By double clicking on the sound file in the Edit window, you can create the waveform or overview data. When doing this, you can choose a different color for each sound file -- black for the music bed, blue for voice #1, green for voice #2, and so on. Once you have the overview data, you can edit out any dead space in the front of the sound file. Remember, this is non-linear and non-destructive editing. Nothing you do in this window is permanent, so have fun. Move it from track to track effortlessly and place your sound effects exactly where you want them. This window uses three basic tools and three views. The tools are zoom in and out, waveform select for looping and creating fades, and the pointer, used to move and edit sound files. You can also separate or capture a smaller portion of a recorded sound file, without destroying the original, and move it to another track, or use the captured section instead of the original. The Edit window also offers other options. You can record in this window the same way you record in the Mix window, with the exception that you do not see your input level, only the time line.
Using the punch-in and out feature you can re-record over bad portions of a track such as an incorrect price, address, etc., or use this feature to make donuts that are always 30 or 60 seconds -- no more guess work. Just put your marker where you want it, click on punch in/out, and lay it down. Also in this window you can change the time grid. With the grid off, you see seconds at the top of your edit screen. For music edits, click on the grid bar and choose Bars/Beats, quarter-notes, eighth-notes or sixteenth-notes. Now, when you move a sound file, find the downbeat and drag it (in the quarter-note mode) four beats up or down your time line, and you have a perfect seamless edit. Or use the automatic fader. Simply highlight the sound file or files you want to fade in, out, or cross-fade and choose the type of fade you want. Session 8 automatically does a perfect cross fade that stays in time, a perfect fade out of a sixty second bed you're using for a thirty second spot, or a waterfall sound effect that fades in AND out at exactly the rate and time YOU want it to. Once you've placed all of your sound effects, music beds, and VOs where you want them, return to the Mix window.
Now you can add up to four EQs to each channel, adjust your levels, and send it to reel or cart with the press of the space bar. After you've made all the dubs you need, you can archive it to DAT in stereo through the digital I/O and keep your playable master in the digital domain. If it's a complicated spot or promo, you can save the whole session to DAT. Everything! This includes information such as when it was recorded, who the voices are, what CD the music came from, and so on. When you recall a saved session back to the Session 8, it puts everything back where it was -- the VO on its track, the bed and effects on their tracks. If a spec spot sells but needs a quick change in the copy before it goes on the air, you can edit the track without having to recreate the whole session. Simply recall the session from DAT, set your punch-in/out points, and record. You're happy you didn't have to start from scratch, the client gets the same spot he heard on the spec cassette, and the salesperson and the station make money.
As you can see, the Session 8 offers a lot of what the high-end boys are offering with the exception of the price tag. And I've been pleased with the service from Digidesign, the service you're going to need with your first digital experience. When I first received my Session 8, it didn't have pre and post effects sends. They were all post. This didn't work too well when doing a pitch transposition through my effects box, so I called Digidesign and explained this to them. They told me they had designed the Session 8 for the musician, but because a lot of small production houses were using it, they changed the software. Now it has a pre or post option. I'm also told that sometime in the near future, Session 8 will receive a new update to include sound file compression and expansion. As it is now, if you have the perfect read, but it's :31, you have to re-read it or go back and edit out dead spots. Editing out dead spots doesn't take long, and you can usually take two to three seconds off without it sounding bad.
Overall, how does the Session 8 work? Like a stallion. As you know, station IDs get old quickly. Using my Session 8, I can, in a matter of minutes, take two station IDs and make one new one from them. ID #1 says, "Serving over 35,000 square miles, we are Power 93 KTMT." ID #2 says, "The station for winners, Power 93 KTMT." The new one says, "Serving over 35,000 square miles of winners, Power 93 KTMT." Now, instead of two IDs, you have three. If your liner guy sends you twenty-five dry voice tracks, imagine the possibilities. You can make dozens of IDs, keeping the station sounding fresh and keeping your PD happy. Using the punch in/out feature, those dreaded updates -- "starts Friday," "starts tomorrow," "starts today" -- become a breeze to perform, without re-reading the entire voice track.
I also do a lot of agency field audio for television commercials. I record to a portable DAT then dump the audio digitally to the Session 8 back at the studio. When the director is editing the spot at the local TV station, he calls and tells me what takes they need. I dump them digitally back to DAT, and it's first generation audio on the air! Due to the quality of the digital format, this service has really taken off. We also use the Session 8 for basic video looping. The agency brings in the talent and a 3/4-inch dub of the video. Then I run the video to a monitor in the sound booth for the talent to see while recording the VO to disk. This way the agency can change one price or point in a produced spot without having to start all over. Don't get me wrong; it's not the same way they do it in Hollywood, but it works, and works well, and it brings in extra cash that the station didn't have before. And remember, the more the station makes with your toys, the more toys the GM will be willing to buy you.
Here's another selling point you might try with your GM. When I first moved from overnights on the air to the analog 8-track production studio, it was about a year old. We were getting from $300 to $500 a month in outside agency work. Since we have installed Session 8, my production billing has doubled. This year, I expect it to do so again with the help of the field audio. That's dollars in the pocket! Add it up; in less than two years, it has paid for itself, and the station gets to use it FREE!
We still have a one-man production department, me, for four different radio stations. I do all the in house spots, spec spots, and outside agency work, and I do all the billing. Because the Session 8 works in Microsoft Windows, it can multi-task. While I'm dubbing from the Session 8, I switch to Microsoft Works and print out the bill and tape labels. This does not affect the quality or speed of the Session 8 and means I can get my clients in and out in the least amount of time. They're happy it didn't take a lot of time which saves them money, and I can turn out high volume which makes us a lot of money.
If you're tired of staring glassy eyed at all those color glossy photos of everybody else's workstation, consider the powerful and affordable Session 8.
♦