
by Michael R. Lee, Ph.D., Robert Lee and Jerry Vigil
 Digital recording has at once excited the imaginations and passions of radio broadcasters while at the same time has confused and disappointed them. A version of the "tapeless" tape machine is currently available from fifty-two different manufacturers. Each of them now has a very serious competitor. It's the brand new DDR-10 from Otari.
You get the quietest recording on earth -- 92db signal-to-noise with none of the "crunch" we associate with digital. You get the ability to accurately edit a single syllable of a word or perform edits to a music bed like no razor can. If you don't like the edit, it's no problem. Editing is non-destructive. You get digital signal processing with five band graphic EQ, an unlimited parametric equalizer, digital compression/limiting, expansion and noise gates. You get time compression, automatic fading and more. You get all this with an operating system that allows you control never known before, and you get it at an affordable price.
All that being said, the major limitation of the DDR-10 is that it is essentially a two-track device at this point. But don't let that fool you. Random access recording has many more applications in a 2-track format than it does in multi-track. If you're expecting speed as an advantage, like most other hard disk systems, the DDR-10 sacrifices quickness for an affordable price. In every other respect, the DDR-10 makes the best analog machines seem like toys.
At the heart of the DDR-10 is the Sound Tools disk-based digital recording and editing system from Digidesign. Sound Tools was introduced in 1989 and now boasts over three thousand users worldwide throughout the music, film, video, and TV industries. Now, Otari presents Sound Tools in a design more suited to radio production. Otari licensed key hardware components and the software system from Digidesign and brought the components together in a cabinet which sports a "broadcast friendly" control panel unique to the DDR-10.
To understand the DDR-10, it is helpful to first identify the major components.
Sound Designer II Software: This is Digidesign's operating software for Sound Tools and the DDR-10 and includes a sound accelerator board that plugs into a NuBus slot. When software improvements come along, you need only boot up the new disk. All pre-existing material is preserved intact.
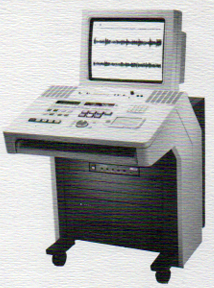
MAC II computer: This is the only family of computers that will operate the Sound Designer II software. Otari supplies a Mac II ci with 5 megabytes of RAM with the DDR-10. There is a computer keyboard which slides in and out of the cabinet and is used mainly for naming soundfiles. The keyboard also accesses many of the options available from the system, however the most used functions have been transferred to the control panel. The DDR-10 comes with a 19-inch, 2-page monochrome monitor. You don't need color, and monochrome has greater definition.
Hard drive or magneto optical (M-O) drive: This is the external drive to which you write your data, or sound. Unlike most other digital recording manufacturers, you can use any hard drive that has access time faster than 28 milliseconds. Thus, there are dozens of options in hard-drives. One of the leading suppliers for this application is Eltekon Technologies. Their rack-mounted hard-drives are fast, reliable, quiet and favorably priced. Eltekon has long been at work on a magneto-optical drive for the Sound Tools/DDR-10 systems. In fact, they are now back ordered on MX2D M-O drives. The advantages are considerable because you write to an erasable, replaceable cartridge. Load time of an hour's worth of stereo material (600 meg) takes about seven seconds instead of an hour. The cost should be only about twenty-five percent greater than a hard drive. Since you currently cannot store the names of each soundfile on DAT, magneto optical drives offer another advantage.
One more piece of advice on hard drives: Get the largest that you can afford. Six hundred meg or one gigabyte drives reduce the need to unload and load data so often, thereby saving you valuable time. The DDR-10 comes standard with a 345 meg hard drive. The upgrade is strongly recommended.
Pro I/O: This is where analog-to-digital conversion (using 64 times oversampling) and digital-to-analog conversion (8 times oversampling) take place. The sonic quality is brought to world-class standards by its Apogee filters which are used only in the most rigorous digital recording systems. The DDR-10 supports four sampling rates: 48 kHz, 44.1 kHz, 44.056 kHz, and 32 kHz. The Pro I/O is also where you bring analog audio in and out of the system using traditional +4dBm active balanced I/O's with three pin XLR connectors.
DAT I/O: This is used to back-up data digitally to a DAT. When your hard disk or magneto optical disk is full, you can dump the data via an AES/EBU or SPDIF port directly to the DAT. Since this is data transfer, it bypasses the A/D and D/A converters in the DAT, which are of much lower quality. When you play back the DAT, it sounds virtually identical to the sound quality on the DDR-10. The drawback to DAT back-up is that it loads and unloads in real time. To off-load an hour of data takes a full hour. Could this be the beginning of a lunch break in radio production?
Controller: The last major component of the system is the large, dedicated control panel of the DDR-10. This is where Sound Tools ends and the Otari DDR-10 begins. The controller eliminates a great deal of the "mouse" work necessary to run the program by combining various key strokes and cursor movements into the push of a button (macros). The result is a more "broadcast oriented" approach to the Sound Tools system.
This dedicated controller is dazzling with a ninety-nine point autolocator, current and event time with SMPTE frame display in an LED format, full transport functions, fifteen dedicated or assignable function buttons, and a metal, sample-accurate scrub wheel. A Top Of File button performs instantaneous rewind to the beginning of a sound file similar to the common Return To Zero functions of analog recorders. An Input/Repro button selects whether the DDR-10 monitors the source or a recording on the disk. In and Out buttons select "regions" of a soundfile to be cut, copied, pasted, replaced, or stored for future editing. The Scrub/Scroll and Jog/Shuttle buttons define the operating modes of the data wheel which lets you "rock" the audio just as you would with an analog reel-to-reel deck. Three Mode Select buttons enable easy switching to the three most used functions of the Sound Tools program.
While many of the DDR-10's functions are controlled by buttons on the control panel, there is still a notable amount of "mouse work" to be done when moving through the different screens. However, there is no mouse to use. Instead, the control panel of the DDR-10 offers an "Un-Mouse" which is a stationary, touch-sensitive panel. Simply touching this panel and moving your finger in any direction will move the cursor on the screen in the same direction. The Un-Mouse performs the same functions as a mouse but takes up less room to operate.
Without question, the control panel of the DDR-10 is the unit's single biggest advantage for broadcasters. Indeed, it is an advantage over every other hard disk recording system on the market. Last but not least, the controller for the DDR-10 is ergonomically designed with the broadcast audio engineer in mind.
Having established that the DDR-10 is a formidable soft-ware/hardware system, the next part of this review briefly details how you use it. Though popular mythology suggests that it takes weeks or months to learn the system, it actually takes a few days to a week. While the learning curve is not as short as that of a basic analog 2-track recorder, it is not as long as one might expect for a system that offers so much power. The control panel of the DDR-10 and the straightforward operation of the Sound Tools program are largely responsible for this shortened curve.
There are two primary screens or modes where most work is performed: the Tape Deck mode where recording takes place and the Waveform Edit mode where the majority of the editing power of the DDR-10 occurs. A third mode, the Playlist mode, is where saved "regions" of a soundfile are selected and manipulated. Rather than editing two sections of audio together in the Waveform Edit mode, the two sections can be defined as separate regions and "sequenced" in the Playlist mode.
Tape Deck Mode: This is where the magic of real-time, hard disk recording occurs. Levels are set using two bargraphs on the screen and there are on-screen buttons that emulate those of a tape machine. These transport buttons can be used with the Un-Mouse or you can use the transport buttons on the control panel. There is also a monitor button on-screen that allows listening while recording. If the monitor button is not selected, the output is muted during recording. This is very handy if you use an I/O module of your console to monitor the DDR-10. You can leave the faders up while recording, and no feedback will occur. Once recorded, the soundfile is ready for playback and editing in the Waveform Edit mode.
Waveform Edit Mode: When your recording is completed, click the "Done" button and prepare for the core of Sound Tools and the DDR-10 -- the Waveform Edit screen. This is a highly manipulable mode with the ability to make numerous changes to previously recorded material in the digital domain. The Waveform Edit screen appears after the recorded material is saved to disk. This can be a slow process if the file is long and the disk is severely fragmented. (You would be wise to keep any unneeded material off the drive.)
One distinct drawback of the playback function is a two second pre-roll that makes it difficult to manually start playback at a precise moment. This problem can be solved by using the provided Live List program which lets you select individual sound files for "instantaneous" playback.
The speed of fast forward and rewind depends on how much material you've recorded. It's very slow when you've recorded 20 or 30 seconds and very fast when you've recorded two or more minutes.
The initial function to perform after recording is a Trim, where you literally edit the beginning and end of the recorded material. This allows you to save needed space on the disk. Visually, trims and edits are easy to perform. All material becomes a waveform, which can be enlarged many times on-screen to assist editing. The control panel of the DDR-10 allows you to perform these functions with a scrub wheel and In and Out buttons.
Editing with Sound Tools and the DDR-10 is unlike anything in the analog domain. Edits are technically perfect. Gone are ticks, pops, gaps, drop-outs or other artifacts that can occur in analog. The editing described above is essentially destructive editing, although you can always undo your last edit. If you use the optional Back-Up File function, all editing is non-destructive. However, it takes time to create the back-up file. Another caveat is that the edits themselves take time, especially at the beginning of a file. Expect to wait a minute or more for an edit that's made to the beginning of a three minute soundfile. At the end of the file, editing gets faster. When doing heavy editing, make the soundfile as short as possible.
The DDR-10 also provides quick and effective linear fade-outs in the editing mode. You set begin and end points on screen. One click later, a super smooth fade is yours. Any portion of any sound may be reversed, and any number of reverses may be applied to any soundfile. You may also change the volume of any portion of any soundfile. Another option is to create "digital silence," something akin to the ultimate leader tape. Once you hear it, you'll understand why there is no silence like digital silence.
Playlist Mode: A quicker method of editing, which is ideal for music or spots and promos that are built in discreet segments, is non-destructive Playlist editing. Like a sequencer, it allows you to chain a variety of pieces together in any order you like. Using the familiar edit start and end points, you capture a region and name it. After capturing other regions and storing them in playlist memory, you drag each region (using the Un-Mouse) to the playlist box in the order you want them to play. If the edits or transitions aren't smooth enough, there are six different crossfades to help the process, and you can set the crossfade time to your liking.
Digital signal processing: What separates the men from the magpies in disk-based digital recording is signal processing. Equalization, compression, expansion, noise gating and time squeezing are all available on the DDR-10. Auditioning of the graphic and parametric EQ's is real-time in that you can hear the changes you're making, but any changes you decide to keep take a while to perform because the soundfile has to be re-written to the disk. The compressor/limiter contains all the expected parameters -- attack, release, ratio, threshold, etc. It works very well in a limited dosage. Brute-force, heavy compression sounds like just that. The expander, operating in the opposite fashion of the compressor, is of rather limited use in radio production. The noise gate works well and is more helpful but is generally used for cleaning up music tracks in a multi-track environment.
Time compression and expansion sound best on voice-overs. Complex material (such as music) tends to pick up some objectionable artifacts, especially if duration is more than a few percent. Time compression/expansion takes the system quite a while to perform and can't be auditioned prior to the changes.
Cost: The Otari DDR-10 is sold only as a completely bundled system. With a 345 meg external hard drive included, 5 meg of RAM for the Mac II ci, and the 19-inch monitor, the professional user price is $19,990. If you're willing to sacrifice the control panel of the DDR-10, you can have the same system by purchasing the computer components separately and installing Digidesign's Sound Tools in the system. J.L Cooper has released the CS-1 Control Station which emulates some of the functions of the DDR-10's control panel on a much smaller scale. Because Sound Tools offers you more flexibility in acquiring a computer, hard drive and monitor from third parties, its price is more difficult to pin down exactly. The best estimate for a system equivalent to the DDR-10 is about $16,000, or a $4,000 difference.
The DDR-10 offers three major advantages over Sound Tools: 1) a much more elaborate controller, 2) full SMPTE implementation, and 3) the heritage Otari has in the broadcast markets. On the other hand, Sound Tools gives you all the necessary firepower you need, offers greater flexibility in designing your own system, and comes from one of the top companies in this field.
Accessories: There is a wide array of helpful add-ons developed by Digidesign for Sound Tools and the DDR-10. Q-Sheet A/V is probably the best among them. Through MIDI, it allows you to "fly-in" sounds right on SMPTE cue from any external sampler or synthesizer that has MIDI. The recently released Sample Cell provides a state-of-the-art digital playback sampler that is hooked in via a NuBus slot on the Mac II. You can get up to 8 meg of RAM with eight separate outputs on each Sample Cell and may line up to eight Sample Cells together. Other software programs allow you to write your own P & Q subcodes for making compact disks and a limited version of 4- track recording via the DECK program.
Conclusion: Digidesign and Otari are going to make 1991 very uncomfortable for the fifty plus other companies that manufacture digital recording systems. Otari's entrance into this field will make broadcasters feel even safer with the system, which is manufactured in the United States. As magneto-optical drives become available for these systems, they will have another advantage over the competition.
The novice user of hard disk based digital recording systems may find the DDR-10 somewhat intimidating at first mainly because there are so many functions available with the Sound Tools system. For example, the DDR-10 has the ability to zoom in on a piece of audio so close that the entire screen fills up with the waveform of a sound as short as the snap of your fingers (and even shorter). Furthermore, you can switch to the "Draw" mode of the cursor and actually redraw the waveform, altering the sound in the most elementary way. There are powerful MIDI and SMPTE functions we didn't even bother to get into. The point is that many of the functions of the Sound Tools system of the DDR-10 probably won't ever get used by someone in radio production, and you shouldn't be intimidated by their presence. The most commonly used functions are easy to use. Even someone with limited experience in digital editing can perform basic recording, playback, and editing without picking up the manual.
Sound Tools, with its three thousand plus users worldwide, is obviously the most popular disk-based digital recording/editing system available. Otari has simply taken this powerful system, complete with all of its many options, and brought forth on the DDR-10's control panel those functions that will most apply to radio production, both today and in the future.
What the DDR-10/Sound Tools system really provides is a total replacement for any two-track analog tape machine. Think of it as providing the best sonic quality you can imagine with impressive digital editing. Think of the DDR-10 as easy to operate and affordable. And think of it right now, because analog two-track recording is fast becoming prehistoric.