 The S-900 has been around for about two years and still maintains a status of being one of the more popular samplers. When introduced, the unit listed for around $3200. Prices are now around $2700. You can find this price discounted if you do some shopping. Do a little more shopping and you might be able to find a demo model for around $1700.
The S-900 is a 12-bit mono sampler. With a variable sampling frequency of 7.5kHz to 40kHz, the frequency response tops out at 16kHz. Internal memory is 1 Meg, giving you recording time of about 12 seconds at a 16kHz response. Most sounds, that would be used in production, can be sampled with a frequency response around 12kHz or less. This frees up memory and allows for around 20+ seconds of quality sampling time.
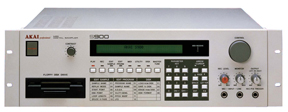
This is an 8 voice sampler with outputs for each along with stereo outs and a mono mix output. Inputs are on the front for either mike or line. The two line liquid crystal display offers "user friendly" step by step instructions for each of the functions and serves as a VU meter when recording. If you're familiar with sampling, you will find the S-900 fairly easy to use. The large control knob speeds up the editing process and helps eliminate some of the button pushing.
There are 8 functions on the sampler, each selected with one of the 8 buttons on the front. The functions are: play, record, edit sample, edit program, midi, utility, disk, and master tune. The four most used functions are record, edit sample, edit program, and disk. Here's a brief rundown of the features on each of these four functions:
RECORD: First you name the sample. After entering a name you page down in a step by step process that sets the sampler up for recording in just a few short steps. You have options to select the sample as a "normal" sample, a "soft" sample, or a "loud" sample. The soft and loud options refer to usage with a velocity sensitive keyboard. The next step is to specify the audio bandwidth. This is the variable sampling frequency control. You can adjust the bandwidth from 3kHz to 16kHz. After setting the bandwidth, you set a recording time. The LCD shows you the maximum time available relative to the amount of memory available. You then assign the sample to a specific key on the keyboard. The next step is to set the record trigger: 1) start recording when any key on the sampler is hit, 2) start recording when a footswitch is hit, or 3) start recording when a preset audio threshold is reached. For most samples, all of these settings can be made in less than 60 seconds.
EDIT SAMPLE: This function gives you 12 pages of options. You will skip many of these for most normal sampling. Options include adjustments for loudness and pitch of the sample. Choose from 3 replay modes: "one shot", "looping", and "alternating". If you're looping an intro of a song to make a music bed, this is where you select the "looping" function. You can then adjust the length of the loop to replay the entire sample over and over, or to loop just the last part of it. The loop length is variable. "Alternating" will replay the looped portion of the sample forwards then backwards then forwards, etc. This is handy when you want a sample to sustain at the end, such as sampled thunder. As you page through the steps, you set the sample start point and end point then discard the unused part of the sample to save memory. Other options allow you to splice two samples together or mix two samples together. For production purposes, the "edit sample" functions offer much more than you'll need for your average sample.
EDIT PROGRAM: After recording a sample or set of samples, this section is used to assign the samples to the key-board. Up to 32 samples can be assigned. Choose to span a sample across the entire keyboard or assign it to just one key. If you recorded "soft" and "loud" samples, the velocity crossfade function can be set up to play the "soft" sample when you strike the key softly and the "loud" sample when you strike the key hard. Strike the key with medium force and get both samples played back. Another function in this section is the ADSR envelope (Attack, Decay, Sustain, and Release). This is one of the most used functions of the "edit program" mode. MIDI assignment is done in this section as well as output assignment. You may choose to send the output to any of the outputs mentioned earlier. Add some other seldom used goodies and again you have more options than you'll need for production purposes.
DISK: The disk functions simply load and save samples and programs to and from disks. It's very easy to use and offers a constant readout of the percentage of memory and disk space that is in use.
The S-900, in terms of options, is more than enough sampler for radio production. If you look for a sampler without the many options found on the S-900, you will probably sacrifice memory as well. Memory equals recording time and the more you have, the more uses you will find for production. For the money, the S-900 is a good choice for radio production.
Akai is introducing the S-950 which has a 2 meg memory. It is still 12-bit mono and basically the same as the S-900 with the exception of twice the memory and a few added options. They also have the S-1000 which is the 16-bit stereo sampler. You'll pay for this one - around $6000.
Advice to those looking for a sampler: Do your homework and do some shopping. You'll want to get one that won't be out-dated to quickly. ♦