by Steve Cunningham
Last month’s article described how to set up what’s known as a localhost server on your personal laptop or desktop computer (see the June 2014 issue of RAP), allowing you to build a website without first renting space on a server and uploading that site to the public internet. We installed a “stack” of software to run the server, and we installed a copy of WordPress with which to build a site. So far, so good.
THE ENCYCLOPEDIA OF WP
Hopefully you’ve gotten your feet wet in WordPress, and have at least done some exploring. Even if you haven’t, what follows is the basics you’ll need to know to get started. The most important thing to know is where to find help.
The official repository for all facts about WordPress can be found in the WordPress Codex <http://codex.wordpress.org>. You’ll note that the domain is a dot-org, not a dot-com. That’s important, because if you go to wordpress.com you’ll be looking at their hosted service, which is primarily for blogs. You definitely want the dot-org.
Once there, all the information is highly searchable. Some of it gets a bit technical, so the following are some general tips to get you started.
GETTING STARTED
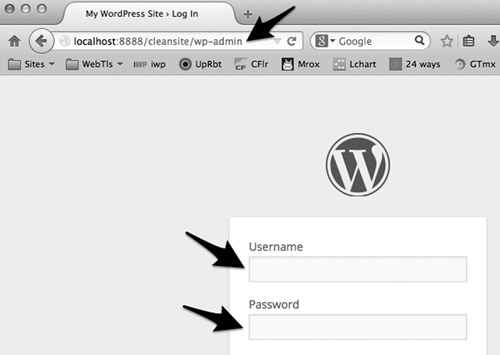
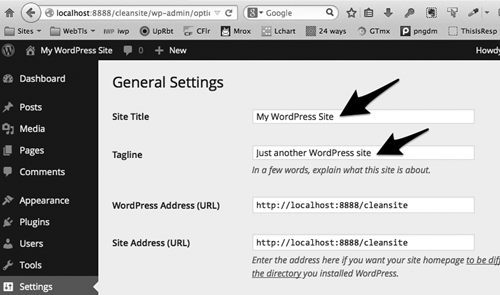
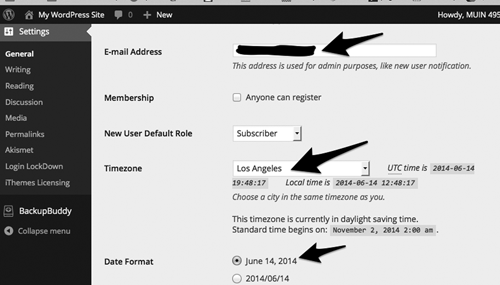
The first thing you will need do is log in to the administration page for your site to perform some basic configuration. You probably already logged in as part of the installation process. If not, just type in the URL for your new site, which will likely begin with “http://localhost...” (because we’re on a “local” site on our computer, and possibly have a 4-digit port number behind that (see Fig. 1) When the Dashboard opens you’ll notice a long menu on the left. Click General in that menu and when the General Settings window opens, enter a title for your site, along with a tag line (see Fig. 2). You can go back and change these any time. Next, scroll down and set the time zone where you are and pick a format for dates (see Fig. 3).
A word about how WordPress works with whatever content you wish to display on it. The appearance of a WordPress site is governed by the theme. A new site will have a built-in theme called Twenty Fourteen, which determines the overall layout, colors, fonts, and so on. WordPress can manage several types of content for you, including Posts, Pages and Widgets.
Posts are your basic time-driven content and are used for standard blog entries. You might write posts monthly, weekly, daily or more than once a day. It all depends on the purpose of your site and how you want to use it to connect with your visitors. In a standard blog, posts appear on the first page in reverse chronological order, but you’ll probably want to organize it a little differently. You will likely want a static home page, and have your regular posts appear under a different menu on another page called “News” or some such.
Pages are basically posts that aren’t time-driven -- they’re added to the menu automatically and serve as the basic structure of the content on your site. They are basically the same as any static page on a traditional website, but are a whole lot easier to create and update without having to pay someone to do it for you.
Widgets are those handy-dandy boxes you often see along the left or right side of a website. They don’t have to go on the left or right, because with the right theme you can put them anywhere. But in general that’s the way people think of them. They let you do really cool things like offer a newsletter subscription box, insert images and videos, put special calls-to-action, list your most recent posts, add easy navigation down the side of your page, or just about anything else you can imagine. Widgets are usually the visible part of WordPress plug-ins, which are discussed below.
PICK A THEME
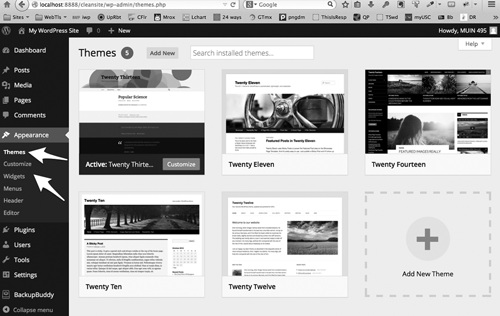
You’re now ready to pick a theme for your site. If you click on the Appearance menu, you’ll see all the options for themes and their options. Plan to spend some time auditioning them to find one that’s right for you. Click on Themes and notice the Add New button on the top left of the window (see Fig. 4). Clicking that will bring you a selection of the most popular themes as curated by the folks at WordPress. I highly recommend you stick with their themes, which are vetted for good code and no malware. They’re safe, they work, and there are several thousand of them on the wordpress.org site. In addition to those shown in the Add Themes area, more are available at <http://wordpress.org/themes>, and you can download these to your computer and add them to your site quickly from that Add New Themes area.
As you look at the themes, decide what features you want: a sidebar on the left, one on the right, or one on either side? A big open area for a picture on the home page, or lots of small areas for text and small pictures together? Check the fonts used in the theme -- are they formal or casual? Check the color schemes; there are often more than one available on a given theme. Don’t forget to check the options for every theme you audition -- these allow you to customize the theme without getting down into code.
Widgets are the spice on most WP sites (and many non-WP sites as well). How many areas for widgets are available on the theme you’re evaluating? How many widgets can go in an area? In most themes you don’t have to fill all the widget areas -- those areas that are unfilled usually just don’t show on the page.
PAGES AND MENUS AND WIDGETS OH MY
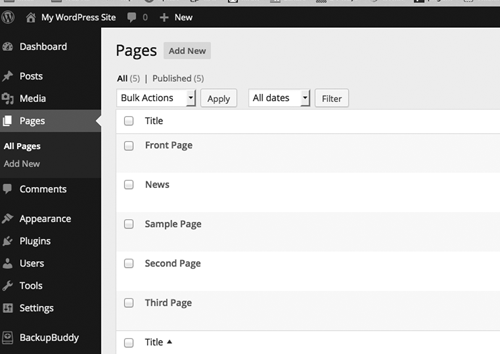
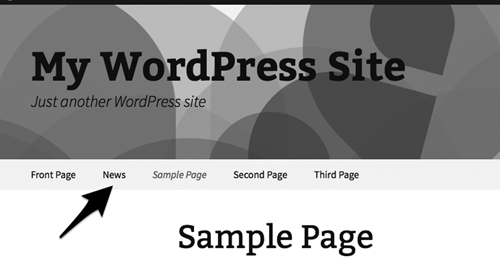
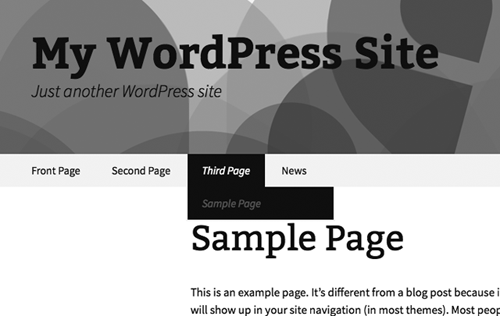
When you think you’ve found a workable theme for yourself, it’s probably time to address the actual structure of your content, and to tend to the navigation. The good news is that WordPress automatically adds a menu item for every page you add. Here I’ve just added a few pages (see Fig. 5), and you can see the menu WP creates by default (see Fig. 6). A quick trip to the Appearances-->Menus page allows one to reorganize those menus into something nicer (see Fig. 7).
I could write an entire article on plug-ins and widgets, and their usefulness on web sites. New plug-ins can be added directly from the Plug-ins-->Add New menu, or you can go shopping directly from <http://wordpress.org/plugins>. Again, you can download new plug-ins from wordpress.org to your desktop, and upload them directly into your localhost site (note: don’t unzip either themes or plugins you download from wordpress.org. WordPress wants you to import them as .zip files, and will unzip those files to their correct locations automatically).
With so many plugins out there it’s helpful to understand a little about how they’re organized and how the process works. First off, the WordPress Plugin Directory is the best source for free plugins. These plugins have been vetted by the WordPress community to ensure there are no malicious plugins or nefarious code in them. But that doesn’t mean every plugin in the directory works perfectly. Some will even break your site. But they are free... and sometimes you get what you pay for. Keep this in mind as you browse the directory. Some plugins might be several years old and haven’t been updated. They may work just fine. Or they might cause all sorts of problems. Just be aware of what you’re installing and don’t be surprised if you need to delete a plugin and find a new one.
It’s also a good idea to install one plugin at a time and check your site after each installation. That way if your site breaks, it’s easy to know which plugin caused it and you can go back and delete it. While many plugins are free, the person who created them put a lot of time and effort into developing them. Keep that in mind when you use a free plugin. It’s good practice to consider making a donation to the developer when you use one of their free plugins. This is a good way to say thanks and help them continue their development work.
If your free plugin isn’t working the way you like, remember what you paid for it when you ask for help. The developer is not obligated to help you out. Be reasonable when you ask for help and be thankful for what you get. If you do end up needing and getting support from a developer, that’s another good time to make a donation and show your appreciation.
Since there are so many plugins out there, it’s important not to overdo it. Each added plugin slows your site down. Some plugins will even overlap, with different plugins doing the same job. Try to minimize your plugins and only use the ones you really need. If you find you’re not using one, deactivate it and delete it.
Here are a very few select plugins that I add to every site I build: For obvious reasons, iThemes Security <http://wordpress.org/plugins/better-wp-security/>; for better Google juice and SEO, All In One SEO Pack <http://wordpress.org/plugins/all-in-one-seo-pack/>, and the one premium plug (that means it costs money) but is worth every penny, Backup Buddy <http://ithemes.com/purchase/backupbuddy/>.
Don’t forget that if you run aground, you can always start over because you’re working on your own computer -- drag that theme or that plugin into the trash and just start over. In a pinch, send an email to
SIDEBAR: WE GOT QUESTIONS
I have received some questions since we published part one; I knew this might be a bit far afield for an audience of audio production pros, and expected some. The most common question came from several Windows users, who wanted to know whether to use Xampp, WAMP or one of the newer stacks like WPM-XM, which substitutes Nginx for Apache for serving pages. The short answer is to choose one that seems most popular, so you’ll have users to help with support issues; this points to Xampp or WAMP. Between those two, the only difference is that Xampp is cross-platform from Windows to Mac to Linux. Otherwise they’re both popular and very similar, outside the minor differences in the user interface.
The most interesting question basically asked “why would you go through the trouble to install and configure all that stuff on your computer when you could rent server space for five or ten bucks a month and have it done for you automatically?” It’s a fair question.
There are several good reasons for creating a localhost engine. Some do prefer to go the rented server route. But they miss out on benefits:
Doing it all on your computer first lets you experiment freely and make mistakes, without having your entire site go dark while you figure out what went wrong. You can feel free to explore non-WordPress frameworks, like Twitter’s Bootstrap <getbootstrap.com>. There’s no uploading of files and folders -- heck, you don’t even need to be connected to the Internet. But if you’re working on a live online site, then every time you make a change, you’ll need to upload the changed file, clear the browser cache to see the newest version, check the results in the browser, note any issues, and repeat. It’s been my experience that the upload-and-check cycle can get old fast, and being able to simply copy a changed file into a local folder beats the heck out of firing up an FTP program and uploading. In addition, renting a server almost always means assigning that server a domain name, and wouldn’t we rather have a valid domain name point to a site that’s ready for public consumption, rather than one that is hidden or, worse yet, shows a “coming soon!” banner and nothing else?
Finally, putting a web site on the public internet makes it vulnerable to any of the millions of software robots that attempt to hack into a public-facing website, finished or not. This is particularly true for WordPress sites, but they are not the only targets for hackers. It doesn’t matter whether a site is built on a local computer and uploaded when done, or whether it is built on a public-facing server; when either goes public it will be attacked, full stop. Why not focus on the building in a safe place and lock it down before it goes online? It’s your choice.
♦

