
by Steve Cunningham
After a few issues wherein we’ve dealt with various forms of Internet esoterica, this month we’ll get back to the basics of assembling a serviceable audio editing station. Our specific goal this month is to investigate inexpensive plug-ins with a minimum of coloration or “character”. In other words, cheap plugs that sound good. It turns out I may have found some.
This month’s evaluation victims come courtesy of a company that originally acted as both publisher and distributor, with the unlikely moniker of Don’tCrac[k]. No, the [k] is not a typo; instead, it’s a nod to the old school label for software whose copy protection had been circumvented, and then distributed freely on the interwebz. More recently the publishing duties have been assigned to a company called Plug and Mix (or P&M for short), which is owned by the same folks that own the Don’tCrac[k] distribution firm.
P&M now offers a total of 40 different plug-ins, spanning the spectrum from work-a-day signal processing to specialized guitar amp simulation. They’re both inexpensive and generally good-sounding, and allow one to assemble a nice arsenal of processing that works across most every platform and editing program. Let’s take a look.
SO WHAT DO WE HAVE HERE?
Given forty plugs to examine, and given that guitar-oriented processors are not particularly useful in radio production and voice over work, it may serve to break out the plugs into categories. If one decided to buy everything P&M makes, one would end up with a total of thirteen guitar-oriented effects (including amp sims and distorters), six “sound design” processors that mangle audio, five dynamic processors and five EQs, and eleven time-based processors including reverb, echo, phasing and flanging, and bass enhancement.
We’ll tackle a few of the dynamics, EQs, and the best of the time-based processors in this evaluation. This is not to ignore all the others, but one can always download an evaluation copy from the plug and mix website (www.plugandmix.com) for a more personal check out. The demo restrictions are quite reasonable -- a demo plug will work for 30 minutes after which it will stop working, presets cannot be saved, and controls cannot be automated. However, you can get another 30 minutes of evaluation by removing the plug, re-launching your editor, and then re-installing the plug to make it active again.
Understand that with few exceptions, these plug-ins are one trick ponies. Their controls are simple, not always calibrated in standard units, and you’ll either like what they do to your track or you won’t. There are no fancy linear phase processors here, since these are not aimed at mastering engineers. They’re a bit like the Waves One Knob plug-ins that we’ve reviewed in the past, but with more character and more controls.
FIRST, THE TECH STUFF
I never tire of telling you, dear reader, that the installation process for a software product is simple and quick, which is precisely what I do tell you when it truly is both of those things. And believe me, when the process is something other than simple and quick I’ll be the first to unleash a well-deserved rant right here in print. However, the P&M series of plugs is about the simplest and quickest install I can remember doing, given that the forty plugs weigh in at about a half-gigabyte of disk space. While the instructions tell you to fire up your favorite editor, install an instance of a plug-in, then fill in a serial number in a box that will appear, I can tell you from experience that’s the hard way.
When you unpack the .dmg or .zip file on your computer, you’ll see three folders appear in a window. Open the first one, labeled “1) Install Your Software”, and just install the dang things. Then open the second folder, titled “2) Authorize Your Software” and run the enclosed installer (where you will need to enter a serial number from the confirmation email you got when you bought the product), and you’re done. The third folder contains the documentation in PDF format, which you can read at your leisure.
When I say you’re done, you’re really done. There’s no additional registration information, no additional auths to confirm, and nothing else. I installed the VST plugs first and authorized them as above. I then installed another format of the same plugs, and those were automatically authorized as well. It’s brilliant and, for a change, it just works. Here’s the best part: P&M allows up to five computers to be authorized from a single unique serial number. Yup, that’s five computers. So I’ve got these things on a Mac laptop, a Win laptop, a Mac desktop, and a Win desktop with one install left over. I like that a great deal.
While we’re on the subject of installs, you should also know that all the P&M plugs will install and run on any Win box with a P4 or Athlon XP running at 2GHz or better and a gigabyte of RAM. Since AMD introduced the last of the Athlon processors in 2004, I’d say the requirements are more than modest. Things are similar on the Mac platform, with operating systems support that goes back to 10.5.8 (sorry, no PPC Mac support) and forward to 10.7 Lion. I evaluated some of the plugs on a 10.8 Mountain Lion machine, and they behaved properly despite the lack of “official” support. All formats are supported as well, including VST 32- and 64-bit for Windows, AU and VST for Mac, and Pro Tools AAX and RTAS for both platforms.
INTO THE FRAY
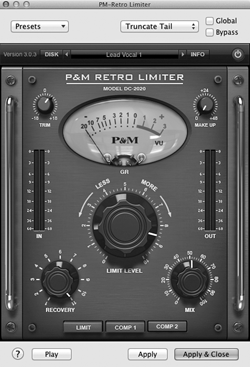 Right out of the chute I had to check out the Retro Limiter. This is a simple limiter that will do both limiting and compression, depending on the setting of the three buttons across the bottom of the unit. I punched the Limit button to start. In the upper left is a Trim knob, which governs the gain of the incoming audio from -18dB to +18dB, while the top right knob handles the Make Up gain at the output from 0dB to +48dB. Of course, the big knob in the center controls the Limit Level, which goes from 0 to 10. It’s tough to determine how the scale maps to volume, but at 0 there’s no limiting whatever, while at 10 it definitely pins the Gain Reduction VU meter.
The Recovery knob in the lower left essentially controls the release time, from 1 to 11, but I cannot tell what units of time those represent. Suffice it to say that at a setting of 1, the release appears to be in the 10-20 msec range, while setting it to 11 feels like a little less than a second for the gain reduction to return to null. Two LED meters on either side of the knob give a good idea of the In and Out levels, and seem properly calibrated.
In the lower right is an unusual Mix knob, which allows the limited signal to be mixed with the dry signal, which suggested some interesting possibilities for generating in-your-face voice over tracks. In fact, the Mix knob proved to be highly useful, and allowed me to create a nearly-slammed voice over track, and mix that with the un-limited track. The results felt like they had most of the dynamics of the original but felt louder and more present at the same time, without actually being louder. I like that a lot, and while I know you can create the same effect with multiple channels in a mixer, it’s very handy in a two-track editor like Twisted Wave or Sound Forge. So how does it sound? It’s a nicely uncolored limiter, so long as you don’t go crazy with the input Trim control. If you advance that one it will turn into a harsh beast quickly, since there’s more than enough gain available to “overdrive” the rest of the plug-in. But if one doesn’t abuse the input gain, one gets a nicely trimmed track in which the original is still present.
The Comp 1 and Comp 2 buttons essentially change the knee of the limiter from sharp to softer, but never really soft like a compressor. While interesting, these settings were much harsher than the actual compressor plugs, and I probably wouldn’t use the Limiter in that mode.
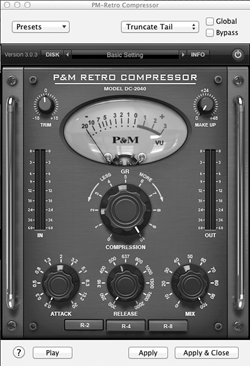 Next came the Retro Compressor, whose controls are far more conventional and calibrated in familiar units. As with the limiter, there’s Trim, Make Up, Compression, Attack, Release, and Mix. The curious thing is the three buttons at the bottom which, emulating a Fairchild, are marked R-2, R-4, and R-8. The manual says that they increase the Release duration, so I tested them out. No, they don’t seem to affect the Release time, but they definitely appear to increase the Compression Ratio (which is actually how the Fairchild worked; there was no Ratio control, just three buttons to change the ratio from a bit of compression to squashed).
Like the Retro Limiter, the controls give you enough rope to hang yourself if you abuse them, but used gently they produce a clean and uncolored sound compared to the bypassed track. Does it sound retro? I’m not sure about that, although someone went to some length to make the compressor respond like an old-school optical compressor with the little incandescent bulb and the photo-resistor. Used properly it is unobtrusive, and the response could be called musical. It’s certainly not digital-sounding, and it seems a good workmanlike processor.
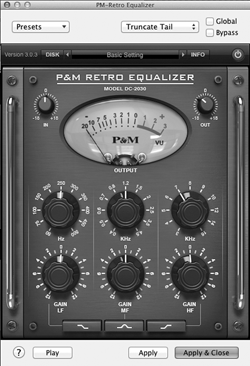 The Retro Equalizer is a simple three-band EQ. Each band has a gain and frequency knob, and the high and low bands can be set to either Shelving or Bandpass mode, while the center band can be switched between Bandpass mode and the (much steeper) Notch mode. Also here are In and Out gain controls that go from -18dB and +18dB. While this module sounds very good, the frequency and gain knobs are all stepped rather than continuous, which makes it a bit less useful. So if you need more control, you’ll have to try the...
...Liquid Air-Q equalizer. This one comes with a low-band filter that handles from 40 Hz to 150 Hz, then two fixed-frequency filters at 830 Hz and 2.2 kHz, and finally a high-frequency shelf that goes from about 2 kHz up to 18 kHz (really? I guess that’s why they call it “Air”). On the surface the Liquid Air-Q seems less flexible than the other, more conventional EQs, but in practice I found it most useful for cleaning up and punching up VO tracks. The low band took care of rumble, while the low-mid band seemed just about right for decreasing any “boxy” qualities. The “air” business does indeed increase intelligibility, but like all EQ tools it can be used for good or for evil, and a little goes a very long way. I like this one a lot, despite its specialized settings.
OTHER FAVES
Both the Digital Reverb and the Digital Plate reverb are very good-sounding units which I’d definitely use (if I didn’t already have too many of them). The Ambiosoniq graphic EQ is a serviceable graphic EQ with a twist -- cranking the Amb-Soniq knob messes with the phase of a stereo track to “spread” the imaging, which is useful in some situations for SFX and lame music tracks. The Ultramaxit Limiter is not nearly as flexible as the Retro Limiter, but it what you need is a seriously limited track, you’ll definitely get it with this plug-in.
Finally, although I’m not sure where I could use it, I’d love to find a place to use it, just because the Dimension 3D is the best emulation I’ve heard so far of a Roland Dimension D chorus unit (which I’m still sick about selling years ago). It’s rich and lush and diffuse and I love it but can’t justify putting on that nice lady’s voice over track even though I really want to just because it makes everything sound So Very Cool.
I’LL BE HAVING A FEW OF THESE, PLEASE
The documentation is somewhat thin and, as mentioned, in some cases it’s flat-out incorrect. But it will give you a sense of what that oddly-labeled knob in the middle of the plug is designed to do, anyway. But the best way to learn how to use these plugs is to simply insert one and begin twiddling. The user interfaces on each are consistent between the different plugs, so it’s likely that you won’t hurt yourself (or your ears) as you experiment.
Besides, it’s a nice way to while away a Saturday afternoon, when I should be doing something else that I’d rather not do. Steve sez check them out.
The P&M plug-ins are available for purchase from the Don’tCrac[k] site at store.dontcrack.com at $49 each, or in bundles -- see the site for more information on those. More information about the plug-ins is available at www.plugandmix.com.
♦