by Steve Cunningham
We knew it would happen eventually. As digital technology became smaller and more powerful, and as the software that utilizes it became more sophisticated, it was inevitable. Cars that parallel park themselves are now quite unremarkable, and others that drive themselves are but a few years off.
So it is no surprise that we’re now seeing a group of software products that process sound without the aid of human intervention. Several plug-ins have been available to “improve” the final quality of VO recordings, some of which we have reviewed in these pages: iZotope’s Nectar (RAP February 2011), Wavearts’ Dialog (RAP May 2011), along with Waves’ CLA Vocals and VX-1 Vocal Enhancer, an entire VO processing suite from Antares, and a slew of others. These plugins rely on presets that include EQ, compression, de-essing, perhaps some limiting, plus other effects to achieve a specific sound quality. Some include software algorithms that analyze the incoming signal and automatically adjust one or more parameters to “enhance” certain aspects of the signal.
Latest on the list: Blue has introduced an inexpensive USB microphone that “adapts” to the recording environment and reduces what it’s been programmed to treat as problems (for example, plosives and room noise). Yes, we’ll give Blue’s “Nessie” a proper once-over in a future issue; for now it is sufficient to add it to the list of devices that “enhance” your recording without any interference from you. The exact definition of “enhance” remains to be seen.
But no matter, these all rely on the basic building blocks of speech processing: dynamic processors and frequency processors. Most of us, myself included, prefer to build a VO processing chain old school; we like to add our own individual processors and adjust them one at a time to achieve the desired result. For those who have forgotten how many different flavors of EQ and dynamics actually exist, let’s take a very brief refresher.
FOCUS ON FUNDAMENTALS
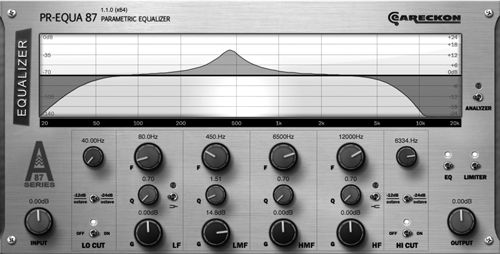
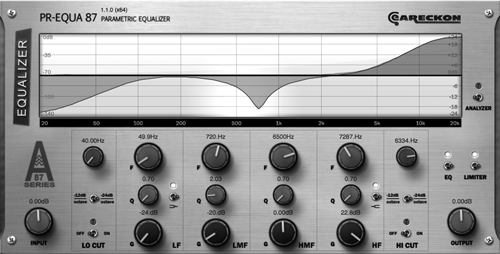
Equalizers are generally simple. They are frequency-based amplifiers that boost or cut specific frequency ranges, to either fix problems or artistically sculpt the sound. They come in several flavors, each of which is useful for specific purposes. The simplest flavor, usually referred to as just a “filter”, has only settings for gain and sometimes for cutoff frequency. More flexible EQs will have a “slope” parameter (aka Contour or “Q”), which governs how many decibels of boost or cut per octave are applied at the cutoff frequency. Fully-parametric EQs come with a Q parameter, which governs both the how many frequencies are affected around the cutoff (the width, measured in octaves), but also therefore the “slope”. Parametric EQs usually combine several configurations into one EQ. See Figure 1, which shows a parametric EQ with a bell-curve boost area in the center frequencies, and both low- and high-pass filters on either end (which are cut only, as labeled). Figure 2 shows the same EQ with a bell-curve cut in the center frequencies, and shelving filters on each end. Clearly there are lots of possibilities for both repair and enhancement of specific frequency ranges in this particular EQ plugin.


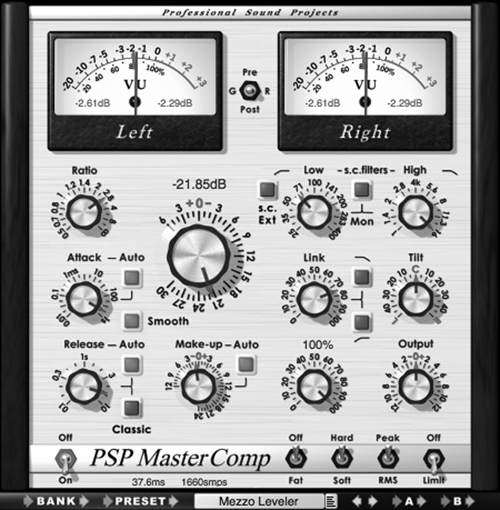
Compressors are a bit more complicated, although they all perform the same task. Basically a compressor makes the loud stuff softer, with a Threshold setting that determines what the plugin considers “loud”, thereby making the overall volume more level over time, and allowing the overall gain of the track to be increased. Once that is understood, the variations on that theme are relatively easy to understand. Despite that simplicity, some compressors are loaded with features and functions that can “complexify” them significantly (see Fig 3 for an example from PSP). But even this one is simple once you see that the big knob is Threshold, and the smaller ones along the left are Ratio, Attack, and Release, with Output (aka Makeup Gain) at the lower left.

The variations on the compressor, with which production folks are most familiar, are limiters (which clamp the output to a given max volume no matter what), de-essers (which perform compression only when they detect sibilance), gates (which shut off any sound below a certain level), and expanders (seldom used, these make only the soft stuff louder). So how do we organize all these building blocks?
WHO’S ON FIRST?
With deference to Abbott and Costello, the first question to be answered is who’s on first? The workhorses are EQ and compression, and there has always been some controversy about which of these two should come first. Should you compress the EQ’d sound, or EQ the compressed sound? In the end it’s how it sounds that matters most, so whatever sounds best wins. Still, there are considerations.
As mentioned, EQ is often used to correct a tonal problem; take the case of excess bass as a result of a microphone’s proximity effect. In that instance it’s probably best to compress the VO track after removing the excess bass with EQ; otherwise the compressor will trigger on the bass and lower the volume of the entire track in response. The results will be a volume level that drops in inappropriate places, and may be quite audible. The same is true with low-frequency room sounds including air conditioning rumble, foot falls, and the like. Better to put a steeply-curved high-pass EQ in first position and remove everything below 70 or 80Hz for low frequency noises. Again, reducing noises with EQ will help the compressor do a better job of leveling the volume.
Voice-driven noises like proximity and plosives can be knocked down with a low-frequency shelving EQ, set as to cut as high as 120Hz, since even baritone voices generate little useful information below that. Female voices can be set even higher. Why not use the same high-pass filter with a sharp cutoff to remove proximity and plosives? A sharp filter with a precipitous slope can be audible as they work in low ranges, while shelving EQs tend to be more gentle. But in any event, these factors argue compellingly for putting the EQ in front of the compressor when trying to reduce “problems”.
EQs can also do wonders for excessively bright microphones; some of the cheaper condensers have nasty high mid response, and will benefit from application of some high-frequency shelving EQ. However, it’s often worth the time to use a bell-curve parametric EQ instead, to tune in on the worst of the offending frequencies and dial it back. For those who don’t know, the deal is to boost a narrow band and sweep it until it makes your molars hurt, and then dial down that frequency. A shallow curve is better here than a sharp one, and won’t make the entire track sound dull as a shelving EQ would.
While it might seem that the compressor should always go next, don’t forget its cousin, the gate, which could well be the next contestant. A carefully set gate can further reduce room noise evident when no one is speaking; the trick to making it work is to set it as low as possible so as to be inaudible. Some gates allow setting the Attack time so as not to produce an abrupt shutoff of background noises -- these are the good ones. But since what the gate is doing is making the soft stuff far softer, it should have absolutely no effect on a downstream compressor’s function.
NOW CAN I USE THE COMPRESSOR?
Well, not necessarily. Given a bright microphone like the one described above, you might want to put a de-esser in the next slot. Why? Because the de-esser looks at the frequency spectrum of the incoming audio for an excess of sibilance, which is normally around 6-7 kHz, and that mic may produce plenty of it. If the de-esser see excess at that frequency range, it reduces the volume of the entire track while the sibilance is present, then restores it to the previous level. Since there’s normally little in the way of fundamental voice frequencies while sibilance is being produced, the momentary drop in volume becomes just a drop in the “ess” sound, and little else, assuming the de-esser is set properly. And while normal compressors don’t respond to sibilance the way they will to proximity or plosives since those high frequencies have far less energy, it couldn’t hurt to locate the de-esser before the primary compressor in the VO processing chain. It is a far superior solution than to try taming sibilance with an equalizer, which will just make everything sound dull.
All else being equal, the next slot is a good home for a compressor, which should be able to do its job better, given cleaner source material. Like and equalizer, a compressor can also be used to fix problems as well as for artistic effect. It can easily deal with a variety of different voices, different levels of excitement, and yes, for poor microphone technique. I like to start with a ratio of about 3:1, and don’t usually get good results over 4:1 for a “normal” VO track.
A higher ratio than that begins to sound squashed, although that’s certainly permissible under the “artistic” use case. Try combining that higher ratio with faster attack and release times to give a sense of urgency and in-your-face presence. It’s been my experience that more compression appears to move the voice talent physically closer to the listener; the quality and tone of the read will determine whether that additional “closeness” represents more intimacy with the listener or just someone yelling into the listener’s ear.
A word about limiters and voiceover, and it’s just my opinion, so take it or leave it. I don’t like them on the track. The only exception to that is when I’ve recorded actors for action-oriented video games, where characters go from soft-but-evil calm to full-throated screaming within ten seconds or less. In that event a limiter becomes an engineer’s best defensive weapon against overload. But it doesn’t do much good, and can do damage as it renders the actor into a cartoon character on other sorts of VO projects. Having said that, a limiter on the mix output buss can improve the presence of an entire project. As with all things processing, moderation is a watch word.
PARALLEL COMPRESSION
This is a technique used extensively in the record biz, and has some application in VO production as well. It does take a bit more time due to the setup, but it may be worth some experimentation. If it works for you, you could create a template from your experiments so the setup will survive through multiple projects.
The theoretical concept is to split the input signal to feed two paths, one being a direct “thru” path to the output, and the other feeding a normal compressor. The compressor’s output is mixed with the direct path to produce the “parallel compressed” signal. So far so good; however there can be a minor phase problem here, since the original “thru” track has no compressor, and the new track has one. This can create a small delay between the two tracks as the compressor takes time to process its slice of the input signal, but we are probably talking about milliseconds.
The solution to the delay is simple enough: Create two sends on the original track, each with their own buss. Now terminate each of those busses to their own new (probably Auxiliary) track. Those two Aux tracks are then phase coherent. Now put the same compressor on both Aux tracks, so they will both be equally delayed. Set the first compressor to a 1:1 ratio so it essentially does nothing but pass signal unchanged. Now set up the second compressor (Comp2) as you wish, or as follows.
Comp2 is set up with a very high ratio, and the threshold is adjusted so that it provides a lot of gain reduction when the input signal is at its loudest. The more gain reduction the better: 20dB is a good start, but 40dB works even better. Of course, this requires a compressor that behaves when applying a lot of gain reduction and doesn’t distort, which some do. The attack and release controls are set as one would for normal VO. I like to start in the mid tens of milliseconds for the attack and low hundreds of milliseconds for the release.
What happens is that the contribution from the Comp2 track during the loudest peaks will be well over 20dB quieter than that of the first Aux, because of the massive gain reduction coming out of Comp2. This means that at those points, Comp2’s part of the mixed output signal is virtually insignificant; the output signal is completely dominated by the first Aux track, which essentially has no compressor. As a result, those loud but delicate transients are almost completely intact and unchanged, which is what we want in the first place.
On the quieter parts that fall below Comp2’s threshold, Comp2 won’t be applying any gain reduction, because those are below its Threshold. So in that case the two tracks’ outputs are identical, and if two identical signals are mixed together, their combined level is 6dB greater than that of each individual signal. In other words, this simple parallel compression arrangement raises the level of quiet signals by 6dB. There’s no active gain manipulation going on here, but we’re getting 6dB more signal overall.
The end result leaves the loud stuff unaffected, and raises the quiet parts by 6dB, while the total reduction in dynamic range is only 6dB. Further, one could create a third send on a new buss to a new Aux, and add a third compressor to that, raising the quiet parts now by 9dB and reducing the dynamic range by the same amount. It’s also possible to combine different compressors with different sound characteristics to alter the overall tone of the output.

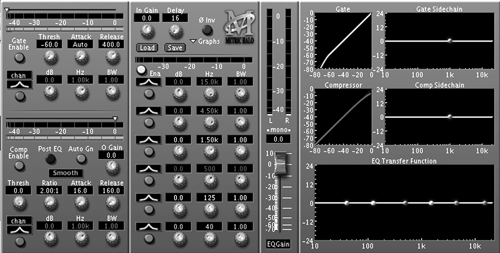
There is a downside -- if the original track with the sends on it has low-level noise, then that noise will also get a 6dB boost. But if your original track is clean, and you’ve set up your processing to clean it further, you should be good to go and your parallel-compressed VO track should be well and truly phat. Enjoy your processor chain. Or, just go buy Metric Halo’s Channel Strip plugin and go back to work (see Figure 4). But you won’t have as much fun...
♦

