
by Steve Cunningham
Let’s talk dynamics, particularly voiceover dynamics. Depending on the script and personalities, a record session for a high-energy promo can run the gamut from well-behaved to completely out of control -- think morning zoo, then add Starbucks Americanos with several extra shots in each. If you’re the engineer/producer, how do you keep a handle on levels during a freewheeling VO session under those circumstances? I know what I do... whenever possible, I put fingers on faders and move ‘em to keep things as level as possible while recording. That’s right, I ride gain as best I can. I’ve been fortunate to get occasional work recording and editing dialog for videogames. Gain-riding the vox fader is mandatory when recording fighting games where vocal reactions to being hit by an opponent are interspersed with taunts. Gotta do it to keep from clipping the track! The same can be true in a VO session with talent whose mic technique is less than stellar.
Waves, one of the more innovative makers of audio plug-ins, has automated a process that some of us have been doing manually for quite awhile. Vocal Rider is a cross-platform plug-in which actually rides the fader for you in real time, and writes its movements as automation data info directly into your audio editor’s session. The benefit is that your track keeps all the original dynamics of the performance, and should you want to compress after all, you can do so more gently since much of the job is already done.
The benefit of riding gain is that the sound doesn’t change at all; it just gets softer or louder. However, while riding one fader can be a challenge, riding multiple faders can quickly become an exercise in futility. That’s when most of us reach for a compressor or even a limiter to do the job for us. But even compressors with little character of their own will change the sound, because at minimum they’re altering the dynamic range -- the difference between the loud and soft -- by making the loud parts softer.
INSTALL AND BASICS
Vocal Rider comes in both mono and stereo versions, and works in real time at up to 24-bits and 96kHz sampling rate. Like all Waves plug-ins, it requires that you have an iLok with an authorization on it to run Vocal Rider, and that’s true even for demo purposes. Waves will send you a demo license for your iLok pretty much on demand, but if you don’t have an iLok you will not be able to even try out the plug.
But once you have a license, installation is straightforward and you’ll see the plug-in show up in your menu.
If you’re already a Waves plug user, there is one caveat. Vocal Rider is part of Waves V7 plug-ins. If you’re running V6, you’ll have no problem. But if you’re running version 4 or 5, installing V7 will remove older installations (with a prompt, of course). To run Vocal Rider and your older plug-ins, you’ll need to upgrade them to V7 versions, which is not a bad idea anyway, as V7 offers several performance enhancements. Besides, it’s free if you’re on the Waves update plan, otherwise known as WUP.
Since Vocal Rider is supplied available in TDM, RTAS, VST, and AU formats, it will work in Pro Tools and several other editors on the Macintosh. On the PC it will also work in Pro Tools and editors that handle VST plugs, including Sound Forge (versions 9/10), Vegas (versions 8/9), and Audition (version 3 and greater). However, the side-chain input feature only works in Pro Tools on both platforms, and on a couple of music-oriented editors on the Mac. The side-chain function doesn’t work in Forge, Vegas, or Audition. This is a minor drag, but it’s not a deal-killer as you’ll see just below. I did use Pro Tools on both platforms to evaluate the Vocal Rider.
IN USE
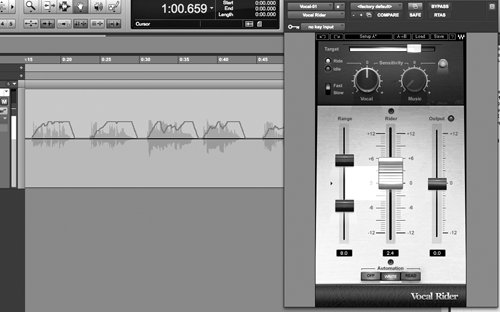
Conceptually, using the Vocal Rider is very simple. First, you insert the Vocal Rider on a recorded voiceover track using a mixer insert.
This allows the Vocal Rider to control the voiceover volume. Next, you set a target level range for the voiceover, and Vocal Rider analyzes level of the voiceover track as you mix. If the VO level goes down, Vocal Rider brings it up, and vice-versa.
There are several controls that give you quite a bit of latitude for optimizing the target level and gain range of the voiceover track. For example, if you don’t want to bring soft sections up too much, you can restrict the maximum amount of gain. Or you might want to do the equivalent of compression, but without the artifacts, you can just use a wide gain range. In any event, it’s easy to try out Vocal Rider settings and if you need to tweak them, that’s equally easy.
Waves does complicate things a little by giving you two different versions of the Vocal Rider plug: a regular one labeled Vocal Rider, and a “live” version labeled Vocal Rider Live. The difference between them is that the Live version is meant for live music performance use, and includes a control labeled Spill that helps eliminate spurious noises from the stage that might get into a vocalist’s microphone, thereby confusing Vocal Rider. Since most of us aren’t concerned with live music performance anyway, I did not use the Live version.
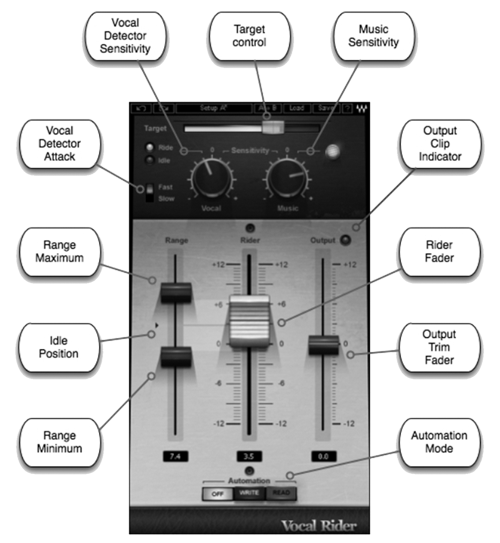
The Vocal Rider plug presents itself with the standard Waves window bar at the top for saving and loading presets and for comparing between ‘A’ and ‘B’ settings. The plug-in also has the aforementioned side-chain input at the upper left in the bar.
The big fader in the center of the window is the Rider Fader, and that’s where the business happens. Note that this fader’s range is only -12 to +12 dB, with 0 dB in the center. That gives a total range of 24 dB for riding, and that can be further restricted by use of the two Range pointers to the left of the Rider Fader. But before we get to these we need to figure out how to select a volume range in which to ride that fader.
The topmost slider is the Target level slider, and it’s important... this is where you set your desired overall level for the VO track.
Gain riding is relative to this Target position, so when you change the Target reference range with the slider, it will actually move the Rider Fader’s zero position. The slider knob is translucent so you can see the yellow fill color beneath it -- this horizontal bar shows the average output level in real time. The range of the Target level slider is from 0 to -42 dBFS, with the center position equal to -21 dBFS.
Once you’ve dialed in the range you can just hit play and the Rider Fader will begin to dance. However, you’ll want to do some additional tweaking to Vocal Rider for best results overall. Most important of these are the Range Maximum and Range Minimum sliders. These restrict the Riding Fader’s motion and therefore the amount of level boost or cut. The small arrow between them is known as the Idle Position, which takes its setting from the Target slider. The combination of Target slider and Range sliders is what allows you to really dial in gain riding that only cuts loud transients, or only boost quiet passages, or just levels everything. An Output Trim Fader to the left gives you another gain stage at the end of the Vocal Rider’s signal chain.
MORE KNOBS
Note that we haven’t discussed the knobs above the Rider Fader. As mentioned above, the Live version includes a knob called Spill. In the regular version of Vocal Rider, the leftmost knob is the Vocal Sensitivity, which helps the plug identify beginnings and endings of words as well as eliminating extraneous noises from the analysis process. Vocal Sensitivity is, in essence, a threshold that tells Vocal Rider to ignore sounds below a certain level, and how sensitive to the sound envelope it should be. A Ride/Idle activity LED lights when an above-threshold VO has been detected. Note that Vocal Rider also includes Waves’ own breath-detection algorithm, so that the plug-in doesn’t turn up all the breath sounds between words. Brilliant!!
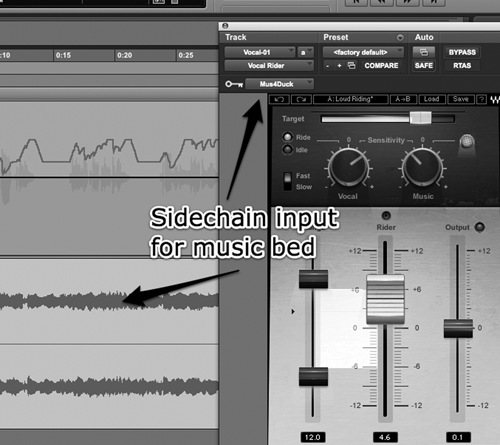
Next to the Vocal sensitivity knob is a Music Sensitivity knob, which is coupled to the use of the side-chain input, which only works with Pro Tools and a few other editors. To enable it, you first need to create a send from your music bed’s mixer channel, then assign that send to the side-chain input of Vocal Rider. Do make sure that you’ve turned up the send level to a nominal volume. The Music Sensitivity knob determines the amount by which Vocal Rider reacts to the music bed level. If the bed gets louder during a chorus, then the voiceover will be lifted a bit so it doesn’t get buried. A sensitivity LED monitors the response to the side-chain input and lights when the music is affecting the Rider Fader.
Note that this does not turn Vocal Rider into a ducker -- there are plenty of those out there, and I was not able to get the Vocal Rider to work as an effective ducker. Rather, using the side-chain input allows Vocal Rider to cause the voiceover to ride more smoothly above the music bed. It’s a nice feature, but the fact that it only works in Pro Tools is annoying. But it doesn’t add any great value to the basic purpose of the Vocal Rider, which is to level out a voiceover track.
So those of you using Audition or Vegas as your main editor can still realize the primary benefit of this plug, and we haven’t even discussed the automation yet.
Finally, let me point out a small but important slide switch on the far left, labeled Fast and Slow. This governs the attack time of the voice detector, and affects both the fader response time and the side-chain response time (if available). The attack time constants are preset, but you can switch between the slow and fast settings and take your pick. I found the fast time most useful, since while the level changes moved more quickly they were small enough to be inaudible.
AUTOMATION
Now comes the fun part. Vocal Rider can record all its movements directly to your editor’s track automation system. Setting that up is relatively simple. The first important item to note is that you want to automate the plug’s Rider Fader, not your track’s native fader. Remember, Vocal Rider is changing the gain of your track via the insert on your track -- it has nothing to do with your VO track’s native fader.
So set up consists of enabling plug-in automation for the Rider Fader on the Vocal Rider plug. Next you engage the Automation Read button below the Rider Fader, and hit play. The Rider Fader’s movements will be recorded on your track’s automation lane for the plug-in. If you do want to use Vocal Rider as you record, then you’ll need to create an Aux track, put Vocal Rider on an insert of the Aux, and buss the Aux output to the input of your record track. That works as well, and the latency of the Rider Fader appears to be near zero. In either case, once you’ve created an automation track with Vocal Rider you can further adjust it as you wish using your editor’s automation tools. You can also automate other functions of the plug, although I did not have need for that.
Waves recommends putting Vocal Rider last in a chain of plug-ins. However, if you want to add a compressed quality to the voice, you can add a compressor prior to Vocal Rider and it will still know how to react. I had some really good results adding a gentle limiter after Vocal Rider, giving a VO track a bit of extra punch.
WRAP IT UP
Waves go to great lengths to explain that Vocal Rider is not a compressor and therefore does not introduce coloration. I get that, as all gain changes are done using a fader rather than an amplifier, although the end result is still an automatic reduction in vocal dynamic range -- which some would still define as a form of compression. But the benefits of doing it in this way are very real, since you don’t hear any of the side-effects of a conventional compressor, and you can edit the results just as you might if you’d manually ridden the fader and recorded the movements.
I tested Vocal Rider with a couple of troublesome VO tracks that had multiple level variations. I’d already tried compressing, limiting, and some hand-drawn level automation, but was never really happy with the results. So I tossed the automation, removed the dynamics processors, and instantiated Vocal Rider. It truly did the trick -- words that were swallowed came out clearly, most of the compression became redundant, and the VO track was consistent throughout.
Like most of Waves’ plug-ins, Vocal Rider is not cheap at three hundred and change on the street. And some would argue that it’s not necessary, since you can ride the gain yourself. I’ll admit it probably won’t make my short list of “deserted island” plug-ins, but I have spent many hours compressing and limiting and automating dialog over the years in an effort to just get it level. Vocal Rider promises to eliminate that busywork. Wait... should I be concerned about job security if this plug does it for me? Hmmm...
Vocal Rider is available in native and TDM formats for $400 and $520 USD, respectively. Street price on the native version is currently a bit over $300. For more information worldwide, visit www.waves.com.
♦