 By Dave Foxx
What a pleasant surprise. I really thought that Jerry and/or I would be getting a pile of emails, critical of my June column questioning the whole global-warming thing. However, as I sit writing this month’s verbal Vicodin, the score stands at Critical Thinkers 119 – Sheep 0. That’s right…zero. Bravo, my fellow broadcasters. I was all ready with the explanation that I don’t want anyone to believe me. I want people to do their own research…but I needn’t have worried. It pleases me no end that you all can think on your own two feet. Well, at least 119 of you can.
Along with all the email about last month’s column, I got a curious one from a Spanish speaker that I had to have translated. (My Spanish is confined to a few curse-words and a lot of food items…especially cerveza…one of the major food groups!) Having heard some of my work at Z100/New York, he was curious about my processing, asking which plug-ins I use and what kind of settings I put on them. I get this same question about every three weeks or so and I usually simply answer them directly and have done with it. As I wrote my response (to be translated back into Spanish), I remembered a few stray comments from various other producers saying things like “Your production is so ‘open’” and “everything is so bright sounding,” and so I decided that this month, I’d like to take you from A to Z in the Dave Foxx processing process.
WARNING: This is written with the Pro Tools system in mind. If you use Audition or an old copy of Cool Edit Pro, you will need to make an adjustment here and there. All of the plug-ins are by WAVES. There are other plug-ins that work similarly and can be substituted. However, I have found that the WAVES software consistently works better and is easier to control and adjust. Please also note that this all assumes you have good quality sound to begin with. None of this will address poorly recorded material, which should be treated before you begin mixing.

Step 1: Get on the buss.
Bussing is critical to making all of this work. If you don’t know how to use the bussing or if your workstation doesn’t support robust bussing, a lot of this information will have to be greatly modified. If you’ve never used bussing, you really need to learn how. It will not only help you with your processing, but will also greatly simplify the entire production mechanism.
In a nutshell, a buss is an audio route. When you want sound to get from point A to point B, you put it on a buss. Your main mix channel is a buss…one I suspect that many use exclusively. Eventually, you will send ALL of your sound to the main mix buss, but in this setup, you’ll use at least three more busses: one for VO, one for special VO and one for effects. Each buss will be sent to a “sub-master” for processing, and then each sub-master is bussed to the main mix. Music always goes directly to the main mix without any extra processing because you want it to sound exactly like the song does when it plays on the air.

Step 2: Compression
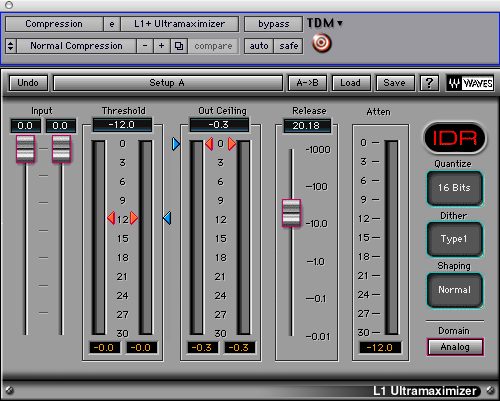
OK. What I’m about to describe is technically “limiting,” however the kind of limiting I use and the way I use it makes it like a compressor, lowering peaks and raising valleys to reduce the dynamic range. On sub-master 1, I insert the WAVES L1 Ultramaximizer. This is a clipping limiter (sometimes called a ‘brick wall’ limiter), which means when you set the output, NO peaks ever go higher. I set the output to -0.3db. I then set the threshold to-12.0db. The output of this buss goes directly to the main mix.

Step 3: Flange
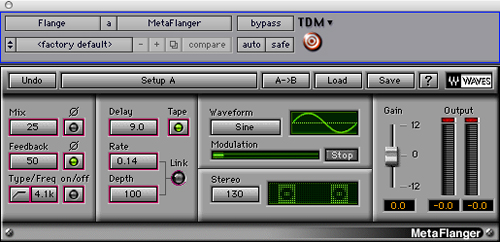
Flange is a method of introducing a second or possibly third copy of an audio track to the same mix with a slight offset to fatten the sound. Traditionally, when producers talk about flange, that offset moves over time, producing a strange “hollow” sound that changes in pitch. So, on the second sub-master, I insert the WAVES MetaFlanger. I set the ‘mix’ control to 25% – no phase, feedback to 50% – phased, type is set to ‘off.’ Delay is 9ms – tape, rate is 0.14 and depth is 100% - not linked. The waveform is ‘sine’ and stereo image is wide open at 130, while gain is set to 0db. OK…that might seem like a lot of techno-babble, but once you put up those settings, you can make adjustments (small ones, please) to fine-tune it for your ears. The critical adjustment for ‘fatness’ is the mix control. Play with that one before any of the others. If you set it to 100%, you’ll definitely hear the ‘hollow’ sound I was talking about.
The ONLY VO that goes to this sub-master is the main VO track. The other voices need to go directly to the compression sub, because they would just sound weird going through the flange. Also note that I do not put my hi-pass filtered tracks through this sub unless I’m looking for an unusual effect. Output of THIS buss goes to the compression sub…NOT the main mix.
Step 4: Making Effects Really Bright
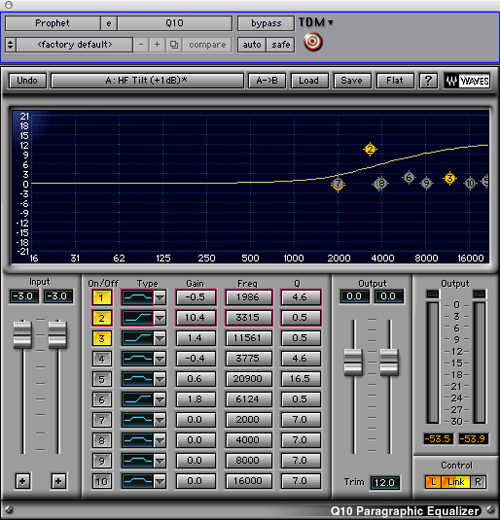
The effects you use should really cut through everything else first, and then you can adjust the gain to ‘mix’ it into your sound. Our third buss gets the WAVES Q10 Equalizer. They have a preset that comes with it called “HF Tilt,” which is where I start. I then grab the #2 button and adjust the gain to +10db, and set the output of the entire plug-in to 0db. If I have a hard time controlling the gain of the effects after that, I will sometimes drop the overall output to -4db. If it is still hard to handle, I will pop on another L1 Ultramaximizer with minimal settings. This sub should then be sent directly to the main mix.
Step 5: Mixing It Up
Now I have absolute control over every element in the promo. If all the VO is simply too loud overall, I adjust the first sub-master. If it’s just my main VO that’s too loud or soft, I adjust the second sub-master. If one track is sticking out like a sore thumb, I adjust that one track. I DO put one more thing in the chain at this point that is there simply for control. On the MASTER MIX track, I insert another WAVES L1 Ultramaximizer, set the output to -0.3 and the threshold to -6db. THEN, I set the MASTER MIX fader to -6db. The only limiting that is actually happening is a miniscule 0.3db – so this is strictly for controlling the peaks.
This month’s audio track is a promo for the Z Zone, our new Social Network program on the Z100 website. (It’s a lot like MySpace, only for Z100 listeners.) There’s the usual opening effect running through sub-master 3/EQ, followed by JJ (our afternoon drive jock) running through sub-master 1/compression. After his opening comment, I come along and introduce him through sub-master 2/flange, plus sub-master 1/compression. As I start speaking, the music kicks in, directly into the main mix channel. And so it goes until the end, when I come back on a high-pass filter (sub-master 1/compression.) The high-pass filter actually happens on that individual track.
Well, there it is…from beginning to end. I really hope you find it useful. Next month, I’ll take the entire bussing idea one step further and explain how I use “sends” versus “inserts”…we’ll add one more sub-master and probably confuse the heck out of some of you. Hey…don’t feel bad. I spent the first 20 years of my career being confused about this stuff. Hopefully, you’ll benefit from my confusion, get a leg up on all of us, and take production to a whole new plateau when you get to the top. That IS where you’re headed, right?
♦

