
COMMON ELEMENTS
Uppermost in each of the four windows are buttons for saving and loading presets. Since good noise reduction depends entirely on analyzing the audio to be cleaned, no presets are included with the program. But as you come up with settings that work for particular problems you face, you can save them and reload them later using these buttons. Note that a saved preset holds the settings for all four panels.
Next to these are four Compare buttons labeled A, B, C, and D. Again, noise reduction is something of a black art, and you may need to try several settings to get the best results... hence the A/B/C/D Compare buttons. To load settings for comparison, you just click the arrow next to one of the buttons. Clicking directly on the letter itself recalls the settings assigned to that button. The button that has the currently active settings is surrounded in red to make it easy to see.
Last on the top is the NOISE ONLY button. This lets you hear only what is being removed by any currently active processes. This is way cool, as it makes it easy to hear what you may be cutting into that you actually want, or lets you decide how much you’re willing to do without in the interest of cleaning things up.
Below the buttons is a spectral display, or Spectrogram. This display reminds me of the spectral display in Adobe Audition (formerly Cool Edit Pro), but it’s quite a bit simpler. It scrolls from right to left, with the white areas showing the sound input, and the red area showing the output. The horizontal scale represents time, and the vertical scale is calibrated to frequencies appropriate to the specific process in the window. So for Hum & Rumble the vertical scale goes from 200 Hz to 800 Hz, while for Click & Crackle it goes from 4 kHz to 17 kHz. So basically the more red you see moving past the window, the more reduction is being applied. There’s a scroll bar that you can use to move the display though time, or to zoom in and out on a particular time period.
At the bottom of each of the four windows are the Tool Tabs that let you choose which of the four processes you want to adjust. Each of these tabs has an in/out checkbox to activate that process, and a thumbnail picture of the control settings for that tab. These thumbnails work in real time — moving a slider all the way to the left in the window makes the thumbnail move left too. Handy.
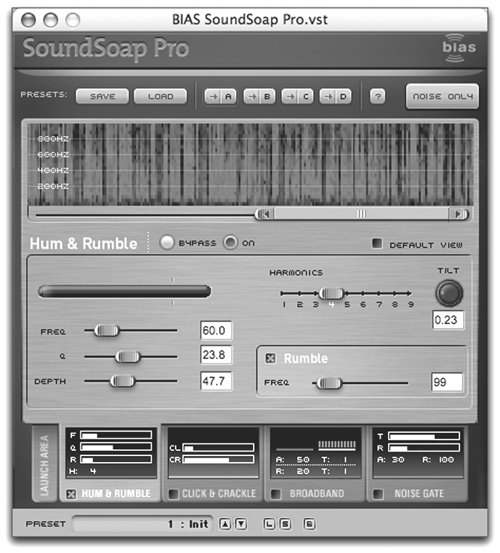
HUM & RUMBLE
Hum is one of the easiest noises to eliminate, because it occurs at predictable frequencies, and usually can be reduced with narrow, high-Q band-reject filters. Most good parametric EQ plug-ins have a setting labeled Hum Buster or some such.
This was the first tool I tried, and I was impressed. There’s a Hum Meter that shows you how much hum is present at the frequency set by the FREQ slider. So zeroing in on the exact frequency is a matter of just adjusting the FREQ slider and watching the meter. When it maxes out, you know you’ve got a live one at that frequency. You can then use the Depth slider to cut the hum at that frequency, and the Q slider to set the width of the cut.
The Harmonics slider lets you choose how many bands of cut you want to use on the hum problem. See, hum in the US occurs most commonly at 60 Hz, because that’s our AC line frequency. But that hum also generates harmonics at 120, 180, 240 Hz, and so on. The Harmonics slider sets the number of upper harmonics that will be filtered, while the Tilt knob sets the amount of cut applied to the upper harmonics compared to the fundamental. When Tilt is zero, the same cut is applied to all harmonics of the hum, but with Tilt at 0.50, each upper harmonic will be cut by half as much as the previous harmonic. That’s most excellent control, and most effective.
There’s also a separate rumble section that consists of a fixed 12dB/octave high-pass filter, that can be set between 20 Hz and 500 Hz to eliminate any general low-frequency trash.
The Hum & Rumble section is effective at reducing (although not quite eliminating) hum, and does it without messing too much with bass program material. If the other processes are this good, I’m gonna like this thing.
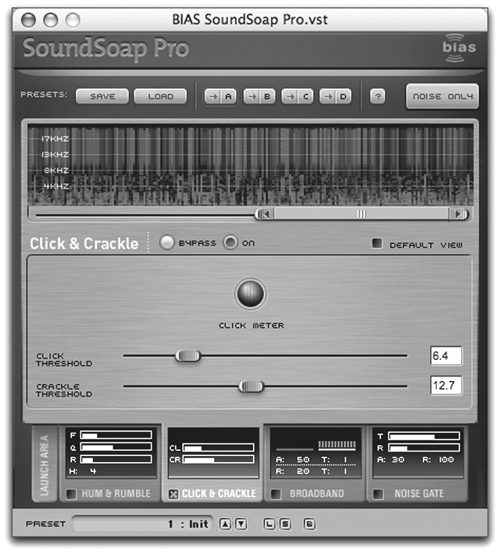
CLICK & CRACKLE
Weren’t those two of the Rice Crispy guys?
This is one of the simpler panels, with just two Threshold sliders — one for clicks, and one for crackles. A “Click Meter” that resembles an electric M&M sits in the center, and turns red when a click is being “repaired.” Perhaps my material wasn’t crackly enough, but the Click Meter never really got active for me. However, using it on a VO that I’d made crackly with SFX Machine’s “78 RPM” setting cleaned up in a reasonable fashion. It didn’t remove them completely, but it reduced them significantly, and didn’t trash the high-end.