
by Steve Cunningham
The world of software DAWs has been significantly rocked in the past year or so... IQS and SAW are essentially gone, Apple bought Emagic and discontinued the PC version of Logic, Cool Edit Pro is now Adobe Audition and Cool Edit 2K is history, and Sony owns all of Sonic Foundry’s products. Yikes! — if you’re not a fan of change, then this has been a tough year for you.
On the other hand, Pro Tools is still Pro Tools, and Digidesign continues to maintain the largest user base in the audio industry. But if you read the trade press, they’ve got competition, notably from Steinberg’s Nuendo package. And yeah, Steinberg was bought by video software maker Pinnacle late last year. It figures.
Introduced by Steinberg in 2000, Nuendo is touted as a Pro Tools killer, and has gained some favor in the music and postproduction markets. But is it right for radio?
Nuendo is a serious piece of software. At a suggested retail of $1495 it had better be, and it indeed shows itself to be a very complete package with some unique features. Nuendo combines multitrack audio recording and editing with heavy MIDI capabilities for the music guys. It boasts an unlimited number of tracks at sample rates from 32kHz to 192kHz and bit rates up to 32 bit, and you can combine different bit depth files in the same project.
Nuendo’s system requirements are on the steep side for radio, where many of us are still running Windows 98SE or Mac OS9. On the Windows side you’ll need to be running either Windows XP or 2000, with at least an 800 MHz Pentium or Athalon and 384 MB of RAM. If you want to have any fun, you’ll really want a 1.4GHz Pentium or Athalon, more than half a gig of RAM, and a monitor that will do 1152 x 864 pixels. Actually two monitors are needed for real fun, as Nuendo’s screens are info-packed. On the Mac side you must run OSX 10.2.5 or later, with at least an 867MHz G4 and 384MB of RAM. Better is a dual 1.25GHz, a boatload of RAM, and either a dual monitor setup or one of those tasty 23" Cinema displays (are you listening, Santa?).
Nuendo is also a wee bit particular about audio hardware — it works best with audio cards that have their own ASIO drivers. ASIO-compliant cards are not unusual, but this rules out some Digidesign hardware (although that should come as no surprise). You can use Nuendo with a card that supports DirectX or MME, but you lose Nuendo’s ability to automatically compensate for latency. The good news is that high-quality ASIO-compliant cards are reasonably cheap. For PC use check out Midiman on the low-priced end, or RME if you have a few bucks in your jeans.
Installing Nuendo was uneventful for me. The program uses a serial number for registration, and it does require the use of a USB dongle for copy protection. I’ve ranted before about having my USB ports stolen by dongles, so I won’t repeat that rant here. I get it, but I don’t like it... ‘nuff said.
FILE MANAGEMENT
This program is vast, and it’s deep. There’s a lot going on here, and if you’ve never used a Steinberg product before it may take a while to become accustomed to how things work. But once you’re in the zone with Nuendo you’ll find a lot to like. Let’s start with a bit of nomenclature.
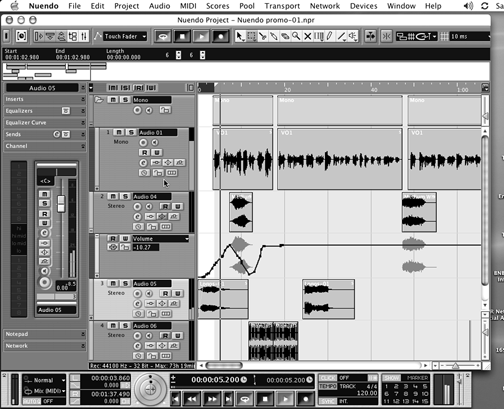
A multitrack recording, including all the audio, mixer automation, effects and settings, and any MIDI stuff is called a Project, and the Project is the main window in Nuendo [see screenshot]. All audio (and video) bits connected with a Project are stored in a “Pool”, and each Project has one dedicated Pool [see screenshot]. Nuendo lets you open more than one project at a time, so you can drag and drop audio files from one Pool to another. It’s a handy way to keep track of all your bits.
You can also create a Library, which is essentially a global Pool that is available to any project. The Library is ideal for storing frequently used sound effects and music beds. Both the Library and the Pool are searchable, so it becomes important to give your effect files descriptive names in the Pool and Library to make them easy to find later.

HOW STUFF WORKS
Steinberg invented the VST (Virtual Studio Technology) standard, so you’ll see lots of things labeled as VST-something-or-other in Nuendo. This includes basic audio inputs and outputs, which you assign using the VST Connections menu. This will likely be the first place you visit, so you’ve been warned.
Although Nuendo’s windows are loaded with information, they’re reasonably easy to navigate. The Project window provides a graphic overview of your tracks and lets you perform large-scale editing. In this regard it’s quite like the Edit window in Pro Tools. The Project window is divided vertically into tracks with a horizontal time line that can be calibrated in hours:minutes:seconds, samples, or feet and frames (that’s for the film guys). You can create an unlimited number of tracks, each of which can be for Mono or Stereo Audio, Folders, FX Channels, Group Channels, MIDI, Markers, Rulers, or Video (stay with me here, I’ll explain the important ones).

Each audio track automatically has a corresponding channel in the Nuendo mixer. Further, audio tracks can have any number of automation “subtracks” for automating insert effect settings and mixer channel parameters. By clicking on the small “+” symbol on the lower left corner of an audio track, you create subtracks where you can see fader and mute automation, EQ on and off settings, send levels, and so on. This is actually much cooler than Pro Tools and some other editors, where you’re only allowed to view and edit one automation parameter at a time.
Folder tracks were confusing at first, but after using Nuendo for a bit I like ‘em. A folder track is a container for other tracks, and makes it easier to organize and manage the track structure. For example, you can drag all your FX tracks into one folder track, and hide or show all of them with one click. Or you can slip all your FX tracks backwards by two seconds at once by simply slipping the folder track. That’s slick.
Group Channels are the mechanism Nuendo uses to group tracks. By creating a Group Channel and assigning audio tracks to it, you can adjust levels or apply and automate effects across all the tracks, or perform any other edit that you would using edit or mixer groups. It’s like a folder track, except that Nuendo automatically creates a Group mixer channel when you create a Group Channel, so you can work from the mixer as well.

EDITING
You’ll likely do most of your editing directly in the main Project window. The zoom sliders let you get close enough for most tasks, and it’s an easy window to navigate. If you highlight an audio “event”, you’ll find red handles on the bottom of it for top and tail trimming, and blue handles on the top for creating quick fades. Grabbing the blue handle in the top center of the event lets you adjust the volume of that event quickly.
Double-clicking on the audio event brings up the Sample Editor window [see screenshot]. This function is reminiscent of Cool Edit Pro, where you could switch between general editing in multitrack and surgical editing in stereo. You can top and tail events quickly, and zoom in to a high magnification level without changing the resolution of your multitrack window — this saves a lot of time and aggravation. All the usual editing tools are available via the icons along the top of the window.
Speaking of the icons, Nuendo’s icon-toolbar is intimidating at first look. Fortunately you can hover your cursor over an icon and the name of the tool will pop up, and you’ll eventually commit them to memory. The next thing that will annoy you is having to click on one of the icons to select a tool when you’re trying to speed through an editing session. You have two options to speed this up: you can right-click to bring up a contextual menu that includes all the tools, or you can use the number keys along the top of your keyboard to select a tool. They’re all numbered from left to right, with “1” being the Object Selection tool, “2” being the Region Selection tool, and so on. Again, it’s a matter of getting into the Nuendo zone, but you’ll get quick with it.
THE MIXER
As of this writing, Nuendo is at version 2.10. Version 2 is a significant upgrade from version 1.x, especially with regards to the mixer. Nuendo’s new mixer emulates a big hardware board better than any program I’ve seen. The multiple windows for channels, EQ and outputs are gone, and in their place is a mixer that looks and feels like a mixer. Although it may take a bit of studying to understand the hieroglyphic icons on the left side, the new mixer gradually reveals itself to be a multilevel digital network that can quickly be expanded for tweaking or collapsed to take up minimal real estate on the screen. In fact, you can create four different mixers, so you can have, for example, one just for FX tweaking, one for EQ, one for tracking, and one with just group and folder channels. You can show selected channels and channel strip sections in narrow, wide and extended mixer views. This is just one area where working on a multi-screen rig has big advantages.
Opening the input/output mixer section lets you boost the level of low-level signals before they hit the EQ and effects, just like the trim on a real board. Each channel has a phase reversal switch and input/output pop-ups for selecting input and output buses. If you add EQ and effects to a channel before recording audio, then the EQ and effects will be printed with the audio. Again, just like a real board.
Two of the eight channel inserts are post-fader. You can bypass EQ, inserts and sends individually or globally for each channel. Right-clicking in Windows (or control-clicking for the Mac) on the channel meter brings up meter options — Hold Peaks, Hold Forever, Input VU, Post-Fader VU and Fast Release. You’ll also find the global reset for the VU meters in this area.
Mix automation comes in five modes. Touch Fader starts writing automation when you touch the control and stops when you release the mouse button. Auto-latch starts writing when you click the control and stops when you stop playback or turn off the Write function. X-Over works like Autolatch, except that it stops writing when you cross a previously written automation curve. Overwrite works like Auto-latch, except that it only affects volume and it continues to write until you turn off the Write function. Trim also only affects volume automation, and offsets the volume automation curve without overwriting previous volume information. Waveform data is displayed as a shadow behind automation curves, and you can make automation data move with edited data when you select the “automation follows events” preference or menu choice. You can edit automation using preset curves, jump curves for on/off and ramp curves for continuous multiple values.
FX return channels give you a convenient way to “premix” effect levels. You can also add processing to the effects returns — FX return channels have inserts and EQ with the same layout as audio channels.
Nuendo’s mixer also does surround, and does it to death. There’s enough here to make George Lucas smile, all the way from plain-vanilla four-channel LCRS to 10.2 surround. Hey, you never know when your AE might show up with an order for car spots in 5.1. Nah, never mind.

OODLES OF EFFECTS
As mentioned, since Steinberg invented VST it stands to reason that Nuendo is VST plug-friendly. The program ships with 72 VST plug-ins, and a diverse selection of more than 400 signal-processing plugs are available from third-party sources. Besides Apogee’s yummy UV-22 dithering, Nuendo’s built-in effects plug-ins include reverb, dynamics, delay, chorus, flanging, and noise reduction - all of which can be automated. For those of you who never got over the Rock Star thing, there are also several software synthesizers to satisfy your music-composition cravings. They’re all quite good, and some are outstanding — the multiband compression is really nice.
THE DOCUMENTATION
Nuendo comes with a 232-page Quick Start Guide that will give you all the information you need to get rolling. The detailed soft cover manual is a whopping 732 pages, and could use a more comprehensive index, but it does the job. Both are available as PDF files on the installation CD, and you may find it easier to search them on your hard drive for a particular term or function.
NETWORKING
Also new in version 2.10, Nuendo’s new networking capabilities may be the one feature that actually makes it worth all the money. Using Nuendo’s networking technology, you can collaborate with other users of Nuendo in a peer-to-peer network. The “owner” of a project can share it with any number of users via LAN (Local Area Network) connections and/or WAN (Wide Area Network) connections using standard Ethernet network protocols. This lets several separate users work on a project simultaneously, and should be interesting to production departments working on bits for the same show. At this time you can share audio and MIDI tracks only, but not mixer setups.
I didn’t have an opportunity to check out Nuendo’s networking, but I hope to do so in the near future. If it works as advertised, it should be way cool.
THE END?
So is Nuendo worth one and a half kilobucks? It’s certainly full-featured, and was rock-stable during my evaluation. It has all the features, and once you get the hang of working in it, Nuendo is as quick as any software. The sound quality is excellent, and it will do anything that Pro Tools or Vegas, or CEP will do. There just isn’t a lot not to like.
I think it comes down to the networking and collaboration features. If those are happening, then I’d say it’s worth the money. Apart from that, Nuendo is a great, if pricey, editor.
Nuendo 2.0 retails for $1,495. For more information, contact Steinberg, a division of Pinnacle, at (818) 973-2788 or visit www.steinbergusa.net. For more information world wide, contact www.steinberg.net.
♦