INSPECTOR
Technically, the Inspector plug-in doesn’t meet the requirements in the list, since it doesn’t sound good. In fact, it doesn’t “sound” at all, but it can help your recordings sound good. And it’s absolutely free.
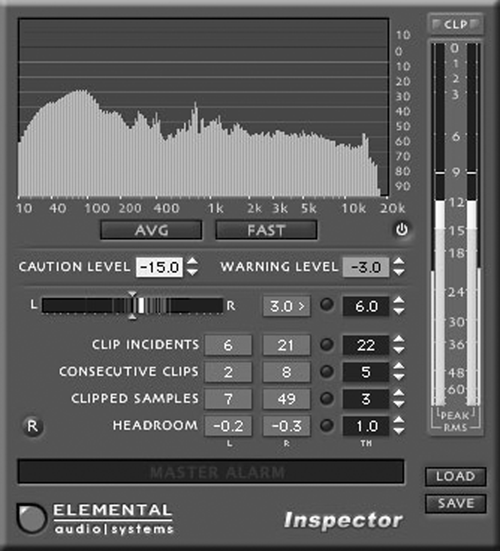
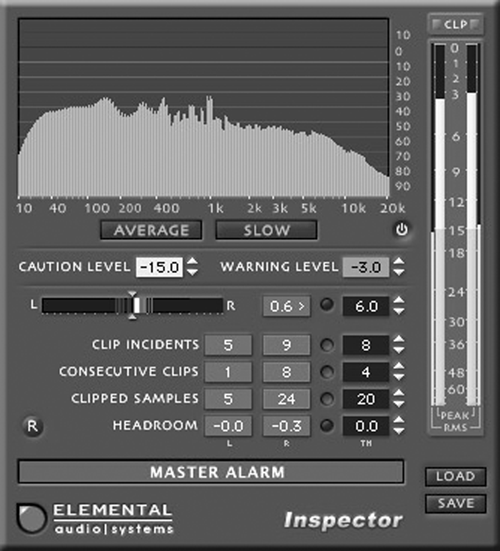
Inspector combines a frequency analyzer with a comprehensive set of meters and clip indicators (see figure 3). Its primary job is to keep track of what you’re recording and ensure that you don’t end up with either digital distortion or too low a level. To nudge you when something has gone over range, Inspector has a Master Alarm bar that goes from dark and unobtrusive when off to bright blood red when on. It will definitely get your attention (see figure 4).
The top third of Inspector’s panel is home to a real-time frequency analyzer (RTA). Although it’s hard to tell here, this is a stereo RTA with the left channel in blue and the right channel in red. Where left and right are the same, the display is purple. The two buttons below the display let you set its mode. Choose between measuring Peak or RMS levels, and between fast and slow decay times which affects how “jumpy” the RTA appears. The RTA does use some computer power, so you can disable it altogether to save CPU cycles using the small button below and to the right of the display.
The meters are on the right-hand side, and Inspector features both Peak and RMS flavors. You can set the color of the meter sections to reflect your comfort zone with respect to level, using the Caution Level and Warning Level parameters. The Caution Level is the volume at which the meters change from green to yellow, and the Warning Level is where the meters go orange. There’s a separate indicator on top of the meters that lights up in red upon clipping.
Below the RTA is a Balance Meter. The white vertical bar in the meter shows you the average balance of your audio at any given moment. Peaks that skew to the left or right are shown as smaller bars in either blue or red according to the channel, and these remain visible until you reset them. The numeric readout next to the meter shows you the highest average balance in dB, and indicates the channel with a “<“ for left and a “>” for right.
To the right of the balance readout is the first of several alarm settings, each of which activates the above-mentioned Master Alarm bar. In this case, setting the balance alarm on the right causes the Master Alarm bar to visually shriek at you if your channel balance exceeds the threshold you’ve set up.
Below the whole Balance Meter assembly are three clipping indicators; each has an associated alarm setting. The most useful of these is Clip Incidents, which measures how many times you clipped during recording. The other two measure the number of Consecutive Clips, and the total number of Clipped Samples in your recording.

The Clip Incidents is most useful because it literally tells you how many times your audio signal exceeds 0dB, irrespective of how long each clipped section may be. If your audio goes over range, you may have clipped only one sample, or several samples in a row, or just some samples and not others. One or even a few consecutive clipped samples is probably not audible, and may not be a cause for concern. But the total number of Clip Incidents is a very good indicator of audible distortion, and may indicate that you need to record again at a lower level. The number of Consecutive Clips is also useful, since in my experience more than ten or twelve clipped samples in a row can be heard. You can set a threshold for each of these clipping conditions, and exceeding that threshold will activate the dreaded Master Alarm bar.
Finally, there’s a headroom indicator below the clipping indicators that tells you exactly how close to 0dB your audio came during recording. It too has its own threshold setting.
Inspector makes no noise, but definitely passes the usefulness test. The RTA can help find peaks in microphone response with a particular actor, and the Stereo Meter is a must-have for checking mono compatibility. The clip indicators are very useful during mixdown, as it helps me keep radio spots as hot as possible without fear that they’ll go all fuzzy and clipped during the MP3 encoding process. Headroom is a Good Thing.
You can download Inspector at Elemental Audio System’s web site (www.elementalaudio.com/). Just click on “Inspector” and follow the links. If you’d rather not hear from Elemental again, you don’t have to provide an email address to download Inspector. The plug is available in Audio Units format for the Mac, and in VST and RTAS (for Pro Tools) formats for both Windows and Mac. Don’t forget to download the PDF manual, which presents a good treatise on clipping and the proper use of meters.
RESOURCES
There are literally hundreds of free plugs on the Internet to get your production juices flowing. Be advised that some of them are just too weird, or don’t work well, or will conflict with other programs on your computer. But there are several web sites that feature well-written effects plug-ins that cost you nothing, and while they may not be to your taste, you may find a gem among the stones.
The mother of all plug sites is K-v-R (www.kvr-vst.com). While the site leans toward the VST format, it links to a wide variety of items in DirectX and Audio Units formats as well. Click on the Instruments/Effects/Hosts tile on the left side navigation bar to find the goods.
A complete collection of free VST plugs for both Windows and Mac are available at Maxim Digital Audio (www.mda-vst.com/). Distortion, filters, panners, compressors, EQs, are all represented. A few are outstanding, most are serviceable, and couple are buggy, but it’s another good place to look for something that doesn’t sound like what shipped with Sound Forge, ya know?
♦
