

by Steve Cunningham
PreSonus has been around for almost ten years, making moderately priced microphone preamplifiers as well as outboard EQ and compressors. I’d used a PreSonus eight-channel pre several years ago, and while it was good for the price it, didn’t have enough clean gain for low-output dynamic mics like the RE-20. Nevertheless, I was intrigued when PreSonus announced an optional 192 kHz AES output card for their Eureka mic processor, and I’d heard good things about the box from colleagues. So this month we’ll look at yet another entry in the low-cost “channel strip” category, the PreSonus Eureka.
The Eureka is a single channel microphone processor whose front panel is divided into four sections: Transformer Coupled Preamp, Compressor, Parametric Equalizer, and Master. With a street price under $500, the Eureka gives you a lot of features you wouldn’t expect, including variable impedance selection and transformer saturation. Moreover, the Eureka’s performance with dynamic mics has improved markedly compared to older products.
![]()
ONE GOES IN, ONE COMES OUT
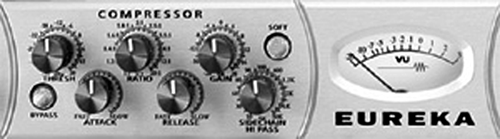
The single-space Eureka’s face is machined from a single piece of brushed aluminum, which in turn is dense with anodized blue knobs and buttons lit with blue LEDs. Front and center is an old-school backlit analog VU meter that can display output level or gain reduction.
The rear panel has a single balanced mic input on XLR, and another balanced line input on a 1/4" TRS jack. The output section is identical, with one XLR output and one 1/4" TRS output, and both are active at all times. There are balanced TRS send and return jacks on the back as well, along with the IEC connector for the power cord and the on/off power switch. Having the power switch on the back panel could be an annoyance, depending on your studio setup, but it didn’t bother me.
THE PREAMP
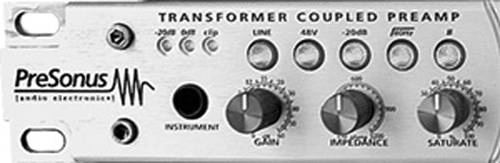
As I mentioned, the front panel is dense, so we’ll take it by section. On the left side is the mic preamp, which is a transformer coupled solid-state Class A unit (yes, there’s a real transformer inside – I checked). The input meter consists of three blue LEDs, one each for -20dB, 0dB, and Clip, and they flash in increasing intensity with the input signal level. It’s a drag that there are only three LEDs, and that they’re all blue in color - you have to pay close attention to them to be sure you’re not clipping, and no, you can’t use the big VU meter to monitor the input level. The jack below the level LEDs is a TS connector for high-impedance instrument signals (input impedance is 1 Meg ohm). Plugging into this input bypasses the mic preamplifier and the Eureka becomes an active instrument preamp.
There are a total of five pushbuttons in the preamp section, each of which lights up when active (in LED blue, of course). The pushbutton labeled LINE selects the line input on the back as the input in use. When the Line input is in use, the microphone preamplifier stage is bypassed and thus the Gain, Impedance and Saturate controls are inactive. The other pushbuttons activate 48-volt phantom power, a 20 dB pad, a highpass filter set at 80 Hz, and a phase reverse switch.
On to the knobs, all of which on the Eureka are stepped pots (excepting IMPEDANCE which is a 5-position switch). The knob’s “steps” don’t seem calibrated to any particular values, and besides the legends around them are much too small to read anyway. But they do give the knobs a nice solid feel. For example, the GAIN knob ramps up smoothly to a full +54 dB of preamp boost, which was quite adequate for the problematic RE-20.
The IMPEDANCE knob allows you to select one of five different settings to match or intentionally mismatch the input impedance of the preamp to a particular microphone. The settings cover a broad range from 50 to 2500 ohms of impedance, and let you “tune” the preamp to a variety of microphones. It can also be used as a tone-shaping effect. The lowest setting, 50 ohms, should be great for most ribbon mics. Used with condensers, reducing impedance cuts low end and results in lower output. Fortunately, Eureka has more than enough gain to make up for that. For most applications, you’ll use the 2,500-ohm impedance, but the tonal options provided by the other settings are a nice bonus. The RE-20 seemed happiest at 600 ohms, a good compromise between low end and sensitivity. This one I like.
The SATURATE knob however, is somewhat inscrutable. PreSonus says this feature adds “warmth” and increases the even harmonics of the input signal to simulate a tube, and works by manipulating the drain current of the FET input buffer of the preamp. It adds something for sure, but I’m not sure I’d call it “warmth.” It sounds to me like it scoops out the upper midrange, and at maximum level it muffles the sound. Nope, this one I don’t like much.
Having said that, the preamp itself is very good. It has lots of clean gain, almost no self-noise, and almost no coloration. It can get a little harsh on sibilance, but there’s a de-esser in the compression section as we’ll see.
SQUASH, BOOST AND CUT
Following the preamp is the Compressor, with selectable hard or soft knee settings and a makeup GAIN control that provides another 10dB of boost or cut. In addition to the usual compressor controls, all of which are on those stepped blue knobs, the Eureka has a SIDECHAIN highpass filter built right in. This can be set to a frequency between 10 Hz and 10 kHz, turning the compressor into an instant de-esser. At the minimum setting of 10 Hz the sidechain has no effect, so the compressor works as normal.
The compressor reminds me of a dbx unit, which is a Good Thing. The attack time is not super-fast, but it’s fast enough, and my overall impression of the compressor is that it’s very smooth. A look inside the box reveals a THAT integrated circuit, which I suspect is the compressor’s FET-based VCA. It’s a good-sounding, highly controllable compressor that does its job well, even when squashing the living daylights out of a track. You can intentionally make it pump, but used responsibly its clean and unobtrusive, particularly when using the soft knee setting.
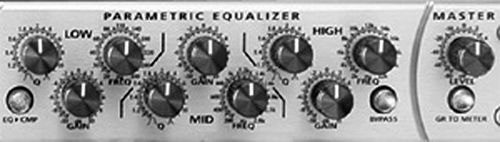
In the Parametric Equalizer section, three identical control sections are provided for low, mid, and high frequencies. From low to high, the frequency range in each section overlaps into the next - in other words, no gaps. For each section you’ll find a knob for selecting frequency, bandwidth range, and up to 10 dB of boost or cut. It’s good for broadband shaping, and has enough precision that you can dial in surgical cuts as well.
Finally, the master section at the far right consists of a single master gain control and a switch for toggling the VU between displaying the output and displaying gain reduction from the compressor. I only wish that you could switch it to display the input level as well, as the three blue LEDs don’t give me a high sense of confidence regarding the input level.
UNDER THE HOOD
A peek inside the Eureka reveals a high build quality, with no visible jumpers or cuts anywhere on the PC boards. In particular, I noticed that the power supply features a hefty two-inch toroidal transformer, which should provide plenty of clean current. The PCB layout is roomy, with lots of space between signal and non-signal PC traces, and a generous ground plane. A tag on the bottom of the case indicates that the Eureka is made in China, but the layout of the electronics is obviously all-PreSonus. Nicely done, and it shows in the unit’s performance.
The Eureka comes with a very thin manual, and the last quarter of it is devoted to settings for various applications – nice I suppose, but since I don’t record live drums it’s of questionable value to me. I really wanted a block diagram in the beginning, but the unit is simple enough that even I was able to figure it all out within an hour.
VO’S AND BITS
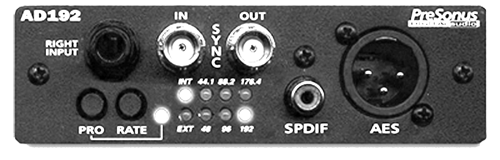
An optional AES digital output card is available, and when installed the card occupies space behind a removable rear-panel plate. It mounts to the inside with a few screws and a single connector, so installation should be straightforward for any competent user (my review unit came with the card installed, which may reflect someone’s opinion of my competency). The AES signal is on an XLR connector, while SPDIF is on an RCA jack. A pair of BNC connectors are provided for word clock in and out, allowing you to clock the Eureka from an external digital device. The AES card generates either AES or SPDIF 24-bit digital audio (selectable with the button marked PRO), at rates from 44.1 kHz to 192 kHz.
I made substantial use of the AES option during my evaluation, and it always worked as advertised. The buttons on the back for selecting the sample rate and format are small and fiddly, but once set you shouldn’t have to fool with them again. And if you clock the Eureka externally from your mixer or DAW, it is smart enough to lock to whatever valid clock shows up on its WC input.
An auxiliary 1/4" TRS line input on the card lets you connect a second Eureka to the AES output card, since AES signals carry two channels by definition. The benefit here is that one digital card can service two Eureka preamps.
CONCLUSIONS
The Eureka is a sexy-looking box, that’s for certain. But its beauty is compromised by some significant user-interface issues. The EQ section is especially difficult from a user’s standpoint. The knobs are positioned tightly; if you’re saddled with fat fingers then you’re going to have some trouble. In the heat of a session, I found it nearly impossible to twist a knob without bumping the one adjacent to it. Fortunately the knobs don’t turn too easily, so they seldom turn when bumped. But the tops of the knobs are also shiny, and the silver pointer can be tough to see quickly. The legends showing a knob’s value are silk-screened in microscopic type, and the blue on brushed silver is hard to see unless you’re right on top of it. To make matters worse, the Parametric EQ section is arranged differently per band. The GAIN knob is the bottom one on the low and high bands, but it’s the top one on the midrange band.
Setting up the Eureka was a breeze, but then again there’s only one set of inputs and outputs to deal with. The detented knobs have a slow, solid travel, and the illuminated buttons have a satisfying click. If you’re one of those who plugs in a mic, sets the processor, and leaves things that way most of the time, then you’ll be fine. But to see the settings and for delicate knob access with any but the smallest fingertips, you’ll want to mount this unit close to you and near eye-level.
Its preamp is surprisingly good and uncolored – it’s definitely not a “character” preamp. The preamp sounds like a well-designed Class-A preamplifier should - lots of gain, no noise, and very little in the way of coloration. Compared to my FMR mic pre, the Eureka is a tad brighter and more “in your face.” Compared to the preamps in a Mackie or Yamaha mixer, well, there’s no contest. The Eureka is much quieter and cleaner than any of these in the A/B comparisons I did, particularly at high gain settings. It also kicked the stuffings out of a Focusrite channel strip, at least in the preamp section. The Eureka sounded much more natural.
The compressor is great, smooth and well behaved. The parametric EQ is musical and sounds great, once you find the settings you want. In the end I used the Eureka mostly by ear, which is how I think things should be done anyway. Once you figure out which of the blue knobs you want, you’ll find it sets up quite well. The digital output is a real bonus for me, and the converters in it are as good as most any I’ve heard (especially at this price).
If you’re in the market for a sub-$1000 mic processor, the PreSonus Eureka should be on your list of things to check out.
The PreSonus Eureka carries a suggested retail price of $699.95, and sells on the street for under $500. The digital output option lists for $249.95, and can be found for less than $200. For more information, visit www.presonus .com.
♦