 By Dave Foxx
When I was starting my professional career, it wasn’t in radio at all. I was a technical director for live theatre, with a heavy interest in lighting. My boss at the time, Jack Ellis at the Scott Theatre in Fort Worth, Texas, gave me a book on lighting and inscribed it with, “Remember, this is not the method. It is a method.” I pass that advice along to you with this column. I am simply sharing the production methods I have discovered and use. They will probably work for you, but there are a thousand roads to success. This is just one of ‘em.
This month I wanna take you for a ride down one of those roads on the magic buss. Yeah, I said B-U-S-S. At first glance, this column is going to look like a “How-To” for Pro Tools. However, the principles I’m talking about are universal. Your DAW may or may not have the same features. If it does not have these features, you might want to start thinking about a new DAW, one with these features. Why? It will make your life incredibly easier. If you have a recording studio background, you’ll know immediately what I’m talking about.
Ask any engineer the difference between a “broadcast” console and a “recording” console and the first thing they’ll point out is sends/receives and bussing. Broadcast consoles, where most radio pros cut their teeth, don’t have these features. If all you’re doing is playing carts, CDs and/or computer soundcards, you don’t need ‘em. However, a recording console will have these features because without them, every session would become a nightmare to control. Most DAWs have these features built in because aside from Orban, none of them were built exclusively for radio. Most were built for multiple uses, including recording.
So, what are sends/receives and busses? Sends/receives are audio pipelines attached to each channel that allow you to siphon off signal (without any loss to the original) so you can fiddle around with it and mix it back into the main signal at will. Busses are like a patch bay built into each channel, allowing you to put that channel’s (and others) output into a sub master where you can fiddle with the signal of several channels at once. Confusing? Let’s do some examples.

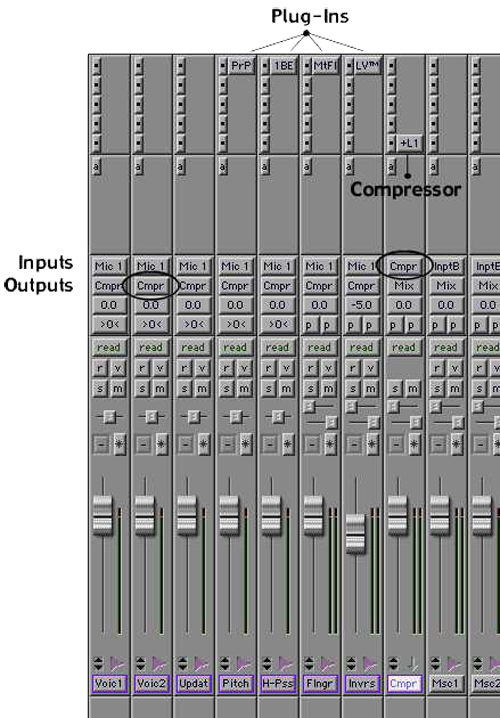
Let’s start with bussing. Say you have 7 VO channels. Two for the main announcer, one for updates, one each for High-Pass, Flange, pitch and one more for an inverse masking effect. You want them all to be compressed the same amount after they’ve gotten whatever effect they need, but you don’t want to compress everything else. Begin by creating a VO sub master. (In illustration 1, it is labeled Cmpr.) Set the sub master output to the mix and the input to a particular buss. (In this case, the buss has been named “Cmpr.”) Step 2) set the output of each voice track to the same buss you put the sub master input. Step 3) set up your compression plug-in on the sub master. Done deal. Do your VO tracks need to be brightened? Add an EQ plug-in to the sub master. One plug-in on several channels at once. It not only saves you from having to set up several compressors, it saves your system DSP because you only instantiate once. (Meaning you can use more and different plug-ins)
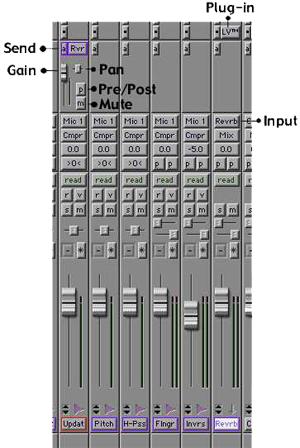
 If you want reverb on your promo, many of you will add reverb to the final mix. BAD producer! Really, you usually only want reverb on the vocal channel. Knowing that, many, if not most of you will add a reverb plug-in to one vocal channel or perhaps two, or three or more. INEFFICIENT! What you want to do is send any channel that requires reverb to a reverb sub master. Then you can mix the sub master output back into the final mix and have absolute control of the overall wetness of the ‘verb and only have to instantiate the plug-in once. Here’s the fun part; you can still control each channel’s level going to the sub master. (See illustration 2.)
Here you have a send open to the reverb buss. You see level, pan, mute and a pre/post button. The level is independent of the channel’s output level, so you can send as much or as little to reverb as you like. The pre/post button tells the send whether to take its signal before (pre) the channel’s fader works the signal or after (post) it works the signal. If you set it for post, the amount of signal will be affected by the output fader’s setting. However, the send level still is a factor. The mute button stops any signal from going to the send.
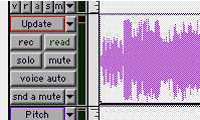
 If this still seems rather opaque to you let me suggest you just try it first. Make sure you have a reverb sub set up to receive signal from a particular buss and then make sure your send is going to that buss. The coolest part about all of this, in Pro Tools at least, is you can automate it. Once you set up a send on any channel, you then have access to a new view on the edit page for that channel. (Illustration 3.) In the pop-up button where you normally find Block/ Waveform/Volume/Mute/Pan, there’s a new option for send a, which pops open further for level/mute/pan. This illustration shows the send as being muted.
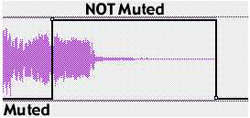
 Using the same tools you’re already used to for volume and pan, you can now turn the send on and off anywhere in your timeline, as well as adjust the level being sent. If you need a big reverb’d pop at the end of a music bed, mute the send until you get to the exact place of the pop. (See illustration 4.)
Note that in illustration 3, the reverb sub master sends its signal directly back into the mix. You can now use the sub master level to control the overall amount of reverb to be in the final mix.
Producing this way will truly make your life easier, your mixing faster, and will add to the plus side of your karma. Well…maybe not the karma part. Many of you will be uncomfortable doing things this way at first, and “Besides,” you say, “I already have a system set up to use my plug–ins. What do I need this for?” Okay. You’re right. You are absolutely right. Remember that this is not THE method. It is simply A method. It happens to be the one I’ve found most useful. That’s why I pass it along.
Next time: Arming yourself for the ULTIMATE promo.
♦

