EDITING TRACKS
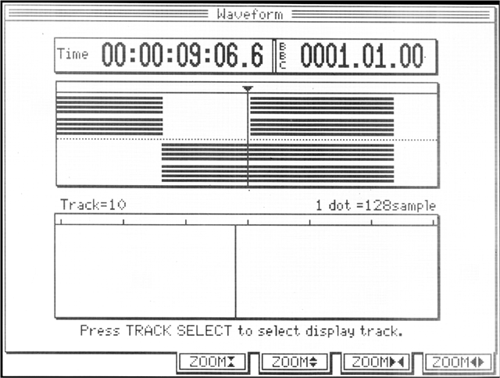
Once you’ve recorded a VO read and a music bed in the DPS16, you’ll want to edit them. The Mode button labeled WAVEFORM brings up the Waveform
screen (see figure 5). It shows you all 16 tracks on top, and any one individual track on the bottom. To view a particular track, you press the desired TRACK SELECT button. At this point you can use the jog/shuttle wheel to scrub through the track and find your edit points.
Editing on the DPS16 is just like editing on tape. You find an edit-in point, and set it by pressing and holding MEMORY then pressing the IN button, both of which are located above the transport. You set your edit-out point in the same fashion. You’ll then see the edit area highlighted in the track area in the upper part of the screen.

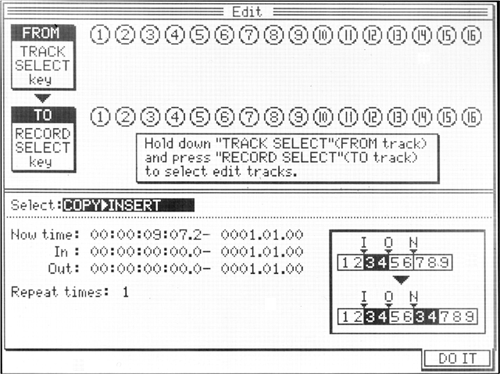
Once that’s done, you press the Mode button labeled EDIT to select an editing operation (see figure 6). Turn the jog wheel to select what kind of edit you want to use, and choose the tracks you wish to edit using the corresponding TRACK SELECT and RECORD SELECT buttons. Press DO IT (F6), and it will.
There are several different types of cut/copy/insert edits from which to choose. The lower right corner shows a graphical picture of the edit you’ve selected, with labels for In, Out, and Now. In the example shown, the audio between the IN and OUT points will be copied and inserted at the NOW point, without overwriting the existing audio.
The DPS16’s edit functions include time compression and expansion. You can stretch part of a track and overwrite later audio, or stretch it and have it move later audio forward in time to fit. At reasonable levels of time compression or expansion (10% or less), the result is transparent, and it’s a real lifesaver for producing spots that have to be exactly :30 or :60.
When you’re finished with your project, you can back up the entire business to a CD-R or CD-R/W. The backup function stores all your tracks, edits, mixer scenes and settings, the whole shebang.
You can also mixdown to two tracks using the DPS16’s internal stereo bus. This bus doesn’t connect to the master outputs, and is designed expressly for mixing down to two without leaving the digital domain. Once mixed, you can assign those mix tracks to an external CD-R or CD-R/W and burn a CD. Cool.

IN USE
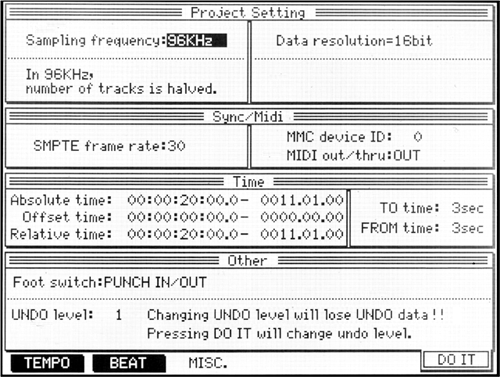
To begin a new recording, press the Mode button labeled PROJECT to create a new recording (see figure 7). Here’s where you’ll select the sample rate and quantization resolution, as well as UNDO levels and offsets. Pressing DO IT (F6) will take you back to the MAIN SCREEN, and you’re ready to record.
Note that when working at a 96 kHz sampling rate, the DPS16 becomes an 8 track recorder, since the additional data is stored on tracks 9 through 16. But at 32, 44.1, or 48 kHz sampling, it’s a full 16-track machine at both 16- and 24-bit resolution.
The DPS16 also has 250 virtual, or storage, tracks. These can be used for alternate takes, and you can assign any virtual track to playback via any mixer channel. For example, I recorded a VO take to track 1 via mixer channel 1. Then I assigned a blank virtual track to mixer channel 1, and recorded another take. I did four of these, and then assigned each take to a different mixer channel, so I had take 1 under fader 1, take 2 under fader 2, and so on. At that point it was easy to cut and paste between them to yet another track and get a good composite VO read.
During the four weeks I had the DPS16, I recorded a wide variety of material on it, including male voice, female voice, and even an upright bass. I used several different mics, both expensive and cheap. I recorded at both 24-bit and 16-bit, and at each of the different sample rates.
This box sounds “really” good.
It sounds so much better than some of my other recorders, including my DAT, that I re-recorded a couple of times thinking something was amiss. It wasn’t. So then I tried comparing recordings at various sample rates and resolutions to see if that would account for it.
I heard the most difference between recordings done at 16-bit and recordings done at 24-bit. It wasn’t hard to tell which was which, as the 24-bit recordings were cleaner and more open-sounding. But even 16-bit, 44.1 kHz recordings on the DPS16 still sounded better than anything else in my room.
While I heard a clear difference between the 16-bit recordings and the 24-bit recordings, the difference between 96 kHz and either 48 or 44.1 kHz was subtle to the point of vanishing. And 96 kHz used up a lot of disk space to boot. Why doesn’t it sound twice as good at twice the sampling rate? That was a real head-scratcher.
Then it hit me — it doesn’t matter. 96 kHz doesn’t matter, at least not to me.
What does matter is the quality of the new 96 kHz converters. I’m convinced that the A/D and D/A converters in the DPS16 are so much cleaner than the converters in, for example, my Panasonic 3700 DAT that even regular old 16/44.1 stuff just sounds better. A tip of the hat to the chip manufacturers is in order here, as is one to Akai for using their converters.
Am I gonna sell everything and buy new? No. But based on what I’ve heard, any new gear in my room will have 96 kHz converters on it. Why not?
WRAP IT UP
The DPS16 packs a whole lot of power into a small package. I do have some quibbles with it. The plastic case looks great, but feels a bit less than pro. Likewise for the plastic 1/4" jacks. And while the large LCD screen is great, the PROJECT screen in particular is cluttered and tough on these old eyeballs.
But those nits aside, it’s a capable box that includes all the tools. It sounds fabulous, and it’s straightforward enough that I’d even trust a morning guy to use it. Well, perhaps I’m being naive... let’s just say it’s easy, and with a street price that should be about two kilobucks, what’s not to like?
The DPS16 should be on store shelves as you read this, and carries a suggested retail price of $2795. For more information, contact AMIC at (800) 433-5627, or visit www.akaipro.com.
♦
