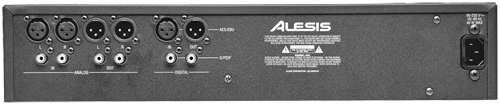
THE BACK SIDE
The rear panel of the MasterLink is Spartan, containing only analog and digital I/O and a jack for the AC cord. The analog inputs consist of balanced XLRs and unbalanced RCAs, both of which are always active. There’s no switch to select XLR vs. RCA, which is a little strange. Just be careful if you have cables connected to both coming from different sources.
The XLR inputs have a +4dBu nominal input level, while the RCA inputs are at -10dBV nominal input level. Both sets of inputs have a reasonable amount of headroom—15dB from nominal input level to clipping, resulting in a maximum of +19dBu at the XLR inputs, and +5dBV at the RCA inputs. This should let you connect most any source you have to the MasterLink, but be aware that there are no gain controls on the inputs, so you’ll likely want to feed it analog audio from a mixer.
The analog outputs are similarly configured, with balanced XLRs and unbalanced RCAs and the same level specs. The analog inputs and outputs are both connected to 24-bit converters.
Digital I/O is provided on both XLR and RCA connectors, with the XLRs configured for AES/EBU format and the RCAs configured for S/PDIF. Unfortunately, like the analog inputs, the XLR and RCA digital inputs are both always active. Feeding them digital signals at the same time will definitely result in data corruption, and that’s a Bad Thing. I’m surprised that Alesis didn’t add a selector switch or a detector that would disallow both inputs to receive at once.
MAKIN’ A LIST
The MasterLink is a single-purpose hard disk recording system that will hold over five hours of 16-bit 44.1kHz digital audio. If we use the DAT-recorder analogy, then those five hours can be divided into as many as 16 individual “tapes” of varying length. In the MasterLink a “tape” is called a Playlist, and each Playlist can hold up to 99 Tracks.
To begin recording, you first select one of the 16 Playlists using the PLAYLIST SELECT button. Then press PLAYLIST EDIT and NEW TRACK to create a new Track within that Playlist. Pressing the RECORD button will put that new Track into “ready” mode, with the sample rate, word length, and input source determined by the state of the associated buttons on the front panel.
A single press of the PLAY button will begin recording to the Track. You can pause the recording using the PLAY button, which will toggle between PLAY and PAUSE. When you’re done recording, just press STOP. To create a second Track, just press NEW TRACK again and continue as before.
The brilliant part of this scheme, and where it leaves DAT in the dust, is that Tracks recorded on the hard disk behave just like CD tracks. The SCAN, SKIP, PLAY, and STOP buttons all work much as they would for a CD.
In particular, the SCAN buttons are a great way to get around within a long Track. Holding the SCAN button while in PLAY makes a Track play at 2x speed for about five seconds, then increases the speed to 4x for five seconds, and finally kicks it up to 8x normal speed. You can hear the sped-up Track as you’re scanning through it, and MasterLink automatically attenuates the sound level so you don’t blow your tweeters while listening at 4x or 8x. Nicely done.
TOPPIN’ AND TAILIN’
Once you’re finished recording, you can adjust some basic parameters in your Track. For example, the first thing you might do is a head and tail trim. In MasterLink parlance, this is called a Crop, which is a term usually associated with pictures—a portion of a picture is selected to keep, and the rest is deleted, or cropped.
To perform a Crop, you first set a Start point by pressing and holding TRACK START while pressing the <<SCAN or SCAN>> buttons to scrub through the audio. Releasing the buttons will set the new Start point. If you press TRACK START again, MasterLink will preview the first five seconds of your Track from the new Start point. Don’t like it? Scrub again to reset the Start point until you’re satisfied. You can also set the Start point on-the-fly by holding PLAYLIST EDIT while the audio is playing, and pressing TRACK START to capture a new Start Point. You can then fine-tune that point by scrubbing as above.
You set the End point in exactly the same way, using the TRACK END button and the SCAN buttons. Pressing TRACK END by itself will play the last five seconds of your Track to preview your edit. When you have everything right, you press TRACK START and TRACK END together and the display will prompt you to confirm the Crop operation. Pressing the Up/Yes button will do it, pressing the Down/No button will cancel the operation.
Cropping is a destructive operation that alters the audio file on the hard disk, and once completed cannot be undone. All instances of Tracks that reference that audio file will be changed, and if you’ve set Fades they will reset to zero seconds duration.
I realize the above description makes Cropping sound complex, but it’s actually a lot easier to do than it is to describe. After the first few tries, I was usually able to do an accurate head and tail trim in less than half a minute.
Here are a couple of editing operations that are simpler to describe—Track Split and Track Join. Track Split is great for breaking up a long recording into individual tracks. Just play your Track and hit Pause at the place you want to split it. Then hold PLAYLIST EDIT and press NEW TRACK, and confirm with the Up/Yes button. It’s done.
Track Join is the opposite of Track Split, and will combine two adjacent tracks into one. Simply go to the top of the second track, hold down the PLAYLIST EDIT button and press DELETE TRACK. Confirm with the Up/Yes button as before, and the two tracks will become one.
You can create a new Track while recording without losing any audio data during the track creation process. Pressing NEW TRACK while recording causes a new Track to be created and audio to begin to be written into that new Track. It’s like an on-the-fly Track Split, and it’s analogous to the “force start ID” feature on most DAT machines.
You can also change the Track Gain by cursoring over to the “dB” field in the display. Using the Up and Down cursor buttons, you can adjust the playback level anywhere between +18dB and -18dB. This adjustment is stored with the playlist, but it’s non-destructive and does not alter the actual audio file on the hard disk. Pressing both the Up and Down buttons simultaneously resets the playback level to 0.0dB.
You can also apply Fade In and Fade Out to your Track. There are three types of Fades: Linear, Logarithmic (a longer ramp), and Inverse Logarithmic (a shorter ramp). Fade times can be set as long or short as you like, up to the entire length of the Track.
You can also Delete Tracks, change their order in the Playlist, and edit their names in the display. All these functions are accomplished using either the dedicated buttons underneath the display, or using the cursor buttons to select various functions and edit their values.