Editing on Sound Forge is effortless. You get Cut, Copy, Paste, Trim/Crop, Clear/Delete, Mix, Crossfade, and some Special Paste functions. There are keyboard shortcuts for just about everything, and once you get the hang of things, editing on Sound Forge is very swift. I like it. The Cut function does your basic cut and splice edit. Copy puts a copy of the selected area into the clipboard. Paste places the contents of the clipboard at the cursor. It does not overwrite existing audio but inserts it at the cursor point. Trim/Crop deletes everything from the file except the selected area, a good housekeeping tool. Clear/Delete performs a Cut function but does not move the cut portion to the clipboard.
The Paste Special functions include Overwrite and Replicate. Overwrite pastes the clipboard contents into the selected area. Replicate fills the selected area with the clipboard contents, making multiple copies if necessary. This is handy for filling selected areas with sound effects such as crowd noise or other ambience. The Paste to New function creates a new Data Window and sound file with the clipboard contents.
The Mix function takes the audio from the clipboard and mixes it with the audio in the Data Window. Multiple files can be opened and selected areas can be dragged to the "destination" file to be mixed. The Mix dialogue box offers several options including level controls for each of the two sound files being mixed, and a ducking feature designed for mixing voice over music. There's also a Preview button that lets you listen to a looped portion of the mix before executing the mix. (This Preview function is available on all editing/mixing/effects/processing screens.) The actual mix rewrites the file and takes a few seconds depending upon the size of the files and the speed of the computer. Mixing a 60-second mono voice track with a stereo bed took eight seconds. Undoing the mix took a little over two seconds.
Processing Power
Much of the power of Sound Forge comes in its Process and Effects functions. The Process pull-down menu has a number of handy functions including Auto Trim/Crop, Channel Converter, Convert to 8-bit, EQ, Fade, Insert Silence, Mute, Normalize, Pan/Expand, Resample, Reverse, Smooth/Enhance, Time Compress/Expand, and Volume. Auto Trim/Crop removes silent sections from a selected area. If you have a voice track with lots of pauses in it, and you want to get rid of all the pauses, this is one fast way to do it. Channel Converter is used to convert mono files to stereo files and vice versa. The Convert to 8-Bit function converts 16-bit files and offers three ways to do it.
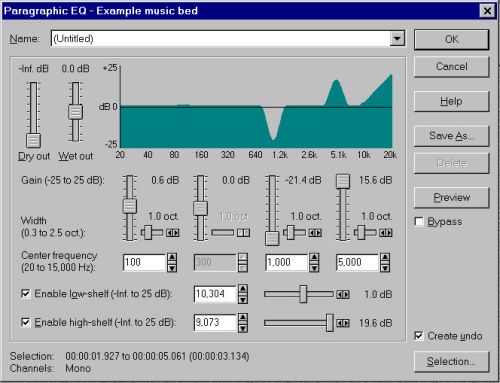
The EQ section provides Graphic EQ, Paragraphic EQ, and Parametric EQ. The Graphic EQ is a 10-band version with -60 to +15dB of cut/boost. The Paragraphic EQ is a 4-band parametric EQ with high and low shelf filters and a graphical representation of the EQ curve with +/-25dB of boost/cut. The Parametric EQ is a set of four filters: high-pass, low-pass, band-pass, and band-reject. This EQ is great for creating some very nice EQ effects or performing notch filtering to eliminate hum and noise.
The Fade function offers In, Out, and Graphic fades. The Graphic fade function displays the selected area of the waveform with a line above it. Click and drag up to sixteen points on the line to create a "fade curve." For most purposes, the Fade In and Fade Out functions will suffice for radio production. Simply select an area to apply a fade to, then select In or Out. You get the perfect fade, and you get it fast.
Insert Silence places a user set amount of silence at the beginning or end of a file, or at the cursor point. Mute basically erases the selected area. This could have easily been placed under the Edit menu and called Erase. Normalize is used to maximize the volume of a sound file by applying gain to just under clipping level. This is useful for setting the levels of several different sound files to the same volume. Pan/Expand is a pan lovers playground. Use the familiar click and drag graphic interface to "draw" the pan and stereo expand effects you wish to apply to a selected area. Use the Resample function to resample a sound file anywhere from 2kHz to 96kHz. Reverse flips the selected area, very quickly. The Smooth/Enhance function is basically a fast and easy way to add or remove high frequencies.
The Time Compress/Expand function works quite well. There are several modes to select from which include different algorithms for compressing/expanding music, solo instruments, voice, speech, drums, etc.. The manual boasts the ability to compress as much as 75% (make a sixty-second track forty-five seconds long) without glitches, so we took a sixty-second voice track and gave it a shot. Amazing! It only took eight seconds, and the result was virtually glitch free. Obviously, the speech did not sound "normal" because it was so much faster, but each word was there in its entirety. This is easily one of the best time compression functions I've heard, and faster than I expected for a disk-based system. Taking a 64-second track and making it a 60 is child's play for Sound Forge.
Finally, the Volume function under the Process menu simply adjusts the gain of a selected area. You can turn the volume completely off or add up to 20dB of gain. This is convenient for those voice tracks with a word here or there that needs boosting. Use it as a special effect to put emphasis on a particular word every time it's said. Together with a little EQ, this is a neat effect for adding emphasis to special words, and Sound Forge makes it...yes, fast and easy.
