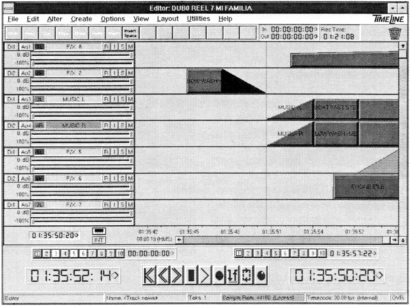
When the system is booted, Windows is automatically loaded and so is the Studioframe software. First thing to learn is how projects are created and stored. There are Projects, Episodes, Reels, and Versions. For the most part, all you need to deal with are Projects and Reels. Click on the New Session icon and the Project Selector screen appears. Here you define your Project which is actually a file "folder" for all the Reels within this Project. You might want to have a Project named after each producer so everyone on the system can have their own file folder of Reels. The Reels would be the individual productions inside their Project folder. Or you might have a Project titled "Commercials" and another titled "Promos" to organize your productions is these categories. Once a Project is selected, create a new or select an existing Reel. When selections are made, the Track Window is loaded displaying the eight tracks and their contents for the current Reel. This screen is where practically all time is spent.

The Track Window displays the Project/Reel name at the top. Below this is a typical Windows menu bar. Many of the functions on these pull-down menus are duplicated on the keyboard or on the DSC-100 Digital System Controller. There are also several functions on the pull-down menus for customizing the layout of the screen and the various functions of the system. Detailing all the options would take pages. Let it suffice to say that the Studioframe enables the user to configure the system in so many ways that one could spend a day just playing with the user preferences. We'll discuss the layout as setup by Computer Concepts.
Below the menu bar is a standard Windows Tool Bar which is also user definable. Again, many of these functions are duplicated on the keyboard and remote controller, and I never had the need to click on one of these tools. I found it easier to use the keyboard or DSC-100. To the right of the Tool Bar are two time displays showing the edit in and out points, and a third time display indicating remaining recording time available on the drive. At the far right is a small trash can. Want to trash something on a track? Click and drag it to the trash can. However, all audio stays on the drive and is retrievable until the Cleanup function is used.
To the left of each track on the Track Window is that track's Control Panel. There are two buttons at the far left of each track that select the audio input source and output destination. Audio from the tracks can be sent to the internal mixer or directly to the outputs at the rear panel. A third button indicates the track number. Clicking on this button "groups" that track with the adjacent track for use of the tracks as a stereo pair. The buttons change color to indicate they are grouped. To the right of this button is a window displaying the track's name. The default is simply "Track1," "Track2," etc.. Click on the window to change the name. To the right of this window are four more buttons: "R" arms the track for recording; "I" sets the monitor to the input signal; "S" solos the track; and "M" mutes the track. Below these buttons is a horizontal fader which can be "grabbed" with the mouse to adjust the monitor output level for that track. Clicking at the far left of this fader activates the Studioframe's automated mixing function. The fader turns red to indicate the automated mode, and any movements made during playback of the mix are recorded and duplicated upon later playback. This is pretty slick, but I found it a little difficult to perform smooth fader movements with the trackball. A mouse might have made this a little easier. Still, the automated feature was a surprise and a welcomed one.
To record to a track, simply arm the track and hit Record and Play (either with the mouse pointer, the keyboard, or the DSC-100 remote controller). When done, the entire soundfile displays itself on the track complete with a default name or any name you want to give it. The audio on the tracks can be represented as rectangles or as waveforms. When set to draw waveforms, the system slows down considerably, but there isn't much need to see the waveforms unless you're doing some extremely precise editing. I was told the slow waveform drawing is being addressed in a software upgrade. Available recording sampling rates are 44.056kHz, 44.1kHz, 47.952kHz, and 48kHz. No data compression is used.
Once the soundfile is recorded and represented on the Track Window as an Event, the powerful editing capabilities of the Studioframe can be put to use. All editing is nondestructive. To select an Event, simply click on it. The Event turns from green to blue. Small black "flags" appear at each end and at the top center of the Event. Click and drag the middle flag at either end to move the start and end points of the audio to "trim" the Event. Click and drag the top flag on either end to quickly and easily set fade in and fade out ramps. Click the flag at the top of the Event to adjust the level of the Event without affecting the level of other Events on that track. One particularly cool function of the Studioframe is the ability to overlap the fades of two events and have them play simultaneously. This allows for some creative transitions from element to element without using additional tracks.

