By Steve Cunningham
The compact disc has become so widely used and accepted that it has nearly overtaken the cassette as broadcast’s audio recording medium of choice. Blank CDs are now cheaper than blank cassettes of similar length. They don’t degrade with multiple plays. They’re a random-access medium, and given good recording technique, they sound better than cassettes. But a CD burner is not as simple as a cassette recorder to the uninitiated. HHB have made a good attempt at solving this problem with the CDR-850 Professional Compact Disc Recorder.
London-based HHB have tried to make the 850 feel operationally as much like a professional cassette recorder as possible. In other words, all the advanced features and the gozintas and gozoutas are there, but anyone who can record a cassette can burn a CD with this machine.
The 850 is a stand-alone CD recorder, which means it requires no computer connection to do its magic. Stand-alone CD recorders have several advantages over computer-driven CD recorders. The most obvious of these is that a stand-alone recorder doesn’t tie up a computer during a CD burn, whereas burning a CD using a computer takes its full attention, and doesn’t allow you to do anything else until the burn is complete. If you happen to be waiting for an urgent email from a client, then you’d best not be burning a CD on your computer, because you probably can’t get the email until the CD is finished.
MY, IT CERTAINLY IS... PURPLE
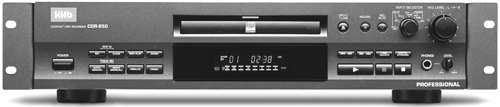
The first thing one notices about the 850 is its color, not that that’s a Bad Thing. The 2U front panel is finished in HHB’s corporate purple, presumably to help remind you to buy your blank CDs from HHB in their distinctive purple packaging. The CD tray is mounted in the center, just above the multifunction display, and all CDs go in the tray as normal with the label up. There’s an indicator LED just above the CD tray that lights in different colors depending upon whether you’re recording, playing, or in the case of CD-RW, erasing.
The left side of the front panel contains the power button, and additional buttons that deal with setting and clearing track ID numbers, finalizing, and erasing, along with the all-important MENU button. The right side features the transport controls, the rotary input selector, concentric left and right record level knobs, and a headphone jack with level control.
The rear panel is a cornucopia of gozintas and gozoutas. Analog inputs and outputs are available on both balanced XLRs and on unbalanced RCAs, and those RCAs are the gold plated variety — an indication of the quality of the 850. The analog XLR outputs can be set to deliver either -8 dBu or +4 dBu levels. Digital inputs include AES/EBU on an XLR, and S/PDIF on both RCA and optical connectors. S/PDIF output is available on both RCA and optical connectors. (HHB have recently introduced the CDR-850 PLUS that also includes AES/EBU output on XLR and a separate word clock input.) Finally, the 850 has an 8-pin DIN connector for an optional hard-wired remote, and a ground terminal for finicky installations that require it.
The 850 also comes with a small infrared remote that controls the basic transport and track select functions, much like those on a regular CD player. However, I found myself using the front panel controls almost exclusively. This was not only to get at the functions that aren’t on the remote, but also because I already have four infrared remotes in my room, and I can’t keep track of them all! I guess I should have asked for the hard-wired remote, huh?
But the front panel buttons are large and have a positive feel, and the INPUT SELECTOR knob clicks into place with a satisfying clunk. This knob allows you to specify a digital input (AES/EBU, optical, or coaxial) or an analog input (+4dBu XLR, -8dBu XLR, or line level). The multifunction display warns you if you’ve selected a digital input source without having actually connected a digital signal to the 850.
EASY AS CASSETTE, BUT WITH TRACK NUMBERS
Continuing the cassette recorder analogy, the simplest way to use the 850 is as a direct replacement for a cassette machine. Just connect the analog outputs of your source to either the XLR or RCA analog input connectors. Then set the INPUT SELECTOR to the appropriate position depending on which connectors you used. Pop a blank CD-R into the tray and close it. The 850 spends a few seconds determining what flavor of CD you’ve just fed it, and then reads the disc’s table of contents (TOC). If there is no readable TOC, the display will flash NEW DISC for a moment, and then it’s ready to record.
To begin recording, you touch the RECORD button and give the 850 a few seconds to check its inputs and calibrate itself for the type of media you’ve used. The display tells you what it’s doing, first flashing INPUT, then SET UP. When the display shows the time at 00:00, then you can press PLAY and start your source material to begin recording. When you’re done, press STOP. If you’re sure you don’t want to record anything else to the disc, then it’s time to finalize it (see sidebar). Finalizing a full CD-R takes about four minutes.
One of the advantages of CD-R over cassette is its ability to zip from any track to any other at will. It accomplishes this using Track Numbers (also known as Start IDs on DAT machines) which are imbedded in the TOC. Track numbers tell the laser which sector on the disc contains the beginning of a desired cut.
When recording on the 850 via an analog source, you have two options for generating Track Numbers. You can either insert them manually by pressing the WRITE (MANUAL) button, or you can have the 850 insert them automatically using its AUTO TRACK function. The manual method is okay if you’re recording just a few cuts with which you’re familiar, since you’ll need to press the WRITE button at just the right moment so your tracks will cue accurately. Once placed, you cannot move a Track Number. If you’re recording to CD-RW, you can erase the entire track and start over, but that’s the only solution to a misplaced Track Number.
A better answer is to use the AUTO TRACK function, which is much easier and (mostly) accurate. The AUTO TRACK function considers any silence greater than two seconds to indicate a division between tracks, and it applies new Track Numbers at those times when the audio signal drops below a certain threshold level. You can set the threshold level via a menu, with choices of -66 dB, -60 dB, 54 dB, 48 dB, 42 dB, and 36 dB. The default level is -60 dB.
Since some music contains low-level or silent passages, this process is not always accurate, but the 850 gives you a way to audition AUTO TRACK without actually recording. By changing the INPUT SELECTOR to any setting other than the current one, then changing it back again, the 850 enters a monitor mode with MONI shown in the display. If you then engage AUTO TRACK by pressing the AUTO/MANUAL button, the LED above the WRITE (MANUAL) button will light during passages below the threshold level, and will go dark during passages above the threshold level. In this manner you can see where the 850 will put Track Numbers, and can adjust the threshold if necessary.
I burned over a dozen CD-Rs using analog inputs, from a variety of sources including cassette, Mini-Disc, and directly from the mixing console. The resulting CDs sounded excellent. The 850 uses “1-bit Multi-Level Delta-Sigma” Digital-to-Analog converters. HHB claim that these DACs perform well even in the presence of clock jitter. I don’t know about that, but I do know that the finished CDs sound quite good.
SHOVELING ONES AND ZEROS
The 850 really shines when recording digitally from CD or DAT. The 850 includes built-in sample rate conversion that allows you to record digitally from a source that uses a sampling rate of 32 kHz or 48 kHz. The digital audio is automatically converted to 44.1 kHz so it can be recorded to CD. I recorded several 48 kHz DAT tapes to the 850 and heard no difference between the original DAT and the finished CD.
If your digital audio source has a sampling rate of 44.1 kHz, you can bypass the sample rate converter altogether. This allows you to make a digital clone of the source material.
The 850’s Digital Synchro feature makes it easy to make a custom compilation CD. With the 850 in RECORD and a digital input selected, pressing the DIGITAL SYNCHRO button will put the 850 into record until the track ends or until it encounters another Track Number or Start ID, at which time it will go into Record Pause. It will wait there for another Track Number or Start ID, at which time it will go back into record. In this way you can compile a number of cuts from different sources onto one CD-R.
If you press the DIGITAL SYNCHRO button twice instead of once, the 850 will begin recording at the first Track Number or Start ID. In both these cases, if AUTO TRACK is enabled the 850 will advance to the next track every time it encounters a new Track Number or Start ID from the source.
Finally, if you press the FINALIZE button with DIGITAL SYNCHRO enabled, the 850 will copy an entire program and finalize it. In this mode it will begin recording at the first Track Number or Start ID, and will automatically stop recording and finalize the disc when it sees one minute of silence. This is perhaps the easiest way to create a Red Book CD with the minimum amount of effort on your part. Set it up, hit play on your source machine, and come back to a finished, finalized CD. Now that is cool.
The only caveat is that the DIGITAL SYNCHRO function only works with S/PDIF material through the optical or coax inputs. It doesn’t work with analog sources, and because AES/EBU does not transmit Track Number or Start ID flags, it doesn’t work with AES/EBU sources. But for making a quick dub of a CD or a DAT over S/PDIF, it’s a no-brainer.
DISC COMPATIBILITY
All recordable CDs are not alike. There are just a few actual manufacturers and most CD-Rs are private-labeled from those manufacturers. However, different manufacturers use different dye formulations, resulting in CDs whose recordable sides appear green, blue, gold, or silver.
The CDR-850 is not too fussy about what brand of blank CD-Rs you use in it, but there can be problems. My first experiments used blanks that I buy pre-printed with my company logo on them. The blank discs are manufactured by Prodisc in Taiwan and are green. They work well for me (less than 2% become coasters), but the 850 did not like them at all. It refused to record more than a few seconds before the display flashed CHECK DISC. There’s not much you can do when that happens except eject it and toss it into the trash — I already have plenty of places to set my drink, so I don’t need another coaster.
A quick trip to the nearest Office Depot and I had both Maxell (CDR74 greens) and Verbatim (CD-R 74min, 8X speed blues) to test. For the record, Maxells and Verbatims were $15 for a package of 10. I also dug up some older Mitsui gold CD-Rs I had from a previous project. Each of these worked flawlessly, as did Maxell CD-RWs (CD-RW74 silvers, $10 for three discs at Office Depot). One can infer that HHB’s own CD-Rs and CD-RW discs will work as well, although I did not test them.
The 850 also lets you set the SCMS (Serial Copy Management System) flag for CDs you create. Your options are Copy Permit (allows others to make unlimited copies of your CD), Copy Once (only one copy of your CD can be made), or Copy Inhibit (you guessed it—zero copies). This could come in handy for protecting your personal sound effects, promos, and bits from being hijacked by your coworkers. But of course that NEVER happens, does it?
FINALIZING THIS REVIEW
I have only one complaint with the 850—no make that a rant—and that concerns the manual. I didn’t receive a printed manual with my review unit, and on calling HHB’s L.A. office they directed me to their website where a .PDF version is available. Fair enough, I don’t mind that; lots of companies provide electronic manuals and you can print them out if you wish.
But the manual is a nightmare. It runs 128 pages, and every other page is a copy of the previous English page, but in both French and Spanish. So the English version should be a 64 page print job, as should the French and Spanish versions, not a 128 page print job. I understand the need for foreign language versions of the manual, but most companies create entire sections in each language. Co-mingling the languages like this is a Bad Idea that needs correction.
And worse, while there is a table of contents there is no index! The first time I tried to go through the menu screens it took 15 minutes of searching to find each item. C’mon HHB, let’s please fix this problem. Okay, I’m done ranting now, and I feel much better.
I burned through a lot of CD-Rs and a few CD-RWs while exercising the CDR-850, and I like it. It’s a professional product, well-built and well-thought out. With the exception of my logo CDs, it handled every disc successfully, and generated zero coasters. I used it on several occasions to record a live voiceover, a job for which I usually use a DAT. Worked great, no problems.
The CDR-850 would make a good addition to most any production room. And with CD-Rs at a buck fifty each, why are we still buying cassettes or DAT tapes?
The CDR-850 has a suggested retail price of $1249. For more information in the US, contact HHB Communications USA at (310) 319-1111. For more information worldwide, phone 020 8962 5000, or go to www.hhb.co.uk.
SIDEBAR: WHAT IS FINALIZATION?
Finalization is the last process in recording a CD-R to allow the disc to be played on a standard CD player.
A disc that you can add audio data to is “open.” When you begin a recording, all data is written into the current recording “session.” When you stop recording, the recorder will close that session and open a new session at the same time for later use. However, if you’ve used all the recording time of the disc, then the recorder will not be able to open a new session at the end. It’s then impossible to add more data to the CD-R. The entire disc is considered “closed.”
The process of changing a session from “open” to “closed” is called “finalizing,” “fixating,” “fix-up,” or just plain “closing” the session. When you close the last session, you have finalized, fixated, or closed the disc.
A finalized disc has three basic regions: the lead-in, which has the Table of Contents (or TOC); the program area, with the data and/or audio tracks; and the lead-out, which doesn’t have anything meaningful in it. An “open” disc doesn’t yet have the lead-in or lead-out written.
If you record audio to a disc and stop without finalizing it, the TOC—which tells a CD player where the tracks are—is written into a separate area called the Program Memory Area, or PMA. CD recorders are the only devices that know to look at the PMA, which is why you can’t see your data in an open session on a standard playback device. CD players won’t find any audio tracks. When the disc is finalized, the TOC is written in the lead-in area, enabling other devices to recognize the disc.
When the recorder closes the current session and opens a new one, the lead-in of the closed session will include a link to the lead-in of the next. The CD player in your car or stereo system doesn’t know about chasing from one lead-in to the next, so it can only see tracks in the first session. But a CD recorder will know about multisession discs and will happily return the first session, last session, or one somewhere in between, depending on what it is capable of.
So once a disc is finalized, recording or skip ID manipulation is no longer possible. It’s important to ensure the disc is in its final form before you finalize it. Furthermore, if AC is interrupted during finalization, the disc may be unusable. No, scratch that—it will be unusable.
According to the 850 manual, “CD-RW discs whether finalized or not can only be played on a CD-RW player, and not on a standard CD player.” I was unable to play finalized CD-RW discs in either a Denon CD player or a Sony Discman, but I hear some folks have been able to play finalized CD-RWs in CD players.
♦
