by Jerry Vigil
Unless you've been in hibernation for the past couple of years, you are aware that the cost of RAM, hard drives, and high speed computers has dropped dramatically. This has made very powerful computer systems very affordable. Couple a high-performance computer with some of today's cutting edge DAW software, and you have an wonderful multitrack digital audio workstation at a price impossible to reach just a few years ago.
SAW (Software Audio Workshop) Plus, from Innovative Quality Software, is probably one of the most popular packages on the market today. It is sold directly from the manufacturer. The list price is $999, but IQS loves to have "sales," and the going price as of this writing is $499. That's quite a discount! Of course, you need a computer, and, as mentioned, the price is right these days. For this Test Drive we were able to put together a Pentium 200 MHz PC with 64 MB of RAM and a 1.2 gigabyte drive for about $1,500 (less monitor). That's a total investment of $2,000 for a pretty powerful digital multitrack workstation. (Minimum requirements recommended by IQS are a Pentium 90 with 16 MB of RAM, DOS 6.2, Windows 3.1, an SVGA monitor with 800x600 resolution at 256 colors, at least a 500 megabyte drive, and any 16-bit Windows-compatible sound card.)
SAW Plus is a 16-track system. Each track can play either a mono soundfile or a stereo soundfile. Up to sixteen stereo tracks can play back simultaneously for a total of thirty-two tracks. How many tracks will actually play back is dependent upon the speed of the computer. One big feature of SAW Plus is its ability to play back soundfiles of different formats and sampling rates--8-bit, 16-bit, 22.05kHz, 32kHz, 44.1kHz, etc., and this sample rate conversion is done live, in real time. This means you don't have to wait for the system to rewrite files before you can play them. There's no waiting for a "mix" file to be written before playing it. This means edits and changes made to the mix are non-destructive. And the ability to use different sample rates means you can conserve disk space and sample audio based on its frequency spectrum--low quality sound effects at 11.025kHz or 22.05kHz, voice tracks and music at 32kHz, for example. Many systems do not allow this mixing of file formats.
SAW Plus supports up to four sound cards, so it is possible to record up to eight channels simultaneously, but this is of more value to the recording musician. For broadcast production, a single card with stereo analog I/O will suffice. If you want to keep things in the digital domain, step up to a card with digital I/O. SAW Plus supports both. The card used for this review is the Tahiti card from Turtle Beach Systems.
You might want to spend the extra dollars on a 17-inch monitor. The SAW Plus screens are loaded with information and there are several screens you might want to have open at the same time. The large monitor and increased resolution make things much easier to see. And speaking of the various screens, the 3-D graphics on all the SAW Plus screens are a treat for the eyes. You can even change color schemes to suit your tastes.
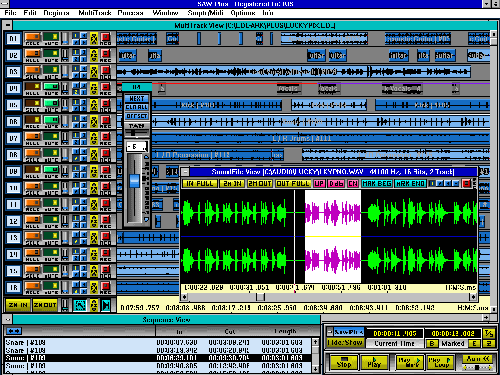
The main window is called the MultiTrack View (see photo). This is where most of the work is done. The window can be resized to show all sixteen tracks, taking up the entire screen, or it can show only a few tracks at a time, leaving room for other windows on the screen. Each track is numbered at the far left. Clicking and dragging on these track numbers moves the track's position. Let's say you recorded a voice track on track 3 and some sound effects that are related to the voice-over on track 8. Click on the 8 and drag the track just below track 3 to have both tracks sitting next to each other.
To the right of the track numbers are the Solo and Mute buttons for each track. To the right of the Mute button is the Fader icon. Clicking this icon brings up the fader and pan control and puts two horizontal lines on that track. These lines are called the Mix Entries View and represent fader and pan settings. As either are changed, the lines change to reflect the new settings. Settings can be made and recorded during playback thus providing automated mixing. Adjustments made to the level and pan are heard as you make them. However, there is a slight delay depending upon the speed of your computer. On the system used for this review, the delay was a little less than a second. It's enough of a delay to make recording fast mix changes on the fly a little awkward, but there's another way to make quick and accurate level adjustments, which we'll get into later. Click the Offset button to set the overall track level. To the right of the Fader icon are four small buttons numbered 1 through 4. They are used to select the sound card for that track. If you're only using one sound card, all the tracks are locked to position 1.
To the right of the blue sound card select buttons is the FX button used to access each track's effects "patch bay." The SAW Plus comes with several effects, and optional plug-ins are available. Effects choices include Vari-Pitch/Speed which adjusts the pitch/speed of all entries on that track. Reverse Audio reverses the playback of all entries on the track. Reverse Phase changes the polarity of the track. Center Channel Eliminator changes the polarity of one channel of a stereo track and combines the two channels together into a mono signal, cancelling whatever audio was in the "center channel." The Graphic Equalizer is actually a 7-band parametric equalizer with a graphic equalizer appearance. Changes are heard in real time, and EQ settings can be saved. This is a nice way to apply commonly used EQ settings to a track, for example, a "telephone EQ" effect. Once you've found the right EQ settings, save them as "PHONE.EQ" and simply recall the settings anytime you want that effect on a track. The Echo/Delay effect adds a maximum of 2.6 seconds of delay to left and right channels on a stereo or mono track, and you get controls for Feedback and Strength which adjusts the amount of the effect applied to the signal. Finally, there is a Compressor/Gate/Limiter effect. You get Attack, Release, and Threshold controls for the compressor and the gate, along with Ratio, Peak Limiter, and Output Volume controls. Settings for the both the Echo/Delay and Compressor/Gate/Limiter effects can also be saved to files.
I tried a couple of the effect plug-ins available by downloading the demos from the IQS Web site. The Reverberator plug-in offered some surprisingly nice sounding reverbs, and you even have the option to tweak the verbs, and once again, save reverb settings. This is a "must have" if you want reverb since there are no sends and returns on the SAW Plus. You could, of course, record the reverb to the SAW Plus from an external box, but that would eliminate any clean edits on a voice track with the reverb as part of the original sound file. The Reverberator lists for $299 and is "sale priced" at $149. Another plug-in "effect" I found almost necessary was the Meter Bridge. The only metering that comes standard on the SAW Plus is on the input levels when recording. As you add tracks, it's very easy to begin overdriving the sound card. The Meter Bridge provides pre and post fader metering of all individual tracks, and can also be patched to the Output Track to monitor the level of the combined tracks. More on the Output Track later.
Finally, to the right of the FX button on each track is a red Record button. Clicking on this button opens the SAW Plus Recording Control Panel. SAW Plus refers the audio files it records as "soundfiles." When soundfiles or portions of soundfiles are placed on the MultiTrack View, they are called "regions." Recording soundfiles is very simple. Click the Filename button to name the soundfile and select the directory or folder for it. Click on the Record button and you're recording. The Recording Control Panel has several options. Click the Rate button to select sampling rates from 11.025kHz, 22.05kHz, 32kHz, 44.1kHz, and 48kHz. These rates are available as long as your audio card supports them. Click the Type button to choose between recording a stereo soundfile, a mono soundfile using the left or right channel input, or a mono soundfile which sums the left and right channels. Click the Resolution button to select 8-bit or 16-bit. Click the Input button to choose between Analog and Digital (if your card supports digital). There's a Retake button that enables re-recording to the same file, overwriting the previous take. You can record several "takes" to a single soundfile, and the SAW Plus will simply append each take to the file. Or, you can click the All button to record over all the previous takes in the file and basically start from scratch.
To the right of the Recording Control Panel are two very nicely done level indicators. Each bargraph contains probably 60 to 70 segments starting with green, then yellow, then red. There are Peak overload indicators, a Margin indicator, and a Margin Reset button. The number of the track being recorded to is displayed above the level indicators. Input level faders are on the left side of the Recording Control Panel, and above them is the Close/Save button which exits the Recording Control Panel. At the top of the panel are the transport controls. Click Record Ready to set levels. Click Record to begin recording. Click Stop to stop recording. The S-R-P button enables "Simultaneous Record and Playback" which lets you hear other tracks while recording to another. Above these controls is a Time Remaining indicator (time remaining on the drive) as well as an indicator to show which hard drive is being recorded to. There are also elapsed time indicators. Finally, the H/S (Hide/Show) button lets you hide SAW Plus while keeping the transport controls "on top." This lets you work in another program altogether while still having access to the SAW Plus transport controls. For example, you could have the script for a commercial on the screen with the transport controls up in the corner. Nice feature.
When you're through recording, click the Stop button then the Close/Save button. The soundfile appears as a region on the MultiTrack View. This is where the fun begins. IQS has made editing and moving regions in a multitrack environment very easy and very fast. To move a region, click the Select icon (or just press "S" on the keyboard) to put the cursor in the Select mode. Then click the region. It changes color to show it's selected. Now use the SHIFT key on the keyboard with the left mouse button to click and drag the region anywhere on the track. Use the CTRL key to move the region vertically to other tracks. Using both the SHIFT and CTRL keys lets you move the region anywhere on the MultiTrack View. Several zoom in/out functions let you configure the MultiTrack View to whatever view best suits the situation at hand.
You can effectively produce broadcast production recording directly to the MultiTrack window much like you would to a tape based recorder. Simply place the cursor at the point on the track where you want to start recording, click the Record button, and off you go. And once your elements are on the MultiTrack palette, you can move them anywhere on any track faster than the same function can be performed on many high-dollar DAWs. It really is as simple as click, drag, and drop.
Editing on the SAW Plus is also a breeze. There are several ways to "mark" areas to be edited. Use the "B" and "E" keys on the keyboard to mark Begin and End points. Areas can also be marked with a click and drag function in the TimeLine area at the bottom of the MultiTrack View. Once marked, there are several functions for splitting, cutting, and splicing regions, and edits can affect any or all tracks at once. Of course, you need to be able to find your edit marks. Waveforms can be displayed in the MultiTrack View and zoomed into well enough to see exactly where to place an edit point. Or you can use the Loop Scrub Mode to hear your edit points by pressing the CTRL key with the left mouse button, then simply move the mouse left and right in a scrubbing motion to move through the soundfile. There are many disk-based systems on the market that have a more responsive scrub mode, but they cost quite a bit more than $500. The scrub mode on the SAW Plus is more like using the search function on a CD player, and with the system used for this review, there was about a half-second delay between a movement of the mouse and hearing the actual move. Still, the combination of both the Loop Scrub Mode and zooming in on waveforms allows for marking very accurate edit points rather quickly.
While most editing you might need to do can be performed in the MultiTrack View, this is what the SoundFile View is better designed for. (In fact, the Loop Scrub Mode is only available in the SoundFile View.) The SoundFile View is also the only other window that you can record from. Click the Record button to bring up the Recording Control Panel as before, only this time, the recorded soundfile will be displayed in the SoundFile View rather than put into the MultiTrack View as a region. In the SoundFile View, the recording can be edited and regions defined for later assignment to the MultiTrack View. This would be one way to record both parts of a 2-voice spot when getting each voice at different times. Record voice one to the file, then record voice two to the same file, appending the audio to it. It now becomes very easy to mark each segment of the dialog, define the regions, and move them to the MultiTrack View.
Defining regions is another simple facet of the program, and there is a separate window for maintaining your growing list of regions. The Regions View is a small window that simply lists the regions in alphabetical order. At the top of this window is the Add To MT (MultiTrack) button. When a region is defined in the SoundFile View, it is automatically added to the Regions View. If you had a commercial that consisted of a donut jingle and a single voice-over, you might record the jingle and the voice-over to the same soundfile as described earlier. Then, in the SoundFile View window, create two regions, one for the jingle and the other for the voice-over. Once created, just highlight the jingle region in the Regions View, click on the track (in the MultiTrack View) that you want to put the jingle on, then click on Add To MT. Do the same for the voice-over and you've built your multitrack session. Now you can begin setting levels and adding effects, etc.. If, during your multitrack session, you decide you need to edit a breath out of the voice track, double click that region on the MultiTrack View screen and the soundfile that contains that region is instantly loaded in the SoundFile View for editing. When done, pressing CTRL-U updates the region in the MultiTrack View. Or you could simply and easily perform the edit on the region itself in the MultiTrack View and keep the soundfile in its original form.
If your multitrack session contains several elements, you'll end up with several tracks with a "sequence" of events on each track. The Sequence View window lists information about events or regions on the selected track such as the length of the region and the in and out points in the production.
Another handy window is the Full View window. This window provides a view of the entire selected soundfile whereas the SoundFile View might show only a small area of a soundfile depending upon whatever zoom level was active. The Full View window provides an easy way to navigate throughout a large soundfile. For example, you might choose to create projects by putting all elements into one soundfile--music, voice, sound effects, etc.. Placing the cursor anywhere on the timeline below the waveform in the Full View and clicking the mouse instantly transfers that area of the soundfile to the SoundFile View window for editing.
Press the "M" key on the keyboard to place markers in the MultiTrack View or SoundFile View windows. The Markers View window lets you name markers and go to them instantly with one click. If you have a large project, this is a great way to mark different elements and get to them quickly.
The last window on the tour is the Remote Transport window. This is primarily a playback transport control. Like the Recording Control Panel (and other windows), the Remote Transport Control can be run outside of the SAW Plus program, so you can work in another windows program while the Remote Transport Control is active on the screen. There are indicators for Current Time (or cursor time) and Marked Time. You get Stop and Play buttons along with a Play Mark button used to play only the marked area of the MultiTrack View or SoundFile View. Also included is a Play Loop button which loops the marked area. Unlike many disk-based DAWs, this loop function provides seamless loops and is a wonderful way to create looped music beds quickly. Adjusting loop points on the fly is a breeze. You also get a "Z" return to zero button and "B" and "E" buttons to quickly go to the Begin and End points of a marked area.
At this point, it probably sounds like the SAW Plus is loaded with features and functions. It is. And we're just getting to the many pull-down menu functions of the SAW Plus. Under the File Menu are 19 selections. Here is where you open and close EDL files, also known as Edit List Files, also known as Edit Decision Lists. Basically, these are the files that contain the editing information of a project. No actual audio is stored in these files. The audio is stored in .WAV soundfiles, which can also be loaded and saved from the File Menu. This is also where the SAW Plus backup/restore function is accessed. Audio files are backed up in real time by recording each soundfile of a project to DAT then recording the EDL information to floppy. Both the DAT with the audio and the floppy disc are required to restore a project. If you only have analog I/O on your card, backup of audio files will resample the audio to the DAT's sampling rate which can slightly alter timing by a few samples. If you use digital I/O, nothing is altered. You can also bypass the system's backup feature and simply copy files to a Zip disk or other file backup system.
Under the Edit Menu are functions primarily for editing soundfiles using cut and paste commands. This is also where the Undo function resides--one level--or you can press ALT-U.
Under the Regions Menu are a variety of functions for manipulating regions. Some of these are duplicated on the keyboard and others are duplicated on various windows. Same goes for the MultiTrack Menu options. The function and its corresponding keystroke are listed on the menus. Until you get familiar with keyboard shortcuts, this is an easy way to perform the function and see what its shortcut is at the same time.
In the Mix Menu are several functions not available in any of the windows. As mentioned earlier, using the Fader icons on the MultiTrack view might not be the best way to perform accurate level adjustments such as a quick fade out. The Mix Menu provides a variety of fade and crossfade functions that are easy to apply, easy to remove, and are displayed in each track's Mix Entries View.
The Output Track was also mentioned earlier. This is a track on the MultiTrack View that can be used to record mixes of the other tracks to. This comes in handy particularly with slower machines that might not be able to process several tracks at once. The tracks can be mixed to this "17th" track and reside on the MultiTrack View just as the other tracks do. This not only frees up the other tracks, but frees up a ton of processing power. Under the Process/Mix Down file menu are options to record this mix to the Output Track or to its own soundfile. If you run SAW Plus on a fast enough machine and use the program mainly for broadcast production, you might not ever need to concern yourself with mixdowns in order to conserve processing power. With the Pentium 200 used for this review, I was able to load ten tracks with stereo files, five of them with effects patches, before the program halted the live playback and offered the message, "This Machine is Not Fast Enough To Keep Up With This Much Multitrack Processing in Real Time." Think about it; when was the last time you had ten stereo tracks playing something all at once? A sound effect here and there doesn't count. I'm talking about ten STEREO tracks all at once. This is all subject to what effects are patched and how many of them are patched. I removed five of the ten stereo tracks and put one effect on each of the five remaining tracks--two with EQ, two with reverb, and one with Echo/Delay. Sorry, can't do. Both the EQ and especially the Reverberator patches seem to really draw on the processing power. The help screens in the Reverberator did offer a good tip. You can record the wet reverb to another track, then remove the patch and simply mix the two tracks. This takes much less processing power, but a little more of your time. Still, five stereo tracks at once is pretty rare in broadcast production, and if you are conservative with the effects, you may not run into this problem. Considering that these are real-time effects, I was surprised the computer handled as much as it did.
Of course, if you do add an effect to a track, EQ for instance, and you know you're not going to change that setting again, and you're not worried about altering the original file, you can use the "Process Marked Area Back To Original File" function to write the processed audio back to the original file. You're given the choice to write the audio to the file with or without the ability to undo the write. This is probably one of the few times the system actually took some time to process something, but it was still pretty fast. I took a sixty-second stereo track and changed the EQ and added some echo. Writing this file with the undo information saved took only nine seconds. Writing it without the undo information took only seven seconds. And by writing the effects to the file, processing power is freed up for other things on the mix.
Other choices on the Menu bar include MIDI and SMPTE support. SAW Plus will lock to MIDI and SMPTE code and can even generate SMPTE code. There's a collection of system setup options. One of these is the Refresh All Function Keys command. Each of the twelve function keys on the keyboard can be used to store a particular screen setup. Store up to twelve different screen setups. One might have just the MultiTrack View taking up the whole screen. Another might be an 8-track view of the multitrack with the SoundFile View below it, and so on. This is a very handy feature. If for some reason, you'd like to reset all your function keys to the current window setup, use the Refresh All Function Keys command. Other choices on the menu include the Color Setup and options to sacrifice some of the screen redraw functions in exchange for processing power. There are unlimited ways to customize this program to your computer and your personal tastes.
The SAW Plus almost has two learning curves. The program is simply so full of features that you have to take your time getting started. Still, it's easy enough to be recording and mixing within a couple of hours. But unless you read the manual and get to know the program, you'll never enjoy the full power of this program. The manual is over 200 pages long, but it is well written and easy to understand. There are several ways to do many things, and it is important to try them all to find the one that best suits you. I thought it was a bit tedious to have to constantly click on the Select icon to enter and exit the Select Mode. Then I discovered all I had to do was press the "S" key. For me, that's much faster than manipulating a mouse. This same type of functionality unfolds itself slowly as you get to know the program, and after a while, it's easy to see how the SAW and SAW Plus have sold so well and crept into several radio production rooms over the years.
A more versatile file management system would be nice. If you name a voice-over track "VO," it will reside on the drive as VO.WAV. If you start a new project the next day and want to record another voice-over track, you can't use the same name unless you create a new directory for the new project. Otherwise, your new voice track will be appended to the old one or erase it altogether, if you so choose. Radio production involves creating as many as a dozen projects or more a day, and it can be very easy to lose track of files all residing in the same directory. Be prepared to do some file managing, but the upside is that with a file manager like Windows', you'll be able to customize your system in any number of ways. I was also surprised to find there was no Time Compression/Expansion effect. As well as the program crunches numbers, I would expect this to be an easy task.
It's very difficult to find much wrong with the SAW Plus. The literature speaks about the program's speed due to use of "assembly language coding." I remember many years ago watching a friend program an Atari 800XL with 64 kilobytes of RAM (that's kilobytes not megabytes). He had written a jet fighter program in assembly language. (It really worked, and looked pretty good!) He said the assembly language was the only way to get the screens to redraw at the speed he needed. I was impressed then, and I'm impressed now. Almost everything that happens in the SAW Plus happens instantly. The waveforms appear immediately. Editing is instant. Many other disk-based systems perform much of the processing of edits and effects by rewriting files. SAW Plus is a real-time system. There was rarely a moment when I was sitting there waiting for the program to finish doing something. Of course, this may be partly due to the fact that the program is running on a Pentium 200 with 64 meg of RAM. To that I'll say, at today's prices, if you're going to build a professional recording studio around the SAW Plus, do not spare a nickel on the processing power. Get all the computer you can buy. The program runs like a dream on this P200, and I wouldn't want to step down even to a Pentium 133. I'm spoiled. Get the Reverberator plug-in and splurge on the Meter Bridge plug-in if you can. By the way, if you get the Reverberator, the manufacturer's suggested minimum requirements for a computer jump from a 90MHz Pentium to a 133MHz Pentium. It's a power hog, but there's plenty of power available in today's computers.
By the time you read this, the SAW Plus 32 will be available. Apparently, this is a 32-bit version of the program designed for Windows 95 which boasts even more processing power and speed. The upgrade will be available to the first 1000 SAW and SAW Plus users at discounted rates.
Hats off to Bob Lentini and crew at IQS for two very impressive 3-1/2-inch floppy disks. The program ran without a single crash (during the few short weeks I had it) and appeared very stable. The version used for this review was version 3.3.
♦
