by Jerry Vigil
Akai's DR4d [April 1994 RAP Test Drive] is a slick little box, and the new DR8 is an impressive follow-up to its 4-track predecessor. Using much of the technology of the DR4d and adding a lot more features, the DR8 brings an 8-track disk-based workstation to a self contained, single rack-mount unit for only $4,995. You get an internal programmable mixer, plenty of recording time with expandability, all the basic workstation editing functions, and much more, in a fun to use unit complete with a short learning curve.
The rear panel features eight ¼-inch TRS analog input jacks that accept either balanced or unbalanced signals. LOW/HIGH output level switches (one for channels 1 and 2, one for channels 3 and 4, etc.) switch between -10dBu and +4dBu. A very nice feature of the DR8 is that these inputs are not "hard-wired" to the individual tracks. Any input can be assigned to any track! So, you could easily use just inputs 1 and 2 for all eight tracks. You also get digital inputs. The XLR and RCA digital connectors input AES/EBU and S/PDIF signals respectively. When activated, digital signals are fed to channels 1 and 2, but, again, these channels can be assigned to any track.
There are eight ¼-inch TRS analog outputs that can be used balanced or unbalanced. Four GAIN switches (one for channels 1 and 2, one for channels 3 and 4, etc.) let you adjust input to LOW (0 dB), MID (+20dB), or HIGH (+40dB). As mentioned, the DR8 sports an internal mixer, so there are analog MASTER L/R outputs. A LOW/HIGH switch sets output levels to -10dBu or +4dBu. This master mix is duplicated at the digital MASTER OUT connectors, XLR and RCA for AES/EBU and S/PDIF formats. Wrapping up the rear panel audio I/O connectors are two analog sends (also with a single HIGH/LOW output level switch for both). The sends can be set to either pre or post channel level, and they can be set as individual mono sends or as one stereo send.
Up to seven DR8s can be connected together using the REMOTE and THRU connectors on the rear panel. This enables up to 56-track operation. The SYNC connector and adjacent TERMINATOR ON/OFF switch are used to sync the DR8 with external clock sources. The SCSI-A connector is used to connect up to six external SCSI drives (or seven if there's no internal disk). Wrapping up the rear panel tour are five empty "option" slots used to install various options including the IB-802T SMPTE interface board, the IB-801S SCSI interface board, and the IB-803M MIDI interface board which enables MIDI control of many of the DR8s controls and parameters.
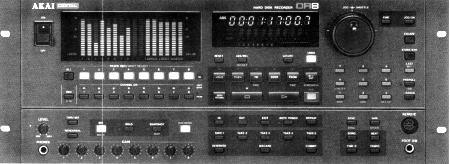
The front panel is a bit intimidating at first glance, but it quickly begins to make sense after a few minutes tinkering with things. The POWER ON/OFF switch is neatly recessed when ON to prevent accidental power off. To the right is the Peak Level Meter fluorescent light display (FLD). This bright display shows levels for each of the eight tracks, the two sends, the L/R Bus, and the Stereo Master levels. These bargraph meters are also used to set various parameters of the unit's internal mixer when in Mix Mode. Below this display are eight TRACK REC/INPUT SELECT keys. These are used to arm tracks for recording, and, when active, these white keys turn red. When the SUB MENU key is pressed first, these TRACK REC/INPUT SELECT keys are used to assign the input channel (1 through 8) for each track. There's also an internal stereo bus that tracks can be assigned to for bouncing tracks in the digital domain. Up to six tracks can be bounced down to two. Several keys on the front panel have other functions when the SUB MENU function is used, and these functions are easily noted on the front panel with the Sub Menu function name printed in an amber color.
To the left of the TRACK REC/INPUT SELECT keys is the ALL key which arms all tracks for recording when pressed. Below the TRACK REC/INPUT SELECT keys are eight CHANNEL ON keys, with accompanying green LEDs, used to select channels for monitoring. These keys also select the channels you want to adjust when in the Mix Mode, and they select tracks when in the Edit mode as well. To the left of these keys is the DIGI/D IN key, another dual-function key. When pressed, the digital inputs are selected for channels 1 and 2 and channels 1 and 2 analog inputs are disabled. When the SUB MENU key is pressed first, the DIGI/D IN key is used to select the digital input format.
At the bottom left of the front panel are the headphone jack and level control. To the right are eight rotary channel GAIN controls used to set the analog input levels. Above these is the SOLO key which mutes all channels and lets you select individual or multiple channels for isolated monitoring.
The MIX/MIXER key is another dual-function key. When in normal mode, the MIX/MIXER key accesses the unit's internal mixer, allowing channel levels, pans, and send levels to be set. When used with the SUB MENU key, the MIX/MIXER key provides access to various system parameters including metering functions, master output levels, and send parameters. The THRU MIX key turns the DR8s 8-channel mixer into a 16-channel digital mixer by mixing the eight input channels with eight tracks playing back from the hard disk. This 16-track mix is output at the analog stereo master outs.
The DR8 does not store "projects" or "productions" to the disk, thereby storing mixer settings with each individual project. So, whatever mixer settings you have on the last project, these mixer settings will be active on the next project unless they are changed. When the unit is shut down and turned back on, the settings at power off are recalled. To store individual mixer settings, use the SNAPSHOT/MAP key. Up to 99 "snapshots" of the mixer can be stored. So, if you want to store mixer settings for a particular project, you'll have to keep a log of where the project is on the disk (using Absolute Time) and what Mixer Snapshot goes with that project. When the SNAPSHOT/MAP key is used with the SUB MENU key, this dual function key access the DR8s Snapshot Mapping function. In effect, this is automated mixing, but it is not as smooth as that of a mixer that records real-time movements of faders and pan pots, etc.. However, if you just want to make an "instant" adjustment to level or pan at a specific time, the Mapping function will automate this for you.
This is a good time to examine why the DR8 doesn't store "projects" like most workstations. The DR8 basically combines the characteristics of random access digital workstations with those of linear, tape-based recorders. You get cut and paste, non-destructive editing and random access, and you also get a 24-hour "reel" of "tape" to work with. This gives the DR8 the feel of working with a multi-track "reel" while simultaneously providing cut and paste editing on individual tracks. Everything is referenced by Absolute Time, and the maximum Absolute Time on the DR8 is 24 hours. (How much actual recording time you have depends upon how many drives are connected.) For radio production, it's necessary to maintain a log of where, in Absolute Time, your various projects are. With a multi-track reel of tape, the first project would be at the beginning of the tape, with subsequent projects following one after the other. This is the way to treat the DR8 as well. More about this later.
To the right of the meter display is the bright blue fluorescent Time/Status display. The top half of this display shows the time, either Absolute Time or Relative Time. It can be switched to also show bars, beats and clocks (BBC time). The bottom half of the display is used to display error messages, system status, locate times, and more. At the very bottom of the display is a row of amber colored dots which illuminate to indicate activity on each of the eight tracks when data is on that track. Mode indicators light to indicate when the DR8 is in S-M (Sub Menu), Mix, Edit, or Song Mode. Below this display is the ABS/REL(OFFSET) key which switches the time display between Absolute Time and Relative Time. When used with the Sub-Menu function, this key also sets a Relative Time offset. The RESET key resets the Relative Time to zero. Once you've located to the beginning of a project or to the start time for a new project, pressing the RESET key switches the display to Relative Time (if in Absolute Time mode) and reads 00:00:00:00 for easy tracking of program length. This also enables convenient use of the ZERO RETURN key. Pressing the LOCATE key activates the numeric keypad to the right of the front panel and lets you punch in an Absolute Time or Relative Time to locate to. When the correct time is entered, pressing LOCATE again instantly locates to that point. To the right of the LOCATE key is the DR8's UNDO key. You get one level of undo, whether you're undoing your last edit or last recording.
The DR8's transport controls are in the middle of the front panel. You get the standard REW, FFWD, STOP, PLAY, and REC keys. The REC key is recessed and illuminates when in Record Mode. There are three transport keys that play segments of audio with reference to the current time. Pressing the TO key starts playback a preset number of seconds (up to 59) before the current time and plays up to the current time. Pressing the FROM key starts playback at the current time and plays for a preset number of seconds (up to 59) after the current time. Pressing the OVER key starts playback at the preset TO time before the current time, and plays beyond the current time the number of seconds set as the FROM time. TO and FROM times are preset using the SUB MENU key with the TO and FROM keys, and the times default to one second.
The IN->OUT(MEMO) key plays back the audio between the set In and Out points. If used with the SUB MENU key, the MEMO function lets you store up to nine different sets of In and Out points which are set using the IN and OUT keys just below the transport controls. To store IN and OUT points, first locate to the desired position. Then press the STORE/ENT key, followed by the IN or OUT key. This is how you mark edit points. Pressing the IN key by itself locates the DR8 to the stored IN point. Likewise with the OUT key.
To edit, press the EDIT key. This puts the DR8 in the Edit Mode where the JOG/SHUTTLE wheel and outer sleeve are used to select the type of edit desired. The choices are Copy, Copy+Insert, Move, Move+Insert, Insert, Erase, Delete, Slip, and Slip Track. The experienced workstation user won't have any difficulty using the DR8's edit functions, even without a waveform display. The CHANNEL ON keys are used to select the tracks you wish to copy or move audio from, and the TRACK REC/INPUT SELECT keys are used to select the tracks you wish to copy or move the audio to. The destination point is whatever the current time is. Pressing the JOG ON key activates the JOG/SHUTTLE wheel for cuing up to audio, and pressing the FINE key sets the Jog function in the Fine mode for more precise cuing. Scrubbing on the DR8 is as good as the scrub on any disk-based system I've played with, but it is still not as fast and accurate as scrubbing in RAM. And with the FINE key activated for more precise cuing, the unit tended to "miscue" slightly after several repeated "jogs" at the same point. Nevertheless, I had no difficulty making perfect edits on the first try.
The Copy function copies selected audio to the destination point/track(s) without removing the source audio, and it overwrites whatever audio is at the destination point. Copy+Insert is the same as Copy except audio at the destination point is not overwritten. It is moved behind the new audio. When you press the STORE/ENT key to perform either copy function, the DR8 asks how many times you wish to repeat the copy. The default is 1, but you may have up to 99 repeats. This is very handy for looping music. Say you've marked a ten-second segment of a bed you wish to extend to sixty seconds. Enter 6 repeats and press STORE/ENT. Bingo! It's done. If you want to do a little "stuttering," the Repeat function can be used for this, too.
The Move and Move+Insert functions are the same as the Copy functions except the source audio is removed, leaving "erased" space in its place. The Insert function is the equivalent of placing leader tape onto a track. You don't have to set In and Out points for this function. Simply locate to the place where you want to start the "leader tape" then tell the DR8 how much leader tape to add. The Erase function removes audio from any number of tracks without altering the timing. This is good for removing breaths or other noise in voice tracks. The Delete function also removes audio, but it brings the In and Out points together after the marked audio is deleted. The Slip function lets you move audio forward or backward on a track without having to set an Out point, though all audio beyond the set In point is affected. After any edit, the UNDO key lets you undo the edit and compare it to the original state. Pressing UNDO again reverts back to the edited version. The ESCAPE key is much like the ESCAPE key on a computer keyboard--press to back out of or cancel whatever function you're in.
The REHEARSAL key is used with the punch-in/out function to practice punch-ins without actually recording. It is located at the bottom left of the front panel, quite a distance away from the AUTO PUNCH key which is used to perform the actual punch-in recording. The AUTO PUNCH key is below the transport controls and next to the REPEAT key. Pressing REPEAT plays back audio between the set In and Out points repeatedly--good for setting levels, EQ, pans, effects, etc. in a mix.
At the bottom center of the front panel are five TAKE keys (1 through 5) and the RESERVED, DISCARD, and COMMIT keys. These are all part of the DR8's Take functions, a very nice feature that enables storing up to five different takes of a recording and recalling them easily. In many cases, this is the equivalent of adding five tracks to your eight. Most workstations are designed for recording music, and this Take function is designed to give the musician the opportunity to record and store up to five shots at that tough guitar solo without having to use separate tracks for each. Convert this feature to radio production and you have five spare tracks to use for things such as copy updates ("Saturday," "tomorrow," "today"). Use these "extra tracks" for that donut jingle that has five different scripts to be inserted. Using the Take function eliminates having to arm and disarm individual tracks when recording as well as having to set levels and pans on each additional track during playback. After making a recording, press the RESERVED key followed by one of the TAKE keys to store that recording. The COMMIT key replaces the original track with your selected take. And the DISCARD key is used to delete takes. The Take function can also be applied to more than one track at a time, saving a set of tracks rather than just one. This might be used when using stereo effects on a voice-over or when you have a single voice track that needs five different music beds under it. Very nice feature. All workstations should incorporate it.
The DR8 comes with a slick auto-locator. All of the ten keys of the numeric keypad are auto-locate keys and set the DR8 to the stored position instantly when pressed except for the 0 key (actually the LAST 0/- key). Pressing this key alternately locates to the last two places the STOP key was pressed. Pressing any of the other numeric keys locates to whatever position is stored in that key's memory. To store a location, simply locate to that point, press the STORE/ENT key, the press the numeric key of your choice from 1 to 9. If this isn't enough locate points for you, the :/STACK key offers 99 more locate points, though these require a few more key presses to store and recall.
The PREROLL/TIME key turns on the Preroll function. When on, a green LED lights next to the key, and the DR8 will locate to a point a few seconds before the specified point. Use the SUB MENU key with the PREROLL/TIME key to set the preroll time anywhere from zero to 59 seconds.
Four of the number keys also have dual functions with the SUB MENU key. The 1/DISK key accesses several disk functions including disk formatting, disk erasing, and readouts of remaining recording time and total recording time. This is also where the DR8's DAT backup and restore functions are found. Sorry, you can't backup and restore portions of the drive. The entire drive must be backed up, and when you restore from DAT, the entire drive gets re-written. The DR8 also offers Cleanup and Minimize functions which free up unused disk space. The 2/DIGI key accesses several digital functions. Use this key to set the format of the digital output, set the sampling frequency (32kHz, 44.056kHz, 44.1kHz, or 48kHz), set the sync format, and set emphasis on or off. The 3/SET UP key adjusts display brightness, sets the sub-frame display on or off, accesses MIDI control parameters, and sets the record monitoring mode. The 4/UTILITY key accesses the DR8's Reload function used with external drives.
The front panel tour winds up at the bottom right where we find the SYNC key, used to sync the DR8 with an external device including other DR8s. To the right is the VARI/SPEED key. The DR8 offers variable speed playback at an approximate range of -41% to +58% depending upon the sampling frequency in use. Below this key are four keys used when the DR8 is in Song Mode. Create beat and tempo maps and sync using MIDI time code (with optional MIDI interface board). To the right is a connector for a footswitch used for punch-in/out operation. Above this is the REMOTE connector for connecting the optional MT8 Mixing Tab remote control due out later in the year. If you plan on using the DR8's internal mixer, plan on getting this option to make things faster.
The DR8 comes standard with a 1-gig internal drive good for 3 hours and 17 track minutes of recording at 44.1kHz. At broadcast quality recording (32kHz), you get over 4.5 track hours! A/D conversion is 18-bit with 64x oversampling. The D/A converter is an advanced 1-bit dual 20-bit with 8x oversampling. The recording format is 16-bit linear PCM. Frequency response is 30-22kHz at 48kHz sampling frequency. Dynamic range is >96dB. Channel crosstalk is >90dB. The DR8 weighs in at about 35 pounds with the internal drive and takes up four rack spaces.
For $4,995 list, this is one nice workstation. Having the option to use all eight outputs and bypass the internal mixer is a big plus for those wishing to do the mixing externally, but there's certainly nothing wrong with the DR8's versatile internal mixer. A nice option is the EQ8 Digital EQ board which adds digital EQ to the internal mixer for a modest $699. I was surprised at how quickly most functions of the DR8 are learned, and the others required only a few minutes in the manual. You get "instant start" with the DR8. Whether you cue to audio with the JOG/SHUTTLE wheel, by entering a time code, or by pressing one of the auto-locator keys, the audio is there instantly when you press PLAY.
What took the longest time to get used to (just a few days, actually) was the fact that this "workstation" acts more like a reel-to-reel deck in the sense that you cannot store and retrieve individual projects. All work is addressed by its Absolute Time, which you have to start thinking of as "tape time." And because all work remains on the same "tape" at all times, if you perform an edit on a track at the beginning of the "tape," this edit will affect the timing on ALL projects that have audio on that track on the rest of the "tape." What if you need to go back and revise a previous project? Must you ruin all subsequent projects in the process? Furthermore, any locate points stored to memory will retain their Absolute Time, but the audio on this time line will shift with each edit. So, if you stored a project to locate point 55 then made an edit on a previous project, locate point 55 may not take you back to the exact place again. All this can become a nightmare, but there is a fix. Once the light bulb turns on in your head and you realize exactly what the DR8 is doing, you quickly figure out how to use it in radio production.
As mentioned earlier, the DR8 has a maximum Absolute Time of 24 hours (actually 23:59:59:29.9 to be exact to the sub-frame; actual recording time depends upon the number of disks attached). You have to think of the DR8 as a reel-to-reel deck with a 24-hour tape on it. That's the equivalent of nearly fifty reels of the analog stuff at 15 ips. So, we're not talking about just a little work space here. If the DR8 were in my studio, I'd keep a log, on computer, noting Absolute Time for the beginning of every project. Since I have 24 hours of Absolute Time, I would always start a project at an exact minute on the time line for simplicity's sake. If all projects are a minute long or less, there's enough "Absolute Time" to store 1,440 projects--I'd run out of disk space long before I run out of Absolute Time. Maybe I'd start each project on even numbered minutes to insure space between projects. And I would always know where my "clean tape" starts. Now, if I have to go back and revise a spot done weeks ago, I go and mark the beginning and end of the entire spot and copy all eight tracks to the start of my "clean tape." Since this is a disk-based system, I'm not using up additional disk space. The same audio is just being referenced with two different sets of pointers. Now I can perform all the edits I want without affecting any other projects, because there are no other projects "further down the tape."
Eventually, you'll need to free up disk space and delete old projects. If you just mark and delete these projects, the Absolute Time will shift for everything after those projects, and this will screw up any log you're keeping. Rather than delete the projects, use the Erase function. This is not the equivalent of "cutting tape" and will not affect Absolute Times. On my computer log of projects, I'd simply delete the line indicating the Absolute Time and the name of the project (plus other info). This will prevent the log from becoming a long list with a lot of blank lines in between projects. Eventually, you'd probably run out of Absolute Time and would have to start from scratch. Hopefully, by then, Akai will have introduced software, either internal or for an external PC, that will provide cataloging functions for better handling of multiple projects on disk.
Aside from this necessary adjustment for radio production, the DR8 is a definite consideration for the cost conscious radio station or small production house. And you know the name Akai has been around for a while. During this Test Drive, I didn't encounter a single glitch or crash of any kind.
♦
