IN USE
Conceptually, using the Vocal Rider is very simple. First, you insert the Vocal Rider on a recorded voiceover track using a mixer insert.
This allows the Vocal Rider to control the voiceover volume. Next, you set a target level range for the voiceover, and Vocal Rider analyzes level of the voiceover track as you mix. If the VO level goes down, Vocal Rider brings it up, and vice-versa.
There are several controls that give you quite a bit of latitude for optimizing the target level and gain range of the voiceover track. For example, if you don’t want to bring soft sections up too much, you can restrict the maximum amount of gain. Or you might want to do the equivalent of compression, but without the artifacts, you can just use a wide gain range. In any event, it’s easy to try out Vocal Rider settings and if you need to tweak them, that’s equally easy.
Waves does complicate things a little by giving you two different versions of the Vocal Rider plug: a regular one labeled Vocal Rider, and a “live” version labeled Vocal Rider Live. The difference between them is that the Live version is meant for live music performance use, and includes a control labeled Spill that helps eliminate spurious noises from the stage that might get into a vocalist’s microphone, thereby confusing Vocal Rider. Since most of us aren’t concerned with live music performance anyway, I did not use the Live version.
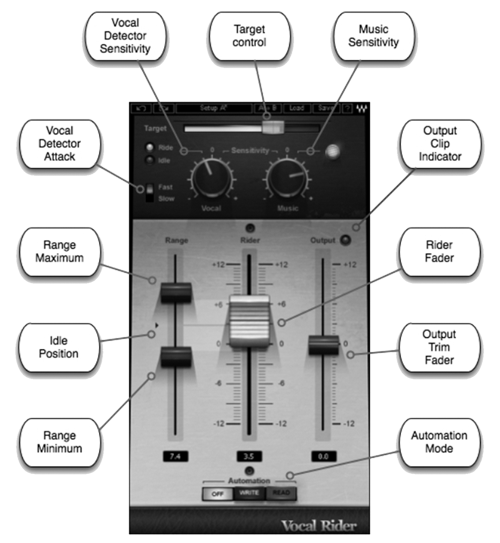
The Vocal Rider plug presents itself with the standard Waves window bar at the top for saving and loading presets and for comparing between ‘A’ and ‘B’ settings. The plug-in also has the aforementioned side-chain input at the upper left in the bar.
The big fader in the center of the window is the Rider Fader, and that’s where the business happens. Note that this fader’s range is only -12 to +12 dB, with 0 dB in the center. That gives a total range of 24 dB for riding, and that can be further restricted by use of the two Range pointers to the left of the Rider Fader. But before we get to these we need to figure out how to select a volume range in which to ride that fader.
The topmost slider is the Target level slider, and it’s important... this is where you set your desired overall level for the VO track.
Gain riding is relative to this Target position, so when you change the Target reference range with the slider, it will actually move the Rider Fader’s zero position. The slider knob is translucent so you can see the yellow fill color beneath it -- this horizontal bar shows the average output level in real time. The range of the Target level slider is from 0 to -42 dBFS, with the center position equal to -21 dBFS.
Once you’ve dialed in the range you can just hit play and the Rider Fader will begin to dance. However, you’ll want to do some additional tweaking to Vocal Rider for best results overall. Most important of these are the Range Maximum and Range Minimum sliders. These restrict the Riding Fader’s motion and therefore the amount of level boost or cut. The small arrow between them is known as the Idle Position, which takes its setting from the Target slider. The combination of Target slider and Range sliders is what allows you to really dial in gain riding that only cuts loud transients, or only boost quiet passages, or just levels everything. An Output Trim Fader to the left gives you another gain stage at the end of the Vocal Rider’s signal chain.
