REAPER is available as a download from Cockos’ website, and when you buy a license you can choose to purchase a CD copy for an additional $12.50. There’s not much point in that, since REAPER seems to get a version makeover every few weeks, and your shipped CD will likely be out of date before it arrives. Besides, the download is less than 3MB, so you’ll have it within a couple of minutes on a broadband connection. When installed, the entire program is small enough (and fast enough) to run directly from a flash drive or USB memory stick. It’s a clean install too, as it doesn’t clutter your system folders with a bunch of DLL files... it’s nearly self-contained.
The installer gives you the option of installing all components and demo files or just the basics. I went with the Whole Enchilada, which includes 15 FX plug-ins, the above-mentioned codecs to ensure compatibility with compressed formats, a driver for Rewire, and a bunch of those custom “skins” to change REAPER’s appearance. The only copy protection is the serial number you get with the purchase, so you can install and run it on any machine you own (but you can use it on only one machine at a time). Oh, and don’t forget to download the PDF manual, as it is the main documentation for the software.
The first step after installation is to configure your sound card and choose the audio settings for a new project. REAPER includes (and the company recommends) using the included ASIO drivers to interface with your sound card or external interface. I used the ASIO drivers, since well-written ASIO drivers almost always provide the best performance and lowest latency anyway, and those included with REAPER seem to be quite well done. After that’s done, a short demo song will load and you’ll have a chance to check things out right away.

CUSTOMIZING THE UI
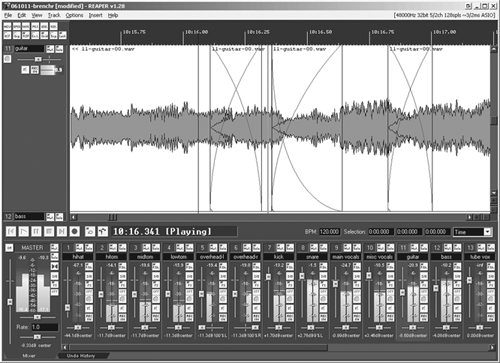
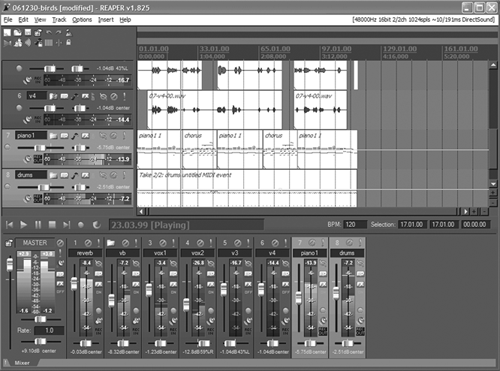
When you first start it up, REAPER’s look and layout is reminiscent of an earlier version of Vegas, or perhaps of Cool Edit Pro prior to Adobe. At the top are the drop-down menus, and below those are just a few function icons. The timeline ruler is to the right of the icons. Below the icons and ruler are the tracks, organized with a mini-mixer strip for each track on the left, and the actual waveforms on the right. The mini-mixer strip is home to the usual functions including Arm Track, Solo, Mute, both FX Insert and Send, and more. Along the bottom of the waveform area are the Transport buttons, counters, a Playback Rate slider, and the Selection Time readouts. But what’s more interesting is the area below these buttons and readouts. That’s where you can customize REAPER’s interface by “docking” any of several windows.

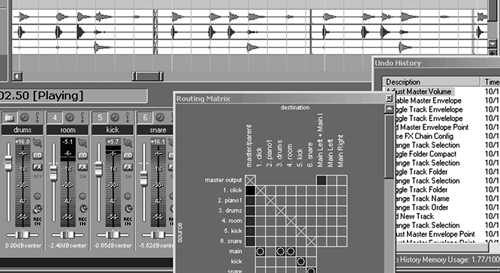
REAPER lets you dock the mixer, a Sony Acid-like Media Explorer, the Undo History window, the Performance Monitor, and even a Big Counter display in this lower section. Also in the area is the Routing Matrix, which is shown as a grid with Sources on the vertical axis and Destinations on the Horizontal axis. By default the mixer will be assigned to this lower section. Just select a dockable element like the Media Explorer and drag it onto the lower section of the window. It will show up in the dock on a new tab.
It’s sweet, and much better than the collection of floating windows offered by other programs. However, if you happen to be a fan of floating windows, you’ll be happy to know that many of those same windows can be “torn off” and left to float on your screen, including the entire Transport Bar.

REAPER’s Color Themes are yet another customization tool. The Themes consist of 10 pre-made templates that you simply apply using the Options menu. Selecting the Quasar_stealth Color Theme makes the entire DAW look more like Nuendo. Amsterdam is kinda sorta close to a Pro Tools scheme. But in any case, you now have your workspace set up the way you like it, with everything located where you want it. Easier to read, too.
GET TO WORK
The software works as one would expect when it comes to recording. Basic recording is a matter of pressing one or more Track Arm buttons and hitting Record. Other options are available by right-clicking the Track Arm buttons, and let you choose a source from the available inputs among other things. You can punch into record manually, or pre-select a region and set REAPER to Auto Punch, thereby recording in only that selected region. There’s a TAKES function that’s part of the normal record process. Just record one, then go back and record another over the first, and so on. Once done you can press Ctrl-L to display the takes in “lanes” grouped under each track. You can then explode those lanes onto new individual tracks if you wish.
Here’s a big one for me — REAPER does folders, where you can gather related tracks into a single Track Folder that can then have it’s own unique FX processing, or be sent to different outputs then other tracks. Having Track Folders also means your Tracks Window can be less cluttered and better organized.
Editing on REAPER is a bit different, in that it is selection-based and key-command driven, but there are no editing tools per se. You select a range by clicking and dragging in the time ruler, then select the region or object to which that range should apply. The actual editing commands, including cut, copy, paste, split, delete, and move, are available under the Edit menu or via a key combination (that’s almost always faster).
While its audio editing functions are certainly competent, REAPER is not a feature-rich surgical audio editor with specialized tools; for example, the program lacks a pencil tool for drawing out audio clicks. However, as a convenience it allows you to set your preferences to access two different external editors for the surgical stuff (think Sound Forge or even Audacity). Simply select a region in REAPER, and either hit Control-Alt-E to open the region in your primary external editor, or access the Edit menu to select your secondary editor, or to work on a copy of the region rather than the original. Nice.
When it’s time to mix and add effects, there’s plenty of power in REAPER. The mixer is fully automated, and you can write the automation by moving the appropriate onscreen control or by drawing envelopes. Envelopes can include smoother bezier curves between points, and the curves are superimposed on the waveforms in the tracks. Native effects are also automated, using the same toolset. REAPER’s automation is as capable as Vegas or Audition.
FX processing in REAPER works much like Vegas as well, in that you create a chain of FX plugs in a Chain Window. You can make an FX chain as an insert on a single track, or you can create a buss from an individual track and add the FX chain to that buss. This is where REAPER’s Routing Matrix comes in very handy, allowing you maximum flexibility with busses and effects. You have to try it to understand how flexible it is.
WHAT’S MISSING?
So what’s missing? There are a few things. As previously mentioned, the audio editing is competent but not killer. There is currently no facility for scrubbing audio to find a click, and that’s a major drag. The closest facility in REAPER is the horizontal Playback Rate slider, whose center represents 1x play speed. Move the slider right and playback speeds up from real time to a maximum of 6x; move the slider to the left and playback slows down to a minimum of 17% of real time. However, there’s no reverse playback at all, so there isn’t even a reasonable workaround for this omission. The good news is that plenty of REAPER users have asked for audio scrub, and according to the REAPER Forum, it will be added to a future release Real Soon Now. Given their track record over this brief eval period, I suspect that Cockos will make it happen.
The key commands aren’t as strange as are those in SAW, but many of them are definitely non-standard. The good news is that all key commands can be re-mapped from the REAPER Preferences window. This window is also where you can program a MIDI control surface, should you have one. As it stands, REAPER supports Mackie’s Mackie Control and Baby HUI, the Behringer BCF2000, as well as Presonus’ FaderPort and Frontier Designs’ Tranzport and AlphaTrack. That’s a good start, to be sure.
Having only ten markers for an entire project is fine for defining regions of a song, but for long-form voice work it just isn’t enough. I routinely use upwards of two or three hundred markers in a long-form voice project, where it’s easier to drop a marker on a mistake and keep rolling. Again, one might well expect Cockos to increase the total number of markers available, but they ain’t there yet.
According to Cockos’ website, the founders believe in releasing incremental free updates on a regular basis, rather than storing up improvements and releasing them all at once as a major paid upgrade. They also believe in pricing their products fairly — the non-commercial version of REAPER is indeed $39.95, but you’re not supposed to use it for money-making purposes. Those of us who want to use REAPER in a production environment will want the full commercial-use license, which is $199.95. It’s still a good value, especially since updates are guaranteed free up to and including version 2.99 (at this writing the program is at 1.886). Upgrading from non-comm to full-comm is a matter of paying the difference between the two. That seems a fair deal.
The biggest risk you run in putting a copy of REAPER on your production PC is that one of the bigger software companies will buy the company and jack up the price! And oh yeah, almost forgot — an alpha version of REAPER for the Macintosh is available from the company’s website. If Cockos continue to add and improve these products, REAPER could be big... very big. Visit the company’s website, and don’t forget to check out the forum for updated info and unvarnished opinions. Just go download the demo file; it’s even easy to remove if you don’t like it. Steve sez check it out. For more information, visit http://reaper.fm/index.php.
♦

