INSTALLATION
The TranzPort’s installers, software components, and documentation are provided on a CD-ROM, and installing the Tranzport software driver under Windows couldn’t be simpler. The installer CD takes you through the process, and offers to install templates for Adobe Audition, Cubase, Nuendo, or Sonar as part of the process. Those of you who use Pro Tools, SAWStudio, Logic, or Acid will be glad to know that the Tranzport works with these and many others right out of the box. Along the way, Windows may ask you if you want to install this new WDM device, and the process will then require a restart. When you’re done, you’ll have a new icon in your tray that allows you to configure the Tranzport’s mode (see below). Mac OSX users will have an equally easy time installing the software, and the Tranzport icon will show up on the right side of the Finder’s menu bar.
Once that’s done, you should pop the four supplied AA batteries into the bottom of the Tranzport. Pressing the BATTERY button will show you the condition of the batteries in the display as a row of asterisks. The TranzPort runs only on batteries and doesn’t have an OFF button. It does, however, go into a low-power Sleep mode after some time has elapsed without any activity, and you can set that time period from one minute up to an hour by holding down the SHIFT key and pressing the BACKLIGHT button. Yes, the display has a backlight, which while somewhat dim, works well enough to illuminate the display in a cave like mine. Do be aware however, that the backlight will substantially reduce the lifespan of your batteries. But without it, you’ll get about 100 hours on a set of alkalines, and Frontier claims that the batteries will last you several years when the Tranzport is in sleep mode.
The Tranzport communicates with the Bridge via RF signals on 2.4GHz frequency. This is, of course, the same frequency as is used by WiFi, Bluetooth, many wireless phones, and microwave ovens, and these may reduce the distance over which the Tranzport will work. Frontier claims that the unit can work as much as 100 feet away from the remote, depending on physical orientation of the bridge, interference from other wireless devices like phones, and other factors. My experience is that it works at about the same range as does my wireless laptop, and moving or turning the Bridge can improve a weak signal (you can tell when it’s weak because the Link LED will flash).
It definitely works through walls, although like WiFi you may lose the signal going through multiple walls, or if there’s a metal cabinet between the Bridge and the Tranzport.
The Tranzport will appear as a MIDI input/output device within your editing software. It actually sends MIDI messages wirelessly to your software, and the control mode specifies which types of MIDI message it sends and receives depending on your editing software. Using the little Tranzport icon in your taskbar or menubar, you can set it to Tranzport Native, Pro Tools (HUI), or Cubase (Mackie Control). If the Tranzport’s installer included a dedicated plug-in for your editor (as it does for Audition), then starting the editor will automatically select the correct mode. Otherwise, you’re welcome to grab the little icon and make a selection yourself.
Most of the time simply starting up your editor will activate the Tranzport. In some cases the Tranzport and Bridge may have trouble finding one another, in which case you press the single button on the Bridge, then press SHIFT and BATTERY on the Tranzport, and the two will “bind” to one another. In any case, you want the Tranzport up, running, and in one of the three modes before you start your editor, so any templates necessary to run your editor get loaded properly.
 WORKING WIRELESSLY
The TranzPort features a 2 by 20-character LCD screen. When you first open a project in your editor, the TranzPort activates itself in Track Mode, in which the unit’s LCD shows the name of the project’s first audio or aux track and its fader level and pan position, along with the editor’s current counter location. You can then use the TranzPort to step or scroll quickly through each of the project’s tracks and view their parameter values on the LCD screen. During playback, the LCD shows the mono or stereo level(s) for the currently selected track using a horizontal bar graph.
Below the Tranzport’s LCD screen are eighteen dual-function buttons and a data wheel, which offers multiple detents. Pressing and holding down an additional Shift button lets you toggle the buttons to perform their alternate functions. Button functions include basic transport (play, stop, rewind, fast-forward, record, return to start, go to end); record-enable, mute, and solo for the currently displayed track (and respective clear functions for all tracks), along with adding and stepping through markers in either direction. Other possible functions include activating or disabling auto-punching and global looping as well as creating in and out points for those functions, and multiple-level undo and redo (to a maximum of your software’s capabilities). Increment and decrement buttons let you step through all the tracks and buses in your project, and variously colored status LEDs show the current track’s record, mute, and solo status. An LED labeled Any Solo will flash when any track is soloed. Other LEDs light up when the editor’s auto-punch and memory-loop functions are active. Finally, a green Link LED lights to confirm the TranzPort is communicating successfully with the Bridge.
You can also use the TranzPort’s Shift and Stop buttons in Native Control mode as modifier keys for most of the other buttons to execute additional user-definable functions, meaning you can program some additional commands yourself if your software allows that. Using the TranzPort’s data wheel, you can scroll your editor’s current counter location forward or backward in time, scroll quickly through track displays (which is useful for projects that have large track counts), or adjust the playback level and pan for the currently selected track. In addition to the 18 dual-function buttons noted above, there are the aforementioned additional local-control buttons that check the TranzPort batteries’ strength and toggle the LCD’s backlight on and off.
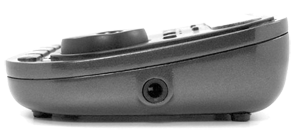
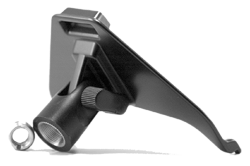
Optional accessories for the TranzPort include a footswitch (for punching-in and -out by way of a 1/4-inch jack on the TranzPort’s right side), a mic-stand adapter, and a padded bag. You can purchase each item for $14.95 or the entire shootin’ match for about forty bucks. Do plan on getting the mic stand adapter, which is terminally slick and lets you put the thing right next to the copy stand and swivel it to avoid glare from overhead lighting.

